
Hanging mustard greens gardening: sounds intriguing, doesn’t it? Imagine stepping onto your balcony or into your garden and being greeted by a cascade of vibrant, peppery greens, ready to be snipped and added to your next meal. Forget the traditional rows in the ground; we’re taking mustard greens to new heights!
For centuries, cultures around the world have cultivated mustard greens, valuing them not only for their distinctive flavor but also for their nutritional benefits. From Asian stir-fries to Southern comfort food, these leafy greens have a rich culinary history. But what if I told you there’s a way to grow them that’s both space-saving and visually stunning?
That’s where this DIY guide comes in. Many of us are short on garden space, or perhaps we’re looking for a unique way to add some greenery to our urban dwellings. Hanging mustard greens gardening offers a fantastic solution. It’s a simple, cost-effective project that allows you to enjoy fresh, homegrown produce even if you only have a small balcony or patio. Plus, it’s a conversation starter! I’m excited to share my favorite tips and tricks for creating your own hanging mustard greens garden, so let’s get started and bring some vertical vibrancy to your life!
DIY Hängende Senfgrün-Gärten: Ein Leitfaden für Anfänger
Hallo Gartenfreunde! Habt ihr wenig Platz, aber Lust auf frische, würzige Senfgrünblätter direkt vor der Haustür? Dann seid ihr hier genau richtig! Ich zeige euch, wie ihr ganz einfach hängende Senfgrün-Gärten selber machen könnt. Das ist nicht nur platzsparend, sondern auch eine tolle Möglichkeit, eure Terrasse, euren Balkon oder sogar eure Küche zu verschönern. Und das Beste daran? Es ist super einfach und macht Spaß!
Was ihr für euren hängenden Senfgrün-Garten braucht
Bevor wir loslegen, hier eine Liste mit allen Materialien und Werkzeugen, die ihr benötigt. Keine Sorge, das meiste habt ihr wahrscheinlich schon zu Hause!
* Hängekörbe oder -töpfe: Wählt Körbe oder Töpfe mit guter Drainage. Ich empfehle solche aus Kokosfaser oder Kunststoff, da sie leicht und wetterbeständig sind. Die Größe hängt davon ab, wie viele Senfgrünpflanzen ihr anbauen möchtet.
* Hochwertige Blumenerde: Senfgrün braucht einen nährstoffreichen Boden. Verwendet am besten eine spezielle Gemüseerde oder mischt Blumenerde mit Kompost.
* Senfgrünsamen: Ihr könnt verschiedene Sorten von Senfgrün wählen, je nachdem, welchen Geschmack ihr bevorzugt. Es gibt milde, würzige und sogar leicht süßliche Sorten.
* Drainagematerial: Tonscherben, Kieselsteine oder Blähton helfen, Staunässe zu vermeiden.
* Hängende Ketten oder Seile: Zum Aufhängen der Körbe oder Töpfe. Achtet darauf, dass sie stabil genug sind, um das Gewicht der bepflanzten Körbe zu tragen.
* Gießkanne oder Gartenschlauch: Zum Bewässern eurer Pflanzen.
* Gartenschere oder Schere: Zum Ernten der Senfgrünblätter.
* Handschuhe (optional): Um eure Hände sauber zu halten.
* Schaufel oder Kelle: Zum Befüllen der Körbe mit Erde.
Schritt-für-Schritt-Anleitung: So legt ihr euren hängenden Senfgrün-Garten an
Jetzt geht’s ans Eingemachte! Folgt diesen einfachen Schritten, um euren eigenen hängenden Senfgrün-Garten zu gestalten.
1. Vorbereitung der Hängekörbe oder -töpfe
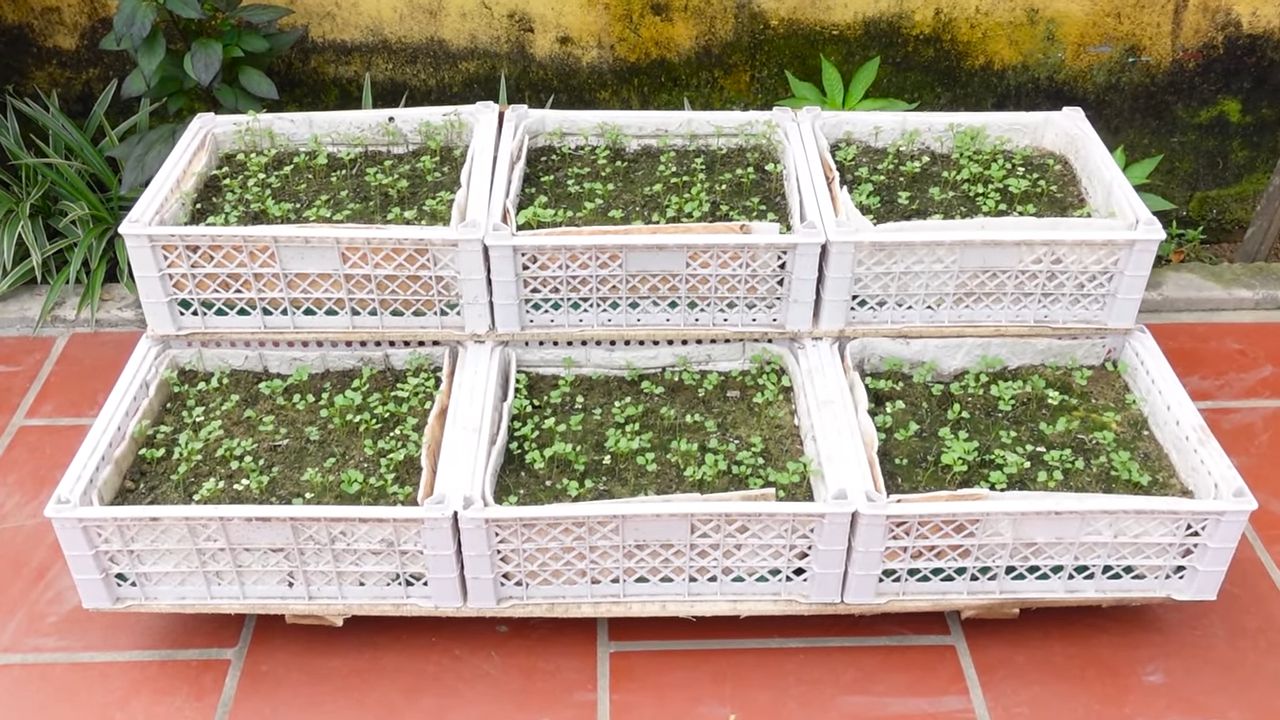
1. Reinigung: Reinigt die Hängekörbe oder -töpfe gründlich mit Wasser und Seife, um eventuelle Krankheitserreger zu entfernen.
2. Drainage: Legt eine Schicht Drainagematerial (Tonscherben, Kieselsteine oder Blähton) auf den Boden der Körbe oder Töpfe. Dies verhindert Staunässe und sorgt für eine gute Belüftung der Wurzeln.
3. Erde einfüllen: Füllt die Körbe oder Töpfe mit hochwertiger Blumenerde. Lasst etwa 2-3 cm Platz bis zum Rand, damit das Gießwasser nicht überläuft.
2. Aussaat der Senfgrünsamen
1. Samen verteilen: Verteilt die Senfgrünsamen gleichmäßig auf der Oberfläche der Erde. Achtet darauf, dass sie nicht zu dicht beieinander liegen, da die Pflanzen Platz zum Wachsen brauchen.
2. Samen bedecken: Bedeckt die Samen mit einer dünnen Schicht Erde (ca. 0,5 cm).
3. Angießen: Gießt die Erde vorsichtig mit einer Gießkanne oder einem Gartenschlauch an. Achtet darauf, die Samen nicht wegzuschwemmen. Die Erde sollte feucht, aber nicht nass sein.
3. Aufhängen der Körbe oder Töpfe
1. Geeigneten Standort wählen: Wählt einen sonnigen Standort für eure hängenden Senfgrün-Gärten. Senfgrün benötigt mindestens 6 Stunden Sonnenlicht pro Tag, um optimal zu wachsen. Ein halbschattiger Standort ist auch möglich, aber die Pflanzen wachsen dann möglicherweise langsamer.
2. Ketten oder Seile befestigen: Befestigt die Hängeketten oder -seile an den Körben oder Töpfen. Achtet darauf, dass sie sicher und stabil befestigt sind.
3. Aufhängen: Hängt die Körbe oder Töpfe an einem stabilen Haken oder einer Stange auf. Achtet darauf, dass sie nicht zu eng beieinander hängen, damit die Pflanzen genügend Licht und Luft bekommen.
4. Pflege eurer Senfgrünpflanzen
1. Bewässerung: Gießt eure Senfgrünpflanzen regelmäßig, besonders während trockener Perioden. Die Erde sollte immer leicht feucht sein, aber nicht nass. Überprüft die Feuchtigkeit der Erde, indem ihr euren Finger etwa 2-3 cm tief in die Erde steckt.
2. Düngung: Düngt eure Senfgrünpflanzen alle 2-3 Wochen mit einem Flüssigdünger für Gemüse. Befolgt die Anweisungen auf der Verpackung des Düngers.
3. Schutz vor Schädlingen: Kontrolliert eure Pflanzen regelmäßig auf Schädlinge wie Blattläuse oder Schnecken. Bei Bedarf könnt ihr natürliche Schädlingsbekämpfungsmittel verwenden.
4. Verwelkte Blätter entfernen: Entfernt regelmäßig verwelkte oder gelbe Blätter, um die Gesundheit der Pflanzen zu fördern.
5. Ernte eurer Senfgrünblätter
1. Erntezeitpunkt: Senfgrün kann in der Regel 4-6 Wochen nach der Aussaat geerntet werden. Die Blätter sind dann etwa 10-15 cm lang.
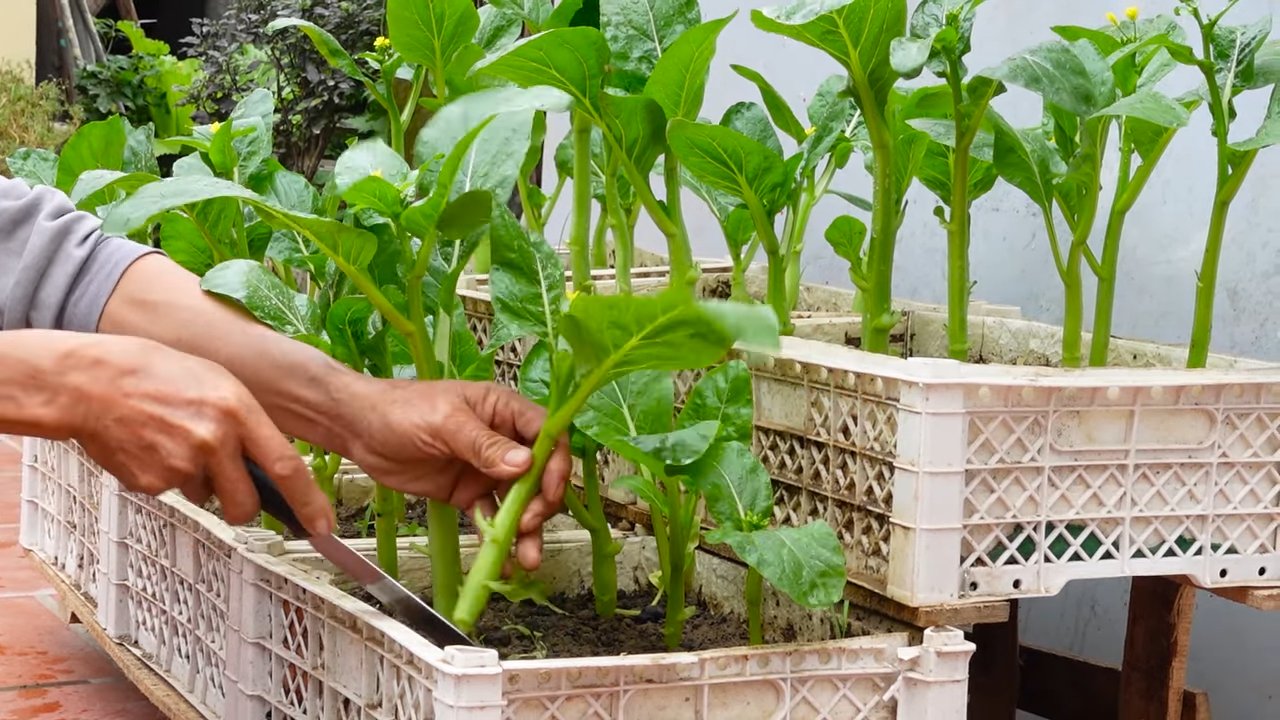
2. Erntemethode: Schneidet die äußeren Blätter mit einer Gartenschere oder Schere ab. Lasst die inneren Blätter stehen, damit die Pflanze weiterwachsen kann.
3. Häufigkeit der Ernte: Ihr könnt eure Senfgrünpflanzen mehrmals ernten. Je öfter ihr erntet, desto mehr Blätter werden nachwachsen.
Zusätzliche Tipps und Tricks für euren hängenden Senfgrün-Garten
* Sortenwahl: Experimentiert mit verschiedenen Senfgrünsorten, um euren Favoriten zu finden. Es gibt milde, würzige und sogar leicht süßliche Sorten.
* Kombination mit anderen Pflanzen: Ihr könnt Senfgrün auch mit anderen Kräutern oder Gemüsesorten in euren hängenden Gärten kombinieren. Geeignete Partner sind zum Beispiel Salat, Radieschen oder Schnittlauch.
* Schutz vor Frost: Senfgrün ist relativ frosthart, aber bei starkem Frost solltet ihr eure hängenden Gärten ins Haus holen oder mit Vlies abdecken.
* Bodenverbesserung: Mischt eurer Blumenerde Kompost oder Hornspäne bei, um die Nährstoffversorgung der Pflanzen zu verbessern.
* Regelmäßige Kontrolle: Kontrolliert eure Pflanzen regelmäßig auf Krankheiten oder Schädlinge. Je früher ihr Probleme erkennt, desto einfacher lassen sie sich beheben.
Häufige Fehler vermeiden
* Überwässerung: Staunässe kann zu Wurzelfäule führen. Achtet darauf, dass die Erde gut drainiert ist und gießt nur, wenn die oberste Schicht der Erde trocken ist.
* Zu wenig Sonnenlicht: Senfgrün benötigt ausreichend Sonnenlicht, um optimal zu wachsen. Wählt einen sonnigen Standort für eure hängenden Gärten.
* Vernachlässigung der Düngung: Senfgrün ist ein Starkzehrer und benötigt regelmäßige Düngung. Verwendet einen Flüssigdünger für Gemüse, um die Pflanzen mit ausreichend Nährstoffen zu versorgen.
* Zu späte Ernte: Wenn ihr die Blätter zu spät erntet, können sie bitter werden. Erntet die Blätter, wenn sie etwa 10-15 cm lang sind.
Senfgrün in der Küche: Leckere Rezeptideen
Senfgrün ist nicht nur einfach anzubauen, sondern auch unglaublich vielseitig in der Küche! Hier sind ein paar Ideen, wie ihr eure frische Ernte genießen könnt:
* Salate: Senfgrün verleiht Salaten eine würzige Note. Kombiniert es mit anderen Blattsalaten, Tomaten, Gurken und einem leckeren Dressing.
* Suppen:
Conclusion
So, there you have it! Transforming your gardening space with hanging mustard greens is not just a visually appealing project; it’s a practical and rewarding way to cultivate fresh, flavorful greens right at your fingertips. We’ve explored the simplicity and benefits of this DIY trick, highlighting how it maximizes space, deters pests, and adds a unique aesthetic touch to any balcony, patio, or even indoor setting.
This isn’t just about growing mustard greens; it’s about embracing a more sustainable and engaging approach to gardening. Imagine stepping outside and snipping fresh, peppery leaves for your salad or stir-fry, knowing you nurtured them from seed to table. The satisfaction is unparalleled.
But the beauty of this method lies in its adaptability. Feel free to experiment with different container types. While we’ve focused on readily available options like repurposed buckets and hanging baskets, you could explore vertical planters or even create your own custom hanging structures. Consider the material – terracotta pots offer excellent drainage, while plastic containers are lightweight and retain moisture well.
Furthermore, don’t limit yourself to just mustard greens! This hanging technique works wonderfully with other leafy greens like spinach, kale, and even certain herbs like parsley and cilantro. The key is to choose varieties that have relatively shallow root systems and thrive in partial shade, especially if your hanging garden is exposed to intense afternoon sun.
And speaking of sun, remember to monitor your mustard greens closely. They prefer cooler temperatures and can bolt (go to seed) quickly in hot weather. Providing adequate shade during the hottest part of the day will help prolong their harvest.
We encourage you to take the plunge and try this DIY hanging mustard greens gardening trick. It’s a fantastic project for beginners and seasoned gardeners alike. The initial setup is minimal, and the ongoing maintenance is relatively low. Plus, the rewards – fresh, homegrown mustard greens – are well worth the effort.
Once you’ve set up your hanging garden, we’d love to hear about your experience! Share your photos, tips, and variations in the comments below. Let’s create a community of hanging garden enthusiasts and inspire others to embrace this innovative and rewarding gardening technique. Did you try a different container? Did you find a particular fertilizer that worked wonders? Did you discover a clever way to deter pests? Your insights could be invaluable to other readers.
Don’t be afraid to experiment and personalize your hanging garden. This is your opportunity to get creative and create a space that reflects your unique style and gardening preferences. And remember, even if you encounter a few challenges along the way, the learning process is part of the fun.
So, grab your seeds, containers, and potting mix, and get ready to elevate your gardening game with this simple yet effective DIY trick. Happy gardening!
Frequently Asked Questions (FAQ)
What are the best varieties of mustard greens to grow in hanging baskets?
While most mustard green varieties will do well in hanging baskets, some are particularly well-suited due to their compact size and growth habits. Consider these options:
* **Southern Giant Curled:** This is a classic variety known for its large, frilly leaves and robust flavor. It’s relatively easy to grow and tolerates a wide range of conditions.
* **Florida Broadleaf:** This variety has smoother, broader leaves and a milder flavor than Southern Giant Curled. It’s a good choice if you prefer a less pungent mustard green.
* **Red Giant:** This variety adds a splash of color to your hanging garden with its deep red leaves. It has a slightly spicier flavor than the green varieties.
* **Osaka Purple:** Similar to Red Giant, Osaka Purple offers beautiful purple foliage and a slightly peppery taste.
* **Baby Leaf Varieties:** Many seed companies offer “baby leaf” mustard green mixes, which are specifically bred for harvesting at a young age. These are ideal for hanging baskets as they tend to be more compact and quicker to mature.
How often should I water my hanging mustard greens?
Hanging baskets tend to dry out more quickly than in-ground gardens, so regular watering is crucial. The frequency will depend on factors like the weather, the type of container you’re using, and the size of your plants.
As a general rule, check the soil moisture daily. If the top inch of soil feels dry to the touch, it’s time to water. Water thoroughly until water drains out of the bottom of the container. Avoid overwatering, as this can lead to root rot.
During hot, sunny weather, you may need to water your hanging mustard greens twice a day. In cooler, cloudier weather, you may only need to water every other day.
What kind of soil should I use for hanging mustard greens?
Use a high-quality potting mix specifically formulated for containers. These mixes are typically lightweight, well-draining, and contain added nutrients to support plant growth. Avoid using garden soil, as it can be too heavy and compact for containers.
You can also amend your potting mix with compost or other organic matter to improve its fertility and water retention. A good ratio is 2 parts potting mix to 1 part compost.
How much sunlight do mustard greens need?
Mustard greens prefer full sun to partial shade. Ideally, they should receive at least 4-6 hours of direct sunlight per day. However, in hot climates, they will benefit from some afternoon shade to prevent bolting.
If you’re growing your hanging mustard greens indoors, place them near a sunny window or under grow lights.
How do I fertilize my hanging mustard greens?
Mustard greens are relatively heavy feeders, so regular fertilization is important. You can use a balanced liquid fertilizer diluted to half strength every 2-3 weeks. Alternatively, you can use a slow-release fertilizer at planting time.
Look for a fertilizer that is specifically formulated for leafy greens or vegetables. Avoid over-fertilizing, as this can lead to excessive foliage growth and reduced flavor.
How do I prevent pests from attacking my hanging mustard greens?
Hanging your mustard greens can help deter some ground-dwelling pests, but they can still be susceptible to aphids, flea beetles, and other insects.
Here are some tips for preventing pests:
* **Inspect your plants regularly:** Check the leaves and stems for signs of pests.
* **Handpick pests:** If you find any pests, remove them by hand and drop them into a bucket of soapy water.
* **Use insecticidal soap or neem oil:** These are natural and effective ways to control many common garden pests.
* **Attract beneficial insects:** Plant flowers that attract beneficial insects like ladybugs and lacewings, which prey on aphids and other pests.
* **Ensure good air circulation:** Proper air circulation can help prevent fungal diseases and deter pests.
How do I harvest my hanging mustard greens?
You can start harvesting your mustard greens when the leaves are about 4-6 inches long. Simply snip off the outer leaves with scissors or a knife, leaving the inner leaves to continue growing. This is known as “cut-and-come-again” harvesting.
Harvest your mustard greens in the morning, when the leaves are crisp and flavorful. Wash them thoroughly before using.
How long will my hanging mustard greens last?
With proper care, your hanging mustard greens can last for several weeks or even months. However, they will eventually bolt (go to seed), especially in hot weather. Once they bolt, the leaves will become bitter and less palatable.
To prolong the harvest, provide adequate shade, water regularly, and harvest frequently. You can also succession plant new seeds every few weeks to ensure a continuous supply of fresh mustard greens.
Leave a Comment