
Harvest Celery From Backyard: Imagine stepping into your backyard and snipping off fresh, crisp celery stalks for your salad, soup, or even a healthy snack. Sounds idyllic, right? Well, it’s more achievable than you might think! For centuries, cultivating our own food has been a cornerstone of sustainable living, connecting us to the earth and providing nourishment straight from our own hands. From ancient Roman gardens to the victory gardens of World War II, the ability to grow our own produce has always been valued.
But let’s face it, in today’s busy world, the idea of a sprawling vegetable garden can feel overwhelming. That’s where these simple DIY tricks and hacks come in! Learning how to harvest celery from backyard is a game-changer, offering a convenient and rewarding way to enjoy fresh, organic produce without the hassle of large-scale gardening. I’m going to show you how to easily harvest celery from your backyard, ensuring you always have this versatile vegetable on hand. Plus, we’ll cover some clever tips to maximize your yield and keep your celery patch thriving. Ready to ditch the grocery store celery and embrace the joys of homegrown goodness? Let’s get started!
DIY: So erntest du Sellerie aus deinem Garten wie ein Profi!
Hey Gartenfreunde! Ich liebe es, frisches Gemüse direkt aus meinem Garten zu ernten, und Sellerie ist da keine Ausnahme. Es ist super vielseitig und schmeckt einfach fantastisch, wenn es frisch geerntet ist. In diesem Artikel zeige ich euch, wie ihr Sellerie richtig erntet, damit ihr das Beste aus eurer Ernte herausholen könnt. Keine Sorge, es ist einfacher als ihr denkt!
Wann ist der richtige Zeitpunkt zum Ernten?
Der Zeitpunkt der Ernte ist entscheidend für den Geschmack und die Qualität eures Selleries. Hier sind ein paar Anzeichen, auf die ihr achten solltet:
* Größe: Der Sellerie sollte eine angemessene Größe erreicht haben. Die meisten Sorten sind erntereif, wenn die Stangen etwa 20-30 cm lang sind.
* Festigkeit: Die Stangen sollten fest und knackig sein, nicht weich oder schlaff.
* Farbe: Die Farbe sollte ein sattes Grün sein. Gelbliche oder bräunliche Verfärbungen können ein Zeichen dafür sein, dass der Sellerie überreif ist.
* Zeitpunkt im Jahr: Sellerie wird in der Regel im Spätsommer oder Herbst geerntet, je nachdem, wann ihr ihn gepflanzt habt.
Benötigte Werkzeuge und Materialien
Bevor wir loslegen, stellt sicher, dass ihr alles griffbereit habt:
* Scharfes Messer oder Gartenschere: Ein scharfes Werkzeug ist wichtig, um die Stangen sauber abzuschneiden.
* Gartenschlauch oder Gießkanne: Um den Boden vor der Ernte zu befeuchten.
* Eimer oder Korb: Zum Sammeln der geernteten Stangen.
* Handschuhe (optional): Um eure Hände sauber zu halten.
Schritt-für-Schritt-Anleitung zur Sellerieernte
So, jetzt geht’s ans Eingemachte! Folgt diesen Schritten, um euren Sellerie richtig zu ernten:
1. Boden vorbereiten: Gießt den Boden um den Sellerie herum gründlich, bevor ihr mit der Ernte beginnt. Das macht es einfacher, die Stangen herauszuziehen oder abzuschneiden. Ein feuchter Boden schont auch die Wurzeln, falls ihr nicht alle Stangen auf einmal ernten möchtet.
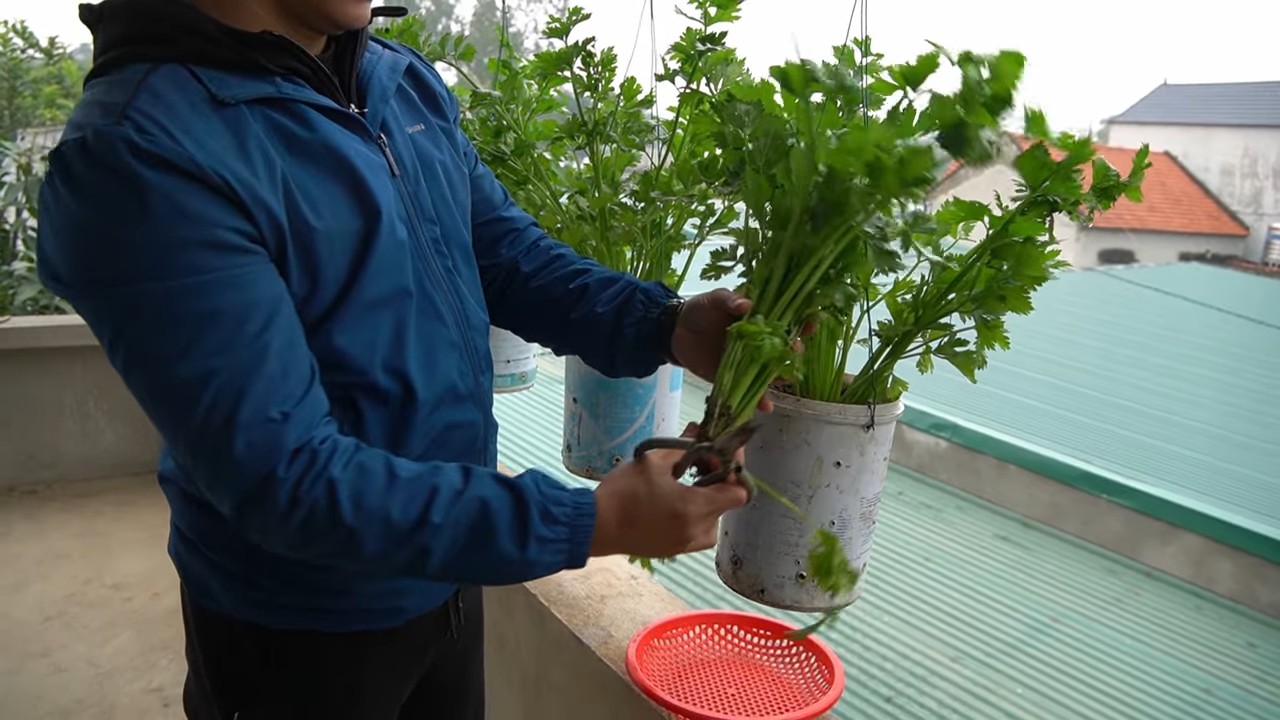
2. Auswahl der Stangen: Wählt die äußeren Stangen aus, die groß genug und fest sind. Lasst die inneren Stangen weiterwachsen, damit ihr später noch mehr ernten könnt.
3. Erntemethode 1: Einzelne Stangen ernten (für fortlaufende Ernte)
* Nehmt eine der ausgewählten äußeren Stangen.
* Sucht die Stelle, an der die Stange am Boden des Selleriebusches ansetzt.
* Schneidet die Stange mit eurem scharfen Messer oder der Gartenschere direkt über dem Boden ab. Achtet darauf, die anderen Stangen nicht zu beschädigen.
* Legt die geerntete Stange in euren Eimer oder Korb.
4. Erntemethode 2: Ganze Pflanze ernten (für einmalige Ernte)
* Wenn ihr die ganze Pflanze ernten möchtet, greift den gesamten Selleriebusch am unteren Ende zusammen.
* Schneidet den gesamten Busch mit eurem scharfen Messer oder der Gartenschere direkt über dem Boden ab.
* Hebt den gesamten Selleriebusch vorsichtig aus dem Boden.
* Entfernt überschüssige Erde von den Wurzeln.
5. Reinigung und Vorbereitung:
* Entfernt alle losen Blätter oder Erde von den geernteten Stangen.
* Wascht die Stangen gründlich unter kaltem Wasser ab.
* Trocknet die Stangen mit einem sauberen Tuch ab.
6. Lagerung:
* Sellerie hält sich am besten im Kühlschrank.
* Wickelt die Stangen in ein feuchtes Papiertuch und legt sie in einen Plastikbeutel oder eine luftdichte Dose.
* So gelagert, hält sich Sellerie bis zu zwei Wochen frisch.
Zusätzliche Tipps und Tricks
Hier sind noch ein paar zusätzliche Tipps, die euch bei der Sellerieernte helfen können:
* Regelmäßige Ernte: Erntet regelmäßig die äußeren Stangen, um das Wachstum der inneren Stangen zu fördern.
* Sellerie blanchieren: Um den Sellerie milder zu machen, könnt ihr ihn vor der Ernte blanchieren. Das bedeutet, dass ihr die Stangen etwa zwei Wochen vor der Ernte mit Erde oder speziellem Blanchiermaterial bedeckt. Dadurch werden sie weniger bitter.
* Sellerieblätter verwenden: Werft die Sellerieblätter nicht weg! Sie sind essbar und können in Suppen, Eintöpfen oder Salaten verwendet werden. Sie haben einen intensiven Selleriegeschmack und sind eine tolle Ergänzung zu vielen Gerichten.
* Schädlinge und Krankheiten: Achtet auf Schädlinge und Krankheiten, die den Sellerie befallen könnten. Entfernt befallene Blätter oder Stangen sofort, um die Ausbreitung zu verhindern.
* Bodenpflege: Sellerie benötigt einen nährstoffreichen Boden. Düngt den Boden regelmäßig mit Kompost oder organischem Dünger, um das Wachstum zu fördern.
Sellerie richtig lagern: So bleibt er knackig frisch
Die richtige Lagerung ist entscheidend, damit euer geernteter Sellerie lange frisch und knackig bleibt. Hier sind meine bewährten Methoden:
* Im Kühlschrank: Wie bereits erwähnt, ist die Lagerung im Kühlschrank die beste Option. Wickelt die gewaschenen und getrockneten Stangen in ein feuchtes Papiertuch und legt sie in einen Plastikbeutel oder eine luftdichte Dose. Das feuchte Papiertuch verhindert, dass der Sellerie austrocknet.
* Im Wasserbad: Eine weitere Methode ist, die Selleriestangen in einem Behälter mit Wasser im Kühlschrank aufzubewahren. Schneidet die Stangen am unteren Ende ab und stellt sie in ein Glas oder eine Schüssel mit Wasser. Wechselt das Wasser alle paar Tage, um die Frische zu erhalten.
* Einfrieren: Wenn ihr Sellerie für einen längeren Zeitraum aufbewahren möchtet, könnt ihr ihn einfrieren. Schneidet die Stangen in kleine Stücke und blanchiert sie kurz in kochendem Wasser (ca. 2-3 Minuten). Schreckt sie dann in Eiswasser ab, um den Garprozess zu stoppen. Lasst die Selleriestücke gut abtropfen und friert sie in Gefrierbeuteln oder -dosen ein. Eingefrorener Sellerie eignet sich gut für Suppen, Eintöpfe und Soßen.
Sellerie in der Küche: Vielseitige Verwendungsmöglichkeiten
Sellerie ist ein echtes Multitalent in der Küche! Hier sind ein paar Ideen, wie ihr euren frisch geernteten Sellerie verwenden könnt:
* Roh als Snack: Selleriestangen mit Hummus, Erdnussbutter oder Frischkäse sind ein gesunder und leckerer Snack.
* In Salaten: Sellerie verleiht Salaten eine knackige Textur und einen frischen Geschmack. Probiert ihn in Kartoffelsalat, Coleslaw oder einem einfachen Blattsalat.
* In Suppen und Eintöpfen: Sellerie ist eine wichtige Zutat in vielen Suppen und Eintöpfen. Er sorgt für einen aromatischen Geschmack und eine angenehme Textur.
* Als Basis für Soßen: Sellerie, Zwiebeln und Karotten bilden oft die Basis für Soßen und Schmorgerichte.
* Als Saft: Selleriesaft ist ein beliebter Gesundheitstrend. Er soll entzündungshemmend wirken und viele Vitamine und Mineralstoffe enthalten.
* Gegrillt oder gebraten: Sellerie kann auch gegrillt oder gebraten werden. Er bekommt dadurch einen leicht süßlichen Geschmack.
Fazit
Ich hoffe, dieser Artikel hat euch geholfen, Sellerie richtig zu ernten und zu lagern. Mit diesen Tipps und Tricks könnt ihr sicherstellen, dass ihr das Beste aus eurer Ernte herausholt und den frischen Geschmack von selbst angebautem Sellerie genießen könnt. Viel Spaß beim Gärtnern und Kochen!
Conclusion
So, there you have it! Harvesting celery from your own backyard isn’t just a gardening task; it’s a gateway to fresher, more flavorful meals and a deeper connection with the food you eat. We’ve walked through the simple steps, from understanding the signs of ripeness to the gentle art of extraction, ensuring you get the most out of your homegrown celery.
Why is this DIY trick a must-try? Because store-bought celery, while convenient, often lacks the vibrant taste and crisp texture of freshly harvested stalks. Imagine the difference in your salads, soups, and snacks when you use celery that was still growing just moments before it landed on your plate. The flavor is simply unparalleled. Plus, you’re reducing your carbon footprint by cutting down on transportation and packaging. It’s a win-win for your taste buds and the planet!
But the benefits don’t stop there. Growing your own celery allows for experimentation and customization. Consider these variations to elevate your celery harvesting experience:
* **Succession Planting:** Plant celery seeds or seedlings every few weeks to ensure a continuous harvest throughout the growing season. This way, you’ll always have fresh celery on hand whenever you need it.
* **Blanching for Tenderness:** For even more tender and milder-flavored stalks, try blanching your celery a week or two before harvesting. Simply mound soil around the base of the stalks, leaving the tops exposed to sunlight. This process reduces chlorophyll production, resulting in paler, more delicate celery.
* **Leafy Greens Bonus:** Don’t discard the celery leaves! They are packed with flavor and nutrients. Use them in salads, stir-fries, or as a garnish. You can even dry them and grind them into a celery leaf powder for seasoning.
* **Seed Saving:** If you allow some of your celery plants to bolt (go to seed), you can collect the seeds for planting next year. This is a great way to save money and ensure you have a continuous supply of your favorite celery variety.
Beyond these variations, remember that the key to successful **harvest celery** lies in observation and patience. Pay attention to your plants, learn their needs, and adapt your harvesting techniques accordingly.
We wholeheartedly encourage you to give this DIY trick a try. It’s a rewarding experience that will transform the way you think about celery. And once you’ve tasted the difference between homegrown and store-bought, you’ll never go back!
Don’t be shy about sharing your experiences with us. We’d love to hear about your celery harvesting adventures, any challenges you encountered, and the delicious dishes you created with your homegrown bounty. Share your photos and stories on our social media channels using #HomegrownCelery or leave a comment below. Let’s build a community of celery enthusiasts and inspire others to embrace the joys of gardening!
Frequently Asked Questions (FAQ)
1. How do I know when my celery is ready to harvest?
The best indicator of celery maturity is its size and firmness. The stalks should be at least 6-8 inches long and feel firm to the touch. The color should be a vibrant green (or the characteristic color of your chosen variety). Avoid harvesting celery that is thin, spindly, or has yellowing leaves, as this indicates it is not yet mature or may be stressed. Also, consider the days to maturity listed on your seed packet or plant tag as a general guideline.
2. What’s the best way to harvest celery without damaging the plant?
The key is to be gentle and use a sharp knife. Cut the stalks at the base of the plant, close to the soil line. You can harvest the entire plant at once, or you can harvest individual stalks as needed, starting with the outer stalks. If you only harvest a few stalks at a time, the remaining plant will continue to grow and produce more celery. Be careful not to disturb the roots of the remaining plant when harvesting individual stalks.
3. Can I harvest celery leaves?
Absolutely! Celery leaves are edible and packed with flavor. They can be used in salads, soups, stir-fries, or as a garnish. You can harvest the leaves at any time, even before the stalks are fully mature. Simply snip off the leaves with scissors or a knife. Harvesting the leaves can actually encourage the plant to produce more stalks.
4. How do I store harvested celery to keep it fresh?
To keep your harvested celery fresh for as long as possible, wrap it loosely in a damp paper towel and store it in a plastic bag or container in the refrigerator. This will help to prevent the celery from drying out. You can also store celery stalks upright in a container of water in the refrigerator, changing the water every few days. Properly stored celery can last for up to two weeks in the refrigerator.
5. My celery stalks are bitter. What could be the reason?
Bitter celery can be caused by several factors, including:
* **Insufficient Watering:** Celery needs consistent moisture to grow properly. If the soil dries out, the stalks can become bitter.
* **High Temperatures:** Extreme heat can also cause celery to become bitter. Provide shade during the hottest part of the day if necessary.
* **Nutrient Deficiencies:** A lack of certain nutrients, such as boron, can also contribute to bitterness. Amend the soil with compost or a balanced fertilizer.
* **Variety:** Some celery varieties are naturally more bitter than others. Choose a variety known for its mild flavor.
* **Maturity:** Overmature celery can also become bitter. Harvest your celery when it is at its peak ripeness.
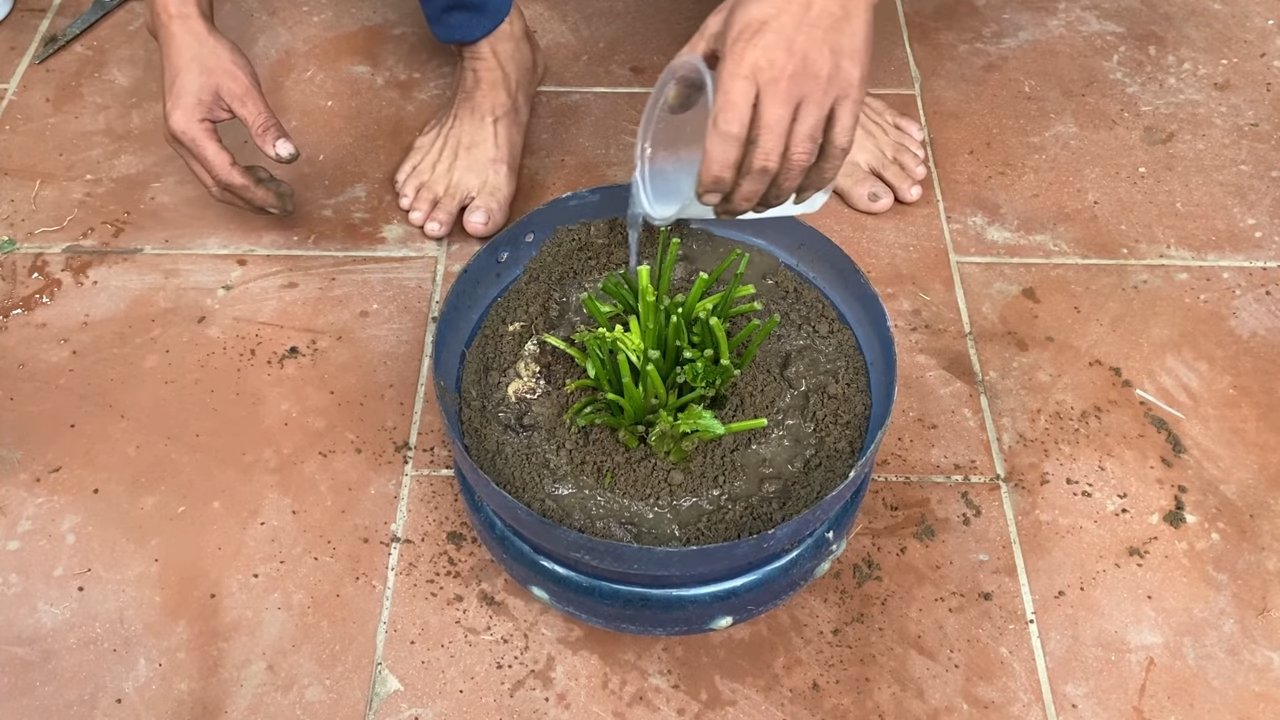
6. Can I regrow celery from the base of a store-bought stalk?
Yes, you can! This is a fun and easy way to propagate celery. Cut off the base of the celery stalk, leaving about 2 inches of the root end intact. Place the base in a shallow dish of water, with the cut side facing up. Place the dish in a sunny location and change the water every day. After a few days, you should see new roots and leaves starting to grow. Once the roots are well-developed, you can transplant the celery base into a pot of soil or directly into your garden.
7. What are some common pests and diseases that affect celery?
Some common pests that affect celery include aphids, celery leaf tiers, and carrot rust flies. Common diseases include celery blight, celery mosaic virus, and pink rot. Practice good garden hygiene to prevent pests and diseases. This includes removing weeds, providing good air circulation, and avoiding overhead watering. If you encounter pests or diseases, treat them promptly with appropriate organic or chemical controls.
8. Is celery easy to grow for beginners?
Celery can be a bit challenging to grow, especially for beginners, as it requires consistent moisture and fertile soil. However, with a little patience and attention, it is definitely achievable. Start with healthy seedlings, provide adequate water and nutrients, and protect your plants from pests and diseases. Don’t be discouraged if your first attempt isn’t perfect. Learn from your mistakes and keep trying! The reward of homegrown celery is well worth the effort.
9. What are the best companion plants for celery?
Celery benefits from being planted near certain companion plants. Some good companions for celery include:
* **Onions and Garlic:** These plants deter pests and help to improve the flavor of celery.
* **Marigolds:** Marigolds repel nematodes and other soil pests.
* **Nasturtiums:** Nasturtiums attract aphids away from celery.
* **Tomatoes:** Tomatoes provide shade for celery during hot weather.
* **Beans:** Beans fix nitrogen in the soil, which benefits celery.
Avoid planting celery near parsley, as they compete for the same nutrients.
10. Can I grow celery in containers?
Yes, you can grow celery in containers, but you’ll need to choose a large container (at least 12 inches in diameter) to accommodate the plant’s root system. Use a well-draining potting mix and water regularly. Container-grown celery may require more frequent fertilization than celery grown in the ground. Place the container in a sunny location that receives at least 6 hours of sunlight per day.


Leave a Comment