
Indoor pepper growing might seem like a challenge reserved for seasoned gardeners, but trust me, it’s totally achievable – even if you’re a beginner like I once was! Have you ever craved the taste of a fresh, spicy pepper in the dead of winter, only to be disappointed by the bland offerings at the grocery store? That’s exactly what sparked my indoor pepper growing journey, and I’m here to share all the secrets I’ve learned along the way.
Growing peppers indoors isn’t just a modern trend; peppers have a rich history, dating back thousands of years to South America, where they were cultivated for both culinary and medicinal purposes. Imagine, ancient civilizations enjoying the same vibrant flavors we do today! While they didn’t have grow lights and fancy potting mixes, their ingenuity paved the way for us to enjoy these fiery fruits year-round.
But why bother with the effort of indoor pepper growing? Well, for starters, you get to control the environment, ensuring your peppers receive the perfect amount of light, water, and nutrients. This means you can extend your growing season and enjoy a continuous harvest, regardless of the weather outside. Plus, it’s incredibly rewarding to nurture a plant from seed to fruit, knowing you’ve created something delicious and beautiful with your own two hands. So, let’s dive into some easy DIY tricks and hacks that will have you harvesting a bounty of peppers from the comfort of your home in no time!
Growing Peppers Indoors: A Spicy DIY Adventure!
Hey there, fellow gardening enthusiasts! Ever dreamt of having fresh, vibrant peppers right at your fingertips, even when the weather outside is frightful? Well, you’re in the right place! I’m going to walk you through the wonderful world of growing peppers indoors. It’s easier than you might think, and the reward of plucking a ripe, homegrown pepper in the middle of winter is truly something special.
What You’ll Need: The Pepper Grower’s Toolkit
Before we dive in, let’s gather our supplies. Think of this as your pepper-growing arsenal!
* Pepper Seeds: Choose your adventure! Bell peppers, jalapenos, habaneros – the possibilities are endless. Make sure to source your seeds from a reputable supplier for the best germination rates.
* Seed Starting Trays or Small Pots: These will be your pepper seedlings’ first homes.
* Seed Starting Mix: This is a light, airy soil mix specifically designed for delicate seedlings. Regular potting soil can be too heavy.
* Potting Soil: Once your seedlings are ready to move to bigger pots, you’ll need a good quality potting soil.
* Grow Lights: Peppers need a LOT of light, especially indoors. A good grow light is essential for healthy growth and fruit production.
* Larger Pots (5-gallon or larger): These will be your peppers’ final homes. The size depends on the variety you choose; some peppers get quite large!
* Watering Can or Spray Bottle: For gentle watering.
* Fertilizer: A balanced fertilizer, or one specifically formulated for peppers and tomatoes, will provide the nutrients your plants need.
* Small Fan: To provide air circulation and strengthen stems.
* Optional: Heat Mat: Peppers love warmth, and a heat mat can significantly improve germination rates.
* Optional: Pruning Shears: For trimming and shaping your plants.
Phase 1: Starting Your Pepper Seeds
This is where the magic begins! Getting your seeds to sprout is the first step towards a bountiful pepper harvest.
1. Prepare Your Seed Starting Trays: Fill your seed starting trays or small pots with seed starting mix. Gently tamp it down, leaving about half an inch of space at the top.
2. Sow Your Seeds: Plant 2-3 seeds per cell or pot, about ¼ inch deep. This increases your chances of at least one seed germinating.
3. Water Gently: Use a spray bottle or watering can with a gentle nozzle to moisten the soil. You want it damp, but not soggy.
4. Provide Warmth: Peppers germinate best in warm conditions (75-85°F). If you have a heat mat, place your trays on it. Otherwise, find a warm spot in your house.
5. Cover and Wait: Cover the trays with a clear plastic lid or plastic wrap to create a humid environment. This helps the seeds germinate.
6. Monitor and Water: Check the trays daily. Keep the soil consistently moist, but not waterlogged. Remove the plastic cover once the seedlings start to emerge. This usually takes 7-14 days, but can vary depending on the pepper variety.
7. Provide Light: Once the seedlings emerge, they need light! Place them under your grow lights, about 2-4 inches away from the top of the plants. Adjust the height as the plants grow.
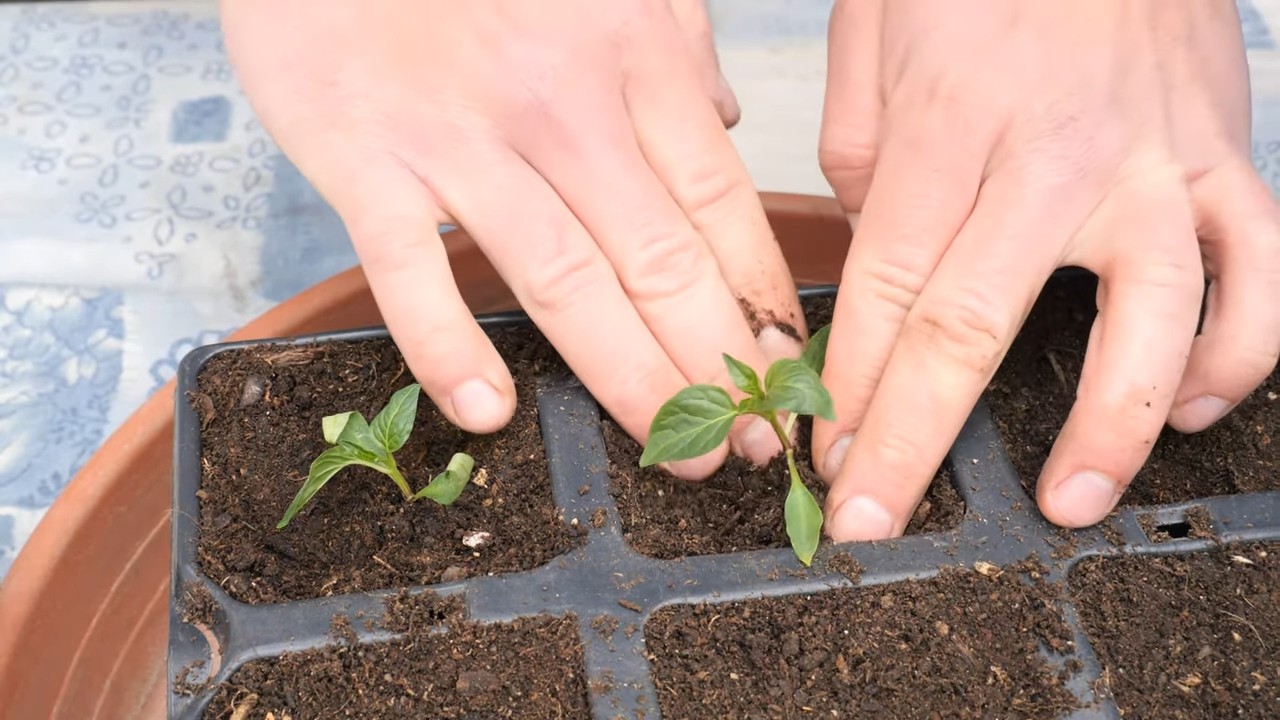
Phase 2: Nurturing Your Seedlings
Now that you have tiny pepper plants, it’s time to give them the TLC they need to thrive.
1. Thinning: Once your seedlings have their first set of true leaves (the leaves that look like miniature pepper leaves, not the initial seed leaves), it’s time to thin them. If you planted multiple seeds per cell, choose the strongest seedling and snip off the others at the soil line. This prevents overcrowding and ensures the remaining seedling gets all the nutrients it needs.
2. Watering: Continue to water your seedlings regularly, allowing the top inch of soil to dry out between waterings. Overwatering can lead to root rot.
3. Fertilizing: Start fertilizing your seedlings with a diluted liquid fertilizer (follow the instructions on the fertilizer package) every 2-3 weeks. This will give them a boost of nutrients.
4. Air Circulation: Place a small fan near your seedlings to provide gentle air circulation. This helps strengthen their stems and prevents fungal diseases. Run the fan for a few hours each day.
5. Hardening Off: Before transplanting your seedlings to their final pots, you need to “harden them off.” This means gradually acclimating them to outdoor conditions. Start by placing them outside for an hour or two each day, in a sheltered location. Gradually increase the amount of time they spend outdoors over the course of a week. This will help them adjust to the sun, wind, and temperature changes.
Phase 3: Transplanting and Growing to Maturity
It’s time to give your pepper plants their forever homes! This is where they’ll grow, flower, and produce those delicious peppers you’ve been waiting for.
1. Choose Your Pots: Select pots that are at least 5 gallons in size. Larger pots are better, especially for larger pepper varieties. Make sure the pots have drainage holes.
2. Prepare Your Potting Soil: Fill your pots with a good quality potting soil. You can also add some compost or other organic matter to improve drainage and fertility.
3. Transplant Your Seedlings: Gently remove your seedlings from their seed starting trays or small pots. Be careful not to damage the roots. Plant them in the center of the larger pots, at the same depth they were growing in their previous containers.
4. Water Thoroughly: Water your newly transplanted pepper plants thoroughly.
5. Provide Light and Warmth: Place your pepper plants under your grow lights, or in a sunny window. Peppers need at least 6-8 hours of direct light per day. Maintain a temperature of 70-80°F.
6. Fertilize Regularly: Continue to fertilize your pepper plants every 2-3 weeks with a balanced fertilizer, or one specifically formulated for peppers and tomatoes.
7. Watering: Water your pepper plants regularly, allowing the top inch of soil to dry out between waterings. Avoid overwatering, as this can lead to root rot.
8. Pruning (Optional): You can prune your pepper plants to encourage bushier growth and more fruit production. Pinch off the growing tips of the main stems to encourage side branching. Remove any yellowing or dead leaves.
9. Pollination: Peppers are self-pollinating, but indoor plants may need a little help. You can gently shake the plants or use a small brush to transfer pollen from one flower to another.
10. Support: As your pepper plants grow, they may need support. Use stakes or cages to prevent them from falling over.
11. Pest Control: Keep an eye out for pests, such as aphids, spider mites, and whiteflies. If you find any pests, treat them with insecticidal soap or neem oil.
Phase 4: Harvesting Your Peppers
The moment you’ve been waiting for! Harvesting your peppers is the most rewarding part of the process.
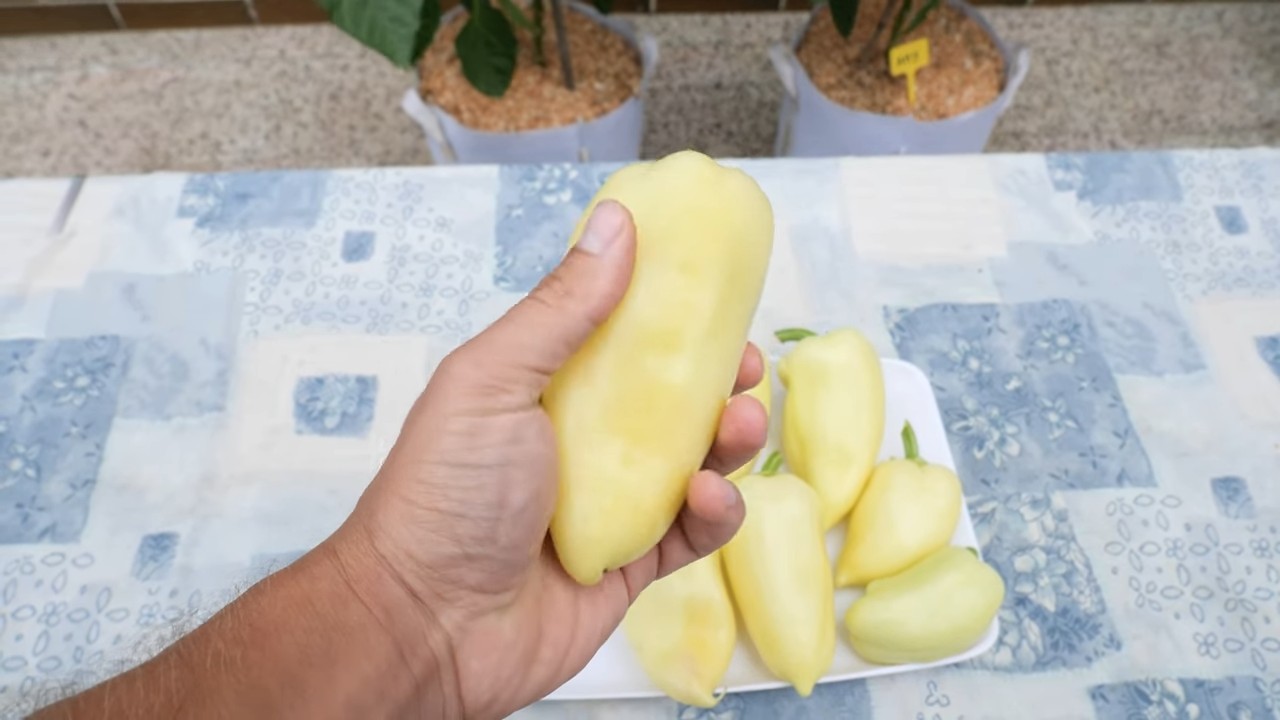
1. Know When to Harvest: The time it takes for peppers to mature depends on the variety. Bell peppers are typically harvested when they are fully colored and firm. Hot peppers can be harvested when they are green or red, depending on your preference.
2. Harvest Carefully: Use pruning shears or scissors to cut the peppers from the plant. Be careful not to damage the plant.
3. Enjoy Your Harvest: Use your homegrown peppers in your favorite recipes, or share them with friends and family!
Troubleshooting: Common Pepper Problems
Even with the best care, you might encounter some problems along the way. Here are a few common issues and how to address them:
* Yellowing Leaves: This can be caused by overwatering, underwatering, nutrient deficiencies, or pests. Check the soil moisture and adjust your watering accordingly. Fertilize your plants regularly. Inspect them for pests.
* Blossom End Rot: This is a calcium deficiency that causes the bottom of the peppers to rot. Add calcium to the soil, or use a calcium-rich fertilizer. Ensure consistent watering, as fluctuations in soil moisture can exacerbate the problem.
* Lack of Fruit: This can be caused by insufficient light, poor pollination, or temperature extremes. Make sure your plants are getting enough light. Help with pollination by shaking the plants or using a small brush. Maintain a temperature of 70-80°F.
* Pests: Aphids, spider mites, and whiteflies are common pepper pests. Treat them with insecticidal soap or neem oil.
Tips for Success: The Pepper Grower’s Secret Sauce
Here are a few extra tips to
Conclusion
So, there you have it! Mastering the art of indoor pepper growing is not just a possibility; it’s an achievable and incredibly rewarding experience. We’ve explored the key steps, from selecting the right pepper varieties to providing the optimal growing conditions, and hopefully, demystified the process along the way.
Why is this DIY trick a must-try? Because it puts you in control of your food source, offering fresh, flavorful peppers year-round, regardless of the weather outside. Imagine the satisfaction of harvesting your own spicy jalapeños in the dead of winter, or adding a burst of color and flavor to your summer salads with homegrown bell peppers. Beyond the practical benefits, indoor pepper growing is a therapeutic and engaging hobby that connects you with nature and provides a sense of accomplishment.
But the journey doesn’t end here! Feel free to experiment with different pepper varieties to discover your favorites. Try growing them in different types of containers, from traditional pots to self-watering planters, to see what works best for your space and lifestyle. Consider adding companion plants like basil or marigolds to your indoor garden to deter pests and enhance the flavor of your peppers. You can even explore hydroponic systems for a more advanced and efficient growing method.
Don’t be afraid to get creative and personalize your indoor pepper growing setup. Perhaps you want to build a small greenhouse in your sunroom, or create a vertical garden on your balcony. The possibilities are endless!
We strongly encourage you to give this DIY trick a try. Start small, be patient, and don’t be discouraged by initial setbacks. Every gardener, even the most experienced, faces challenges along the way. The key is to learn from your mistakes, adapt your approach, and keep experimenting.
And most importantly, we want to hear about your experience! Share your successes, your challenges, and your tips with us in the comments below. Let’s create a community of indoor pepper growers who can learn from each other and inspire others to embark on this exciting journey. What varieties are you growing? What challenges have you faced, and how did you overcome them? What are your favorite tips and tricks for successful indoor pepper growing? Your insights could be invaluable to other readers.
So, grab your seeds, prepare your soil, and get ready to experience the joy of growing your own peppers indoors. Happy gardening!
Frequently Asked Questions (FAQ)
What are the best pepper varieties to grow indoors?
Choosing the right pepper variety is crucial for successful indoor growing. Compact varieties that don’t require a lot of space are generally the best choice. Some popular options include:
* Thai Peppers: These small, spicy peppers are perfect for adding a kick to your dishes and thrive in containers.
* Jalapeños: A classic choice for their versatility and manageable size. Look for compact varieties specifically bred for container growing.
* Bell Peppers: While they can be more challenging than smaller varieties, dwarf bell pepper plants are available and can produce well indoors.
* Poblano Peppers: These mild peppers are great for stuffing and can be grown indoors with proper care.
* Chili Peppers: Many chili pepper varieties, such as cayenne and serrano, are well-suited for indoor growing due to their compact size and high yield.
* Ornamental Peppers: These peppers are grown for their colorful fruits and compact size, making them a beautiful and productive addition to any indoor garden.
Consider the size of your growing space and the amount of light available when selecting your pepper varieties.
How much light do indoor pepper plants need?
Peppers need a significant amount of light to thrive and produce fruit. Ideally, they require at least 6-8 hours of direct sunlight per day. If you don’t have a sunny window, you’ll need to supplement with grow lights.
* Types of Grow Lights: LED grow lights are the most energy-efficient and long-lasting option. Fluorescent grow lights are also a good choice, but they need to be replaced more frequently. Incandescent lights are not recommended as they produce too much heat and not enough light.
* Placement of Grow Lights: Position your grow lights about 6-12 inches above your pepper plants. Adjust the height as the plants grow to ensure they receive adequate light.
* Light Spectrum: Look for grow lights that provide a full spectrum of light, including both blue and red wavelengths. Blue light promotes vegetative growth, while red light promotes flowering and fruiting.
What type of soil is best for indoor pepper growing?
The ideal soil for indoor pepper growing is well-draining and rich in organic matter. A good potting mix will provide the necessary nutrients and drainage for healthy root development.
* Potting Mix Ingredients: Look for a potting mix that contains a blend of peat moss, perlite, and vermiculite. Peat moss helps retain moisture, while perlite and vermiculite improve drainage and aeration.
* Avoid Garden Soil: Do not use garden soil in containers, as it can become compacted and poorly drained, leading to root rot.
* Adding Compost: You can amend your potting mix with compost to provide additional nutrients and improve soil structure.
How often should I water my indoor pepper plants?
Watering frequency depends on several factors, including the size of the pot, the type of soil, and the temperature and humidity of your growing environment.
* Check the Soil Moisture: The best way to determine if your pepper plants need water is to check the soil moisture. Stick your finger about an inch into the soil. If it feels dry, it’s time to water.
* Water Thoroughly: When you water, water thoroughly until the water drains out of the bottom of the pot. This ensures that the entire root system is moistened.
* Avoid Overwatering: Overwatering can lead to root rot, so it’s important to let the soil dry out slightly between waterings.
* Adjust Watering Schedule: Adjust your watering schedule based on the needs of your plants. During hot, dry weather, you may need to water more frequently.
How do I fertilize my indoor pepper plants?
Peppers are heavy feeders and require regular fertilization to produce abundant fruit.
* Fertilizer Type: Use a balanced fertilizer with an NPK ratio of 10-10-10 or 14-14-14. You can also use a fertilizer specifically formulated for peppers or tomatoes.
* Fertilizing Schedule: Start fertilizing your pepper plants about two weeks after transplanting them into their final containers. Fertilize every 2-3 weeks during the growing season.
* Liquid vs. Granular Fertilizer: You can use either liquid or granular fertilizer. Liquid fertilizer is easier to apply and is quickly absorbed by the plants. Granular fertilizer is slow-release and provides a steady supply of nutrients over time.
* Follow Instructions: Always follow the instructions on the fertilizer label to avoid over-fertilizing, which can damage your plants.
How do I pollinate my indoor pepper plants?
Peppers are self-pollinating, but indoor plants may need a little help to ensure successful pollination.
* Hand Pollination: Use a small paintbrush or cotton swab to gently transfer pollen from the male parts of the flower (anthers) to the female part (pistil).
* Shake the Plants: Gently shake the plants to release pollen.
* Use a Fan: Place a small fan near your pepper plants to circulate air and help with pollination.
How do I deal with pests and diseases on my indoor pepper plants?
Indoor pepper plants are less susceptible to pests and diseases than outdoor plants, but they can still be affected.
* Common Pests: Aphids, spider mites, and whiteflies are common pests that can infest indoor pepper plants.
* Pest Control: Use insecticidal soap or neem oil to control pests. You can also try hand-picking pests off the plants.
* Common Diseases: Root rot, powdery mildew, and blossom end rot are common diseases that can affect indoor pepper plants.
* Disease Prevention: Ensure good air circulation, avoid overwatering, and provide adequate light to prevent diseases.
* Treating Diseases: Use a fungicide to treat fungal diseases. Remove and discard any infected leaves or plants.
Why are my pepper plants not producing fruit?
There are several reasons why your pepper plants may not be producing fruit.
* Lack of Light: Peppers need plenty of light to produce fruit. Ensure your plants are receiving at least 6-8 hours of direct sunlight per day or are supplemented with grow lights.
* Poor Pollination: Ensure your plants are being properly pollinated.
* Nutrient Deficiency: Peppers need adequate nutrients to produce fruit. Fertilize your plants regularly with a balanced fertilizer.
* Temperature: Peppers prefer warm temperatures. Ensure your plants are not exposed to cold drafts or extreme temperature fluctuations.
* Stress: Stressful conditions, such as overwatering, underwatering, or pest infestations, can prevent pepper plants from producing fruit.
Can I move my indoor pepper plants outdoors during the summer?
Yes, you can move your

Leave a Comment