
Indoor tomato growing system: Imagine plucking a sun-ripened, juicy tomato right from your own indoor garden, even in the dead of winter! Sounds like a dream, right? Well, it doesn’t have to be! For centuries, humans have cultivated plants indoors, from the elaborate orangeries of European royalty to the humble windowsill herb gardens of today. But growing tomatoes indoors? That’s where the real fun begins, and where this DIY guide comes in!
Let’s face it, store-bought tomatoes often lack that vibrant, fresh-from-the-vine flavor. And for those of us living in apartments, colder climates, or simply lacking outdoor space, the dream of homegrown tomatoes can feel out of reach. But with a little ingenuity and some simple techniques, you can create your very own thriving indoor tomato growing system.
This article is packed with easy-to-follow DIY tricks and hacks that will empower you to grow delicious, organic tomatoes indoors, regardless of your experience level. We’ll cover everything from choosing the right tomato varieties and lighting to building your own self-watering system and troubleshooting common problems. Get ready to ditch those bland supermarket tomatoes and enjoy the unparalleled taste of homegrown goodness, all year round!
DIY Indoor Tomato Growing System: From Seed to Sauce!
Hey there, fellow gardening enthusiasts! Ever dreamt of biting into a juicy, sun-ripened tomato in the dead of winter? Well, dream no more! I’m going to walk you through building your very own indoor tomato growing system. It’s easier than you think, and the rewards are incredibly delicious. Get ready to have fresh tomatoes year-round!
What You’ll Need: The Shopping List
Before we dive in, let’s gather our supplies. This list might seem long, but trust me, it’s worth it!
* Tomato Seeds: Choose a determinate (bush) variety for easier indoor growing. ‘Roma’, ‘Patio’, or ‘Tiny Tim’ are great options.
* Seed Starting Trays or Small Pots: These will be your nurseries for the baby tomato plants.
* Seed Starting Mix: This is a light, airy soil mix perfect for delicate seedlings.
* Grow Lights: Full-spectrum LED grow lights are energy-efficient and provide the necessary light for healthy growth.
* Timer: To automate the grow light schedule (14-16 hours of light per day).
* Larger Pots (5-gallon or larger): These will be the final homes for your tomato plants.
* Potting Mix: A well-draining potting mix is crucial for healthy root development.
* Fertilizer: A balanced liquid fertilizer specifically formulated for tomatoes.
* Watering Can or Spray Bottle: For gentle watering.
* pH Meter (Optional but Recommended): To monitor the pH of your soil. Tomatoes prefer a pH of 6.0-6.8.
* Small Fan: To provide air circulation and prevent fungal diseases.
* Support Structures (Stakes or Cages): Even determinate varieties might need some support as they grow.
* Spray Bottle with Water: For misting the plants to increase humidity.
* Measuring Cups and Spoons: For accurate fertilizer application.
* Heat Mat (Optional): To speed up germination.
* Thermometer: To monitor the temperature in your growing area.
* Humidity Monitor (Optional): To keep track of humidity levels.
* Pruning Shears or Scissors: For trimming and pruning.
* Labels and Marker: To keep track of your tomato varieties.
* A well-ventilated space: A spare room, basement, or even a large closet can work.
Phase 1: Starting Your Seeds
This is where the magic begins! We’re going to nurture those tiny seeds into strong, healthy seedlings.
1. Prepare Your Seed Starting Trays: Fill each cell of your seed starting tray (or individual small pots) with seed starting mix. Gently tamp it down to remove air pockets.
2. Sow the Seeds: Place 2-3 tomato seeds in the center of each cell, about ¼ inch deep.
3. Cover and Water: Lightly cover the seeds with more seed starting mix and gently water the trays using a spray bottle or watering can with a fine rose. You want to moisten the soil without disturbing the seeds.
4. Provide Warmth and Humidity: Cover the seed starting trays with a clear plastic dome or plastic wrap to create a humid environment. Place the trays on a heat mat (if using) to maintain a soil temperature of around 75-80°F (24-27°C).
5. Monitor Germination: Check the trays daily for germination. Tomato seeds typically germinate within 5-10 days.
6. Remove Cover and Introduce Light: Once the seedlings emerge, remove the plastic dome or wrap and place the trays under your grow lights. Position the lights a few inches above the seedlings.
7. Water Regularly: Keep the seed starting mix consistently moist, but not soggy. Water when the top inch of soil feels dry to the touch.
8. Thin the Seedlings: Once the seedlings have their first true leaves (the second set of leaves that appear after the initial seed leaves), thin them to one seedling per cell by snipping off the weaker seedlings at the soil line with scissors. This prevents overcrowding and ensures that each seedling has enough space and nutrients to thrive.
9. Fertilize Lightly: After a week or two, begin fertilizing the seedlings with a diluted liquid fertilizer specifically formulated for tomatoes. Follow the instructions on the fertilizer label.
Phase 2: Transplanting and Growing
Now that our seedlings are strong and healthy, it’s time to move them to their permanent homes!
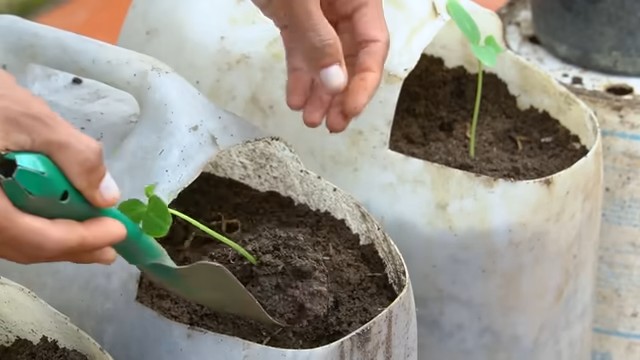
1. Prepare Your Larger Pots: Fill your 5-gallon (or larger) pots with a well-draining potting mix. Leave a few inches of space at the top of the pot.
2. Transplant the Seedlings: Gently remove the seedlings from their seed starting trays or pots. Be careful not to damage the roots. You can gently squeeze the bottom of the cell to loosen the soil and then lift the seedling out.
3. Plant Deeply: Plant the tomato seedlings deeper than they were in the seed starting trays, burying the stem up to the first set of leaves. This encourages the development of more roots along the buried stem, resulting in a stronger and healthier plant.
4. Water Thoroughly: After transplanting, water the seedlings thoroughly to help them settle into their new pots.
5. Provide Support: Install stakes or cages to support the tomato plants as they grow. This will prevent them from falling over as they become heavier with fruit.
6. Position Under Grow Lights: Place the pots under your grow lights, ensuring that the lights are positioned a few inches above the plants. Adjust the height of the lights as the plants grow to maintain the optimal distance.
7. Maintain Light Schedule: Keep the grow lights on for 14-16 hours per day. Use a timer to automate the light schedule.
8. Water Regularly: Water the tomato plants when the top inch of soil feels dry to the touch. Avoid overwatering, as this can lead to root rot.
9. Fertilize Regularly: Fertilize the tomato plants with a balanced liquid fertilizer every 1-2 weeks, following the instructions on the fertilizer label.
10. Provide Air Circulation: Place a small fan near the plants to provide air circulation. This will help prevent fungal diseases.
11. Monitor pH: Use a pH meter to monitor the pH of the soil. Tomatoes prefer a pH of 6.0-6.8. Adjust the pH if necessary using lime (to raise the pH) or sulfur (to lower the pH).
12. Prune Regularly: Prune the tomato plants regularly to remove suckers (the small shoots that grow between the main stem and the branches). This will encourage the plant to focus its energy on producing fruit.
13. Pollinate the Flowers: Since you’re growing indoors, you’ll need to hand-pollinate the flowers. You can do this by gently shaking the plants or using a small paintbrush to transfer pollen from one flower to another.
14. Monitor for Pests and Diseases: Regularly inspect your tomato plants for pests and diseases. If you find any, take action immediately to prevent them from spreading. Insecticidal soap or neem oil can be effective for controlling many common tomato pests.
Phase 3: Harvesting and Enjoying Your Tomatoes
The moment we’ve all been waiting for! It’s time to reap the rewards of our hard work.
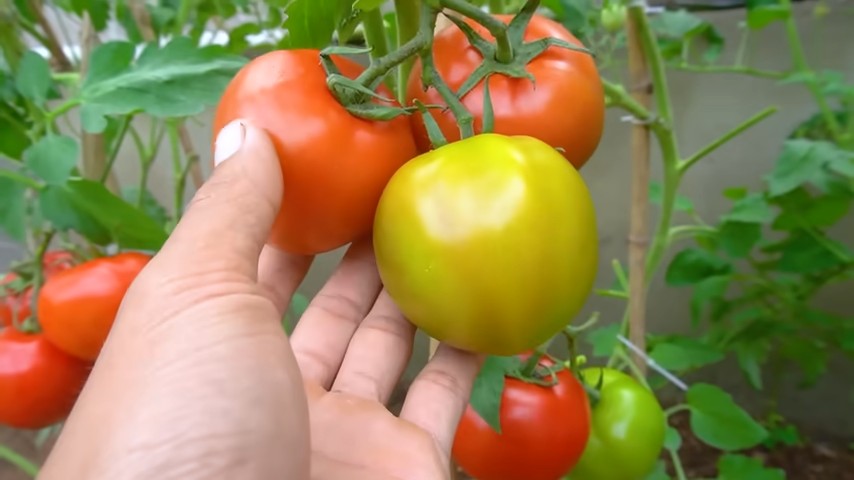
1. Harvest When Ripe: Harvest your tomatoes when they are fully colored and slightly soft to the touch. Gently twist the tomato from the vine.
2. Store Properly: Store your tomatoes at room temperature for the best flavor. Avoid refrigerating them, as this can make them mealy.
3. Enjoy! Use your homegrown tomatoes in salads, sauces, sandwiches, or simply eat them fresh off the vine.
Troubleshooting Tips
Even with the best planning, you might encounter some challenges along the way. Here are a few common issues and how to address them:
* Leggy Seedlings: This usually indicates that the seedlings aren’t getting enough light. Lower your grow lights or provide additional light.
* Yellowing Leaves: This could be a sign of nutrient deficiency. Make sure you’re fertilizing regularly with a balanced fertilizer.
* Blossom End Rot: This is caused by a calcium deficiency. Ensure consistent watering and consider adding calcium to the soil.
* Pests: Regularly inspect your plants for pests and take action immediately if you find any. Insecticidal soap or neem oil can be effective for controlling many common tomato pests.
* Fungal Diseases: Provide good air circulation and avoid overwatering to prevent fungal diseases.
Choosing the Right Tomato Variety
Selecting the right tomato variety is crucial for indoor success. As I mentioned earlier, determinate (bush) varieties are generally better suited
Conclusion
So, there you have it! Creating your own DIY indoor tomato growing system isn’t just a fun project; it’s a gateway to fresh, flavorful tomatoes year-round, regardless of your climate or outdoor space. We’ve walked you through the steps, highlighting the simplicity and cost-effectiveness of this method. But why is this a must-try?
Firstly, consider the unparalleled freshness. Store-bought tomatoes, even the organic varieties, often lack the vibrant taste of homegrown produce. With your own indoor system, you’re in control from seed to table, ensuring peak ripeness and maximum flavor. Imagine biting into a juicy, sun-warmed (or rather, grow-light-warmed!) tomato in the dead of winter – a taste of summer when you need it most.
Secondly, think about the sustainability aspect. By growing your own tomatoes indoors, you’re reducing your carbon footprint associated with transportation and commercial farming practices. You’re also minimizing the use of pesticides and herbicides, ensuring a healthier and more environmentally friendly food source.
Thirdly, it’s incredibly rewarding! There’s something deeply satisfying about nurturing a plant from a tiny seed to a bountiful producer. Watching your tomato plants thrive under your care is a therapeutic and educational experience, especially for families with children.
But the beauty of this DIY indoor tomato growing system lies in its adaptability. Feel free to experiment with different varieties of tomatoes. Cherry tomatoes, Roma tomatoes, and even dwarf varieties are all excellent choices for indoor growing. You can also adjust the lighting and nutrient solutions to optimize growth and yield.
Consider these variations:
* Hydroponics: For a soil-free approach, explore hydroponic systems. These systems use nutrient-rich water solutions to deliver essential elements directly to the roots.
* Aquaponics: Combine your tomato growing with fish farming! The fish waste provides nutrients for the plants, and the plants filter the water for the fish.
* Vertical Growing: Maximize your space by using vertical planters or stacking systems. This is especially useful for small apartments or limited indoor areas.
* Automated Systems: For the tech-savvy gardener, consider automating aspects of your system, such as watering and lighting, using timers and sensors.
Don’t be afraid to get creative and personalize your system to suit your needs and preferences. The key is to provide your plants with adequate light, water, nutrients, and support.
We’re confident that you’ll find this DIY indoor tomato growing system to be a worthwhile and enjoyable endeavor. It’s a simple, sustainable, and rewarding way to enjoy fresh, delicious tomatoes year-round.
So, what are you waiting for? Gather your supplies, follow our guide, and embark on your indoor tomato growing adventure today! We encourage you to share your experiences, tips, and photos with us and the wider gardening community. Let’s learn from each other and cultivate a thriving network of indoor tomato growers! Share your successes (and even your challenges!) in the comments below. We can’t wait to see what you create!
Frequently Asked Questions (FAQ)
What type of tomatoes are best for indoor growing?
The best tomato varieties for indoor growing are typically determinate or dwarf varieties, as they tend to be more compact and manageable in a confined space. Cherry tomatoes, Roma tomatoes, and patio tomatoes are excellent choices. Indeterminate varieties, which grow continuously, can also be grown indoors, but they require more pruning and support. Consider the size of your growing space and the amount of light available when selecting your tomato variety. Some popular choices include ‘Tiny Tim’, ‘Roma’, ‘Patio Princess’, and ‘Early Girl’ (though ‘Early Girl’ will need more space).
How much light do indoor tomato plants need?
Tomato plants require a significant amount of light to thrive and produce fruit. Ideally, they need at least 6-8 hours of direct sunlight per day. However, since natural sunlight can be limited indoors, especially during winter months, supplemental lighting is often necessary. LED grow lights are a popular and energy-efficient option. Look for full-spectrum LED lights that provide a balanced range of wavelengths to support all stages of plant growth. Position the lights close enough to the plants (usually 6-12 inches) to provide adequate intensity, but avoid burning the leaves.
What type of soil is best for indoor tomato plants?
A well-draining potting mix is essential for indoor tomato plants. Avoid using garden soil, as it can be too heavy and compact, leading to poor drainage and root rot. A good potting mix should be lightweight, airy, and contain a blend of peat moss, perlite, and vermiculite. You can also add compost or other organic matter to improve soil fertility. Ensure that the potting mix is pH-balanced, ideally between 6.0 and 6.8.
How often should I water my indoor tomato plants?
Watering frequency depends on several factors, including the size of the pot, the type of potting mix, the temperature, and the humidity. As a general rule, water your tomato plants when the top inch of soil feels dry to the touch. Water deeply, until water drains out of the bottom of the pot. Avoid overwatering, as this can lead to root rot. During hot and dry periods, you may need to water more frequently. Check the soil moisture regularly and adjust your watering schedule accordingly.
What kind of fertilizer do indoor tomato plants need?
Tomato plants are heavy feeders and require regular fertilization to produce abundant fruit. Use a balanced fertilizer that contains nitrogen, phosphorus, and potassium (NPK). A fertilizer with a ratio of 10-10-10 or 14-14-14 is a good starting point. During the vegetative growth stage, focus on a fertilizer with a higher nitrogen content to promote leafy growth. Once the plants start to flower and fruit, switch to a fertilizer with a higher phosphorus and potassium content to support fruit development. Follow the instructions on the fertilizer label for application rates and frequency.
How do I pollinate my indoor tomato plants?
Tomato plants are self-pollinating, meaning they can pollinate themselves. However, indoor plants may need some assistance, as there is no wind or insect activity to help with pollination. You can manually pollinate your tomato plants by gently shaking the plants or using a small brush to transfer pollen from one flower to another. You can also use a fan to create a gentle breeze that will help to distribute the pollen. Pollinating during the warmest part of the day, when the pollen is dry and easily released, is most effective.
How do I deal with pests and diseases on my indoor tomato plants?
Indoor tomato plants are less susceptible to pests and diseases than outdoor plants, but they can still be affected. Common pests include aphids, whiteflies, and spider mites. Regularly inspect your plants for signs of infestation and take action promptly. You can control pests by spraying the plants with insecticidal soap or neem oil. Diseases such as powdery mildew and blight can also affect indoor tomato plants. Ensure good air circulation and avoid overwatering to prevent these diseases. If you notice any signs of disease, remove the affected leaves and treat the plants with a fungicide.
How long does it take for indoor tomato plants to produce fruit?
The time it takes for indoor tomato plants to produce fruit depends on the variety, growing conditions, and care. Generally, it takes about 60-80 days from transplanting seedlings to harvesting the first ripe tomatoes. Cherry tomatoes tend to mature faster than larger varieties. Provide your plants with adequate light, water, nutrients, and support to ensure optimal growth and fruit production. Be patient, and you’ll soon be enjoying the delicious taste of homegrown tomatoes!
Leave a Comment