
Kitchen problem simple fixes are something we all crave, aren’t they? Let’s face it, the kitchen, the heart of our home, can sometimes feel more like a source of stress than a culinary haven. From stubborn stains to overflowing drawers, those little kitchen annoyances can really add up and steal our joy of cooking. But fear not, my fellow home chefs and kitchen enthusiasts! This isn’t just another list of cleaning tips; it’s your guide to reclaiming your kitchen space with clever DIY solutions and simple fixes that will make you wonder why you didn’t try them sooner.
Throughout history, kitchens have been central to family life and community. From ancient hearths to modern, sleek designs, the kitchen has always been a place of nourishment and connection. But even the most beautiful kitchen can become a source of frustration when plagued by everyday problems. That’s where these kitchen problem simple fixes come in.
I’m going to share some of my favorite DIY tricks and hacks that will transform your kitchen from a chaotic zone into an organized and efficient space. Whether it’s banishing fruit flies with a homemade trap or decluttering your pantry with repurposed containers, these solutions are designed to be easy, affordable, and, most importantly, effective. So, grab your apron, and let’s dive into the world of kitchen problem simple fixes and create a kitchen you’ll truly love!
DIY Kitchen Hacks to Solve Common Problems
Hey there, fellow home improvers! I’m so excited to share some of my favorite DIY kitchen hacks that have saved me time, money, and a whole lot of frustration. These are simple solutions to everyday kitchen problems, and I promise, you don’t need to be a master craftsman to pull them off. Let’s dive in!
Decluttering and Organizing Your Kitchen
A cluttered kitchen is a stressful kitchen. These hacks will help you maximize space and keep everything in its place.
* Maximize Vertical Space: Think up, not out!
* Utilize Drawer Dividers: Keep utensils and gadgets organized.
* Repurpose Jars and Containers: Perfect for pantry storage.
* Create a Spice Rack System: No more digging for that elusive cumin!
* Hang Utensils and Pots: Free up drawer and cabinet space.
Hack 1: DIY Under-Shelf Storage Baskets
This is one of my go-to solutions for adding extra storage without taking up valuable counter space.
Materials You’ll Need:
* Wire baskets (choose sizes that fit your shelves)
* Zip ties or strong adhesive hooks
* Measuring tape
* Pencil
Step-by-Step Instructions:
1. Measure Your Shelves: Before you buy anything, measure the thickness of your shelves. You need to make sure the zip ties or hooks you use will be able to securely attach to them. Also, measure the space between shelves to ensure the baskets will fit comfortably.
2. Prepare the Baskets: If you’re using zip ties, position the basket under the shelf where you want it to hang. Thread the zip ties through the basket’s wire mesh and around the shelf. If you’re using adhesive hooks, clean the underside of the shelf with rubbing alcohol and let it dry completely. Then, attach the hooks according to the manufacturer’s instructions. Make sure they are strong enough to hold the weight of the basket and its contents.
3. Secure the Baskets: If using zip ties, tighten them securely and trim off any excess. If using adhesive hooks, let the adhesive cure for the recommended time (usually 24-48 hours) before placing anything in the baskets.
4. Organize Your Items: Now for the fun part! Use these baskets to store things like dish towels, cleaning supplies, or even small appliances. I use mine to hold extra sponges and scrub brushes.
Hack 2: DIY Magnetic Knife Strip
Say goodbye to bulky knife blocks taking up precious counter space! This magnetic knife strip is sleek, safe, and keeps your knives within easy reach.
Materials You’ll Need:
* A strong magnetic strip (available at hardware stores or online)
* A piece of wood (slightly longer than the magnetic strip)
* Wood stain or paint (optional)
* Sandpaper (optional)
* Screws and wall anchors
* Drill
* Level
* Measuring tape
* Pencil
Step-by-Step Instructions:
1. Prepare the Wood: If you want to stain or paint the wood, now’s the time. First, sand the wood smooth with sandpaper. Then, apply your chosen stain or paint according to the manufacturer’s instructions. Let it dry completely. This step is optional, but it will give your knife strip a more polished look.
2. Attach the Magnetic Strip: Center the magnetic strip on the wood and mark its position with a pencil. Use screws to attach the magnetic strip to the wood. Make sure the screws are flush with the surface of the magnetic strip so they don’t scratch your knives.
3. Mark the Mounting Holes: Use a level to determine where you want to mount the knife strip on the wall. Mark the positions for the mounting holes on the wall, making sure they align with the studs in the wall for maximum support. If you can’t find studs, use wall anchors.
4. Drill the Holes: Drill pilot holes into the wall at the marked locations. If using wall anchors, insert them into the holes.
5. Mount the Knife Strip: Align the knife strip with the holes in the wall and screw it into place. Make sure it’s securely attached.
6. Test and Enjoy: Carefully attach your knives to the magnetic strip. Make sure they are held securely. Now you have a stylish and functional knife storage solution!
Hack 3: DIY Produce Storage Bags
Keep your fruits and vegetables fresher for longer with these reusable produce storage bags. They’re eco-friendly and help reduce food waste.
Materials You’ll Need:
* Muslin or cotton fabric
* Drawstring cord or ribbon
* Sewing machine or needle and thread
* Scissors
* Measuring tape
* Pencil
Step-by-Step Instructions:
1. Cut the Fabric: Cut two pieces of fabric to the desired size for your bags. I usually make a few different sizes to accommodate different types of produce. For example, a 12×16 inch rectangle for larger items like lettuce and a 8×10 inch rectangle for smaller items like apples. Remember to add extra seam allowance (about 1/2 inch) on all sides.
2. Sew the Sides: Place the two pieces of fabric right sides together and sew along three sides, leaving the top open. Use a straight stitch and a seam allowance of 1/2 inch.
3. Finish the Top Edge: Fold the top edge down twice (about 1/4 inch each time) and press with an iron. This will create a clean, finished edge. Sew along the folded edge to secure it.
4. Create the Drawstring Casing: Fold the top edge down again (about 1 inch) and press with an iron. Sew along the bottom edge of the fold, leaving a small opening (about 1 inch) for the drawstring.
5. Insert the Drawstring: Use a safety pin to thread the drawstring cord or ribbon through the casing. Start at the opening and work your way around until you reach the opening again.
6. Tie the Drawstring: Tie the ends of the drawstring together in a knot.
7. Store Your Produce: Moisten the bags slightly before storing your produce. This will help keep them fresh and hydrated. Store the bags in the refrigerator.
Hack 4: DIY Cabinet Door Organizer
This is a fantastic way to utilize the often-overlooked space on the inside of your cabinet doors.
Materials You’ll Need:
* Wire baskets or plastic containers
* Screws
* Drill
* Measuring tape
* Pencil
Step-by-Step Instructions:
1. Measure Your Cabinet Door: Measure the inside of your cabinet door to determine the size of the baskets or containers you can use. Make sure to leave enough space so the door can close properly.
2. Position the Baskets/Containers: Position the baskets or containers on the inside of the cabinet door where you want them to be. Use a pencil to mark the locations for the screw holes.
3. Drill Pilot Holes: Drill pilot holes into the cabinet door at the marked locations. This will prevent the wood from splitting when you insert the screws.
4. Attach the Baskets/Containers: Use screws to attach the baskets or containers to the cabinet door. Make sure the screws are long enough to go through the basket/container and into the door, but not so long that they poke through the other side.
5. Organize Your Items: Use this organizer to store things like spices, cleaning supplies, or even pot lids. I use mine to hold my measuring cups and spoons.
Hack 5: DIY Sink Caddy
Keep your sink area tidy and organized with this simple DIY sink caddy.
Materials You’ll Need:
* A plastic container (like a soap dish or a small storage container)
* Suction cups with hooks
* Drill (optional)
Step-by-Step Instructions:
1. Prepare the Container: If your container doesn’t already have holes for drainage, drill a few small holes in the bottom. This will prevent water from pooling in the caddy.
2. Attach the Suction Cups: Attach the suction cups to the back of the container. If the suction cups don’t have hooks, you can use a strong adhesive to attach them.
3. Mount the Caddy: Press the suction cups firmly against the inside of your sink. Make sure they are securely attached.
4. Organize Your Items: Use this caddy to store your sponges, scrub brushes, and dish soap.
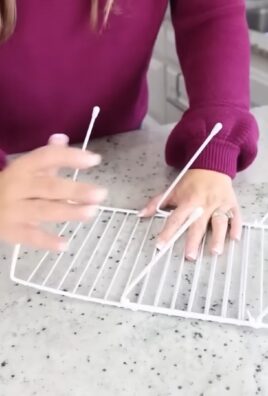
Hack 6: Revive Dull Stainless Steel
Is your stainless steel looking a little lackluster? This simple hack will bring back its shine.
Materials You’ll Need:
* White vinegar
* Olive oil
* Two soft cloths
Conclusion
So, there you have it! This simple DIY trick for tackling common kitchen problems is more than just a quick fix; it’s a game-changer for maintaining a clean, efficient, and enjoyable cooking space. We’ve all been there – staring down a greasy stovetop, battling stubborn food stains, or wrestling with a dull knife. These seemingly small issues can quickly snowball, turning your kitchen into a source of frustration rather than a haven for culinary creativity.
This method, however, offers a practical, cost-effective, and surprisingly satisfying solution. By utilizing readily available household ingredients and a few simple steps, you can reclaim your kitchen and restore it to its former glory. Think of the time you’ll save not scrubbing endlessly at burnt-on food, the money you’ll save on expensive cleaning products, and the satisfaction of knowing you’ve conquered those pesky kitchen challenges with your own two hands.
But the benefits extend beyond mere practicality. This DIY approach is also a more sustainable and eco-friendly option. By reducing your reliance on harsh chemicals and disposable cleaning supplies, you’re contributing to a healthier environment for yourself and your family. Plus, there’s a certain sense of empowerment that comes from mastering these simple skills and becoming more self-sufficient in your home.
Don’t be afraid to experiment and personalize this DIY trick to suit your specific needs and preferences. For instance, if you’re dealing with particularly stubborn stains, you might try adding a bit of baking soda to your cleaning solution for extra scrubbing power. Or, if you prefer a more fragrant kitchen, you could infuse your cleaning mixture with a few drops of your favorite essential oil, such as lemon or lavender.
Consider these variations:
* For stainless steel appliances: A mixture of vinegar and water, followed by a wipe down with a microfiber cloth, will leave your appliances sparkling and streak-free.
* For wooden cutting boards: A paste of baking soda and lemon juice can help to disinfect and deodorize your cutting boards, leaving them fresh and ready for use.
* For dull knives: While this article focuses on cleaning, remember that a sharp knife is a safe knife. Invest in a good quality knife sharpener and learn how to use it properly to keep your knives in top condition.
Ultimately, the key to success with this DIY trick is to be proactive and consistent. Don’t wait until your kitchen is in complete disarray before taking action. Incorporate these simple cleaning and maintenance tasks into your regular routine, and you’ll find that keeping your kitchen clean and organized becomes much easier and less time-consuming.
We are confident that this DIY kitchen problem solver will become an indispensable part of your household routine. So, go ahead and give it a try! We encourage you to share your experiences, tips, and variations in the comments below. Let us know how this trick has worked for you and any other creative solutions you’ve discovered along the way. Together, we can create a community of resourceful and empowered home cooks who are passionate about maintaining a clean, efficient, and enjoyable kitchen. Embrace the power of DIY and transform your kitchen into a space you truly love!
Frequently Asked Questions (FAQ)
Q: What are the main benefits of using this DIY kitchen cleaning trick compared to commercial cleaners?
A: There are several key advantages to opting for this DIY approach. Firstly, it’s significantly more cost-effective. You’re using ingredients you likely already have in your pantry, such as vinegar, baking soda, and lemon juice, which are far cheaper than specialized cleaning products. Secondly, it’s much safer for your health and the environment. Commercial cleaners often contain harsh chemicals that can be harmful to your skin, lungs, and the planet. This DIY method relies on natural, non-toxic ingredients. Finally, it’s incredibly versatile and can be adapted to tackle a wide range of kitchen cleaning challenges.
Q: Is this DIY cleaning method effective for all types of kitchen surfaces?
A: While this DIY trick is generally effective for most kitchen surfaces, it’s always a good idea to test it on a small, inconspicuous area first, especially on delicate materials like natural stone or certain types of wood. For example, while vinegar is great for many surfaces, it can etch marble. Baking soda can be abrasive, so use it gently on easily scratched surfaces. Always research the specific cleaning requirements of your kitchen surfaces before applying any cleaning solution.
Q: How often should I use this DIY cleaning trick to maintain a clean kitchen?
A: The frequency depends on your cooking habits and the level of use your kitchen gets. For general cleaning, aim to use this DIY method at least once a week. For high-traffic areas like the stovetop and countertops, you may need to clean them more frequently, perhaps daily or after each use. Regular maintenance will prevent grime and stains from building up, making cleaning much easier in the long run.
Q: Can I use essential oils in this DIY cleaning solution, and if so, which ones are recommended?
A: Absolutely! Adding essential oils can enhance the cleaning power and leave your kitchen smelling fresh and clean. Lemon, tea tree, eucalyptus, and lavender are all excellent choices due to their antibacterial and antifungal properties. Add a few drops of your preferred essential oil to the cleaning solution for an extra boost. However, be mindful of potential allergies and avoid using essential oils that may be harmful to pets or children.
Q: What if I have extremely stubborn stains or grease buildup in my kitchen?
A: For particularly stubborn stains or grease buildup, you may need to increase the concentration of the cleaning solution or use a more abrasive cleaning tool. For example, you could create a paste of baking soda and water and apply it directly to the stain, letting it sit for a few minutes before scrubbing. You can also use a scrub brush or a non-scratch scouring pad to help remove stubborn grime. In some cases, you may need to repeat the cleaning process several times to achieve the desired results.
Q: How do I store the DIY cleaning solution, and how long will it last?
A: Store the DIY cleaning solution in a clean, airtight spray bottle or container. Label the container clearly with the ingredients and date. The solution should last for several weeks, but it’s best to use it within a month for optimal effectiveness. If you notice any changes in color, odor, or consistency, discard the solution and make a fresh batch.
Q: Is this DIY cleaning method safe for families with young children and pets?
A: Yes, this DIY cleaning method is generally safe for families with young children and pets, as it relies on natural, non-toxic ingredients. However, it’s still important to take precautions to prevent accidental ingestion. Store the cleaning solution out of reach of children and pets, and supervise them closely during cleaning. If you’re using essential oils, be sure to choose pet-safe options and avoid using them in areas where your pets spend a lot of time.
Q: Can this DIY trick be used to clean my oven?
A: Yes, a variation of this DIY trick can be used to clean your oven. Make a paste of baking soda and water and spread it evenly throughout the oven, avoiding the heating elements. Let it sit overnight, then scrub the oven clean with a damp sponge or cloth. You can also add a bit of vinegar to the cleaning process for extra cleaning power. Be sure to rinse the oven thoroughly with water to remove any remaining baking soda residue.
Q: What are some other simple kitchen fixes I can implement to keep my kitchen running smoothly?
A: Beyond cleaning, consider these simple fixes:
* Declutter regularly: Get rid of unused kitchen gadgets and expired food items to create more space and reduce clutter.
* Organize your pantry: Use clear containers and labels to keep your pantry organized and make it easier to find what you need.
* Sharpen your knives: A sharp knife is a safe knife. Invest in a good quality knife sharpener and learn how to use it properly.
* Fix leaky faucets: A dripping faucet can waste a significant amount of water over time. Repair or replace leaky faucets promptly.
* Clean your refrigerator coils: Dirty refrigerator coils can reduce the efficiency of your refrigerator. Clean them regularly to keep your refrigerator running smoothly.
By implementing these simple fixes, you can create a more efficient, enjoyable, and sustainable kitchen environment.
Leave a Comment