
Microwave cleaning with lemon – sounds too good to be true, right? I know, I thought so too! But trust me, this simple DIY trick will revolutionize your kitchen cleaning routine. Forget harsh chemicals and endless scrubbing; we’re harnessing the power of nature to banish splatters and odors from your microwave in minutes.
The concept of using citrus for cleaning isn’t new. In fact, our grandmothers likely used lemon juice to brighten surfaces and disinfect their homes. Lemons have been valued for centuries, not only for their culinary uses but also for their natural antibacterial and deodorizing properties. Think of it as a time-tested, eco-friendly cleaning solution passed down through generations!
Let’s face it, cleaning the microwave is one of those chores we all dread. Burnt-on food, lingering smells, and the sheer awkwardness of reaching into that small space make it a task we often put off. But a dirty microwave isn’t just unsightly; it can also harbor bacteria and affect the taste of your food. That’s why this microwave cleaning with lemon hack is so essential. It’s quick, easy, and uses ingredients you probably already have in your kitchen. I’m excited to share this simple yet effective method that will leave your microwave sparkling clean and smelling fresh!
DIY Microwave Cleaning with Lemon: A Zesty Fresh Start!
Hey there, fellow DIY enthusiasts! Are you tired of staring into your microwave and seeing a Jackson Pollock painting of splattered sauces and mysterious food remnants? I know I was! That’s why I’m sharing my go-to, super-easy, and all-natural method for cleaning your microwave using just one simple ingredient: a lemon! Forget harsh chemicals and elbow grease; this method harnesses the power of steam and citrus to loosen grime and leave your microwave smelling amazing. Let’s get started!
What You’ll Need:
* 1 Lemon (preferably fresh, but bottled lemon juice works in a pinch)
* 1 Microwave-safe bowl
* 1 Cup of water
* A clean sponge or cloth
Step-by-Step Instructions:
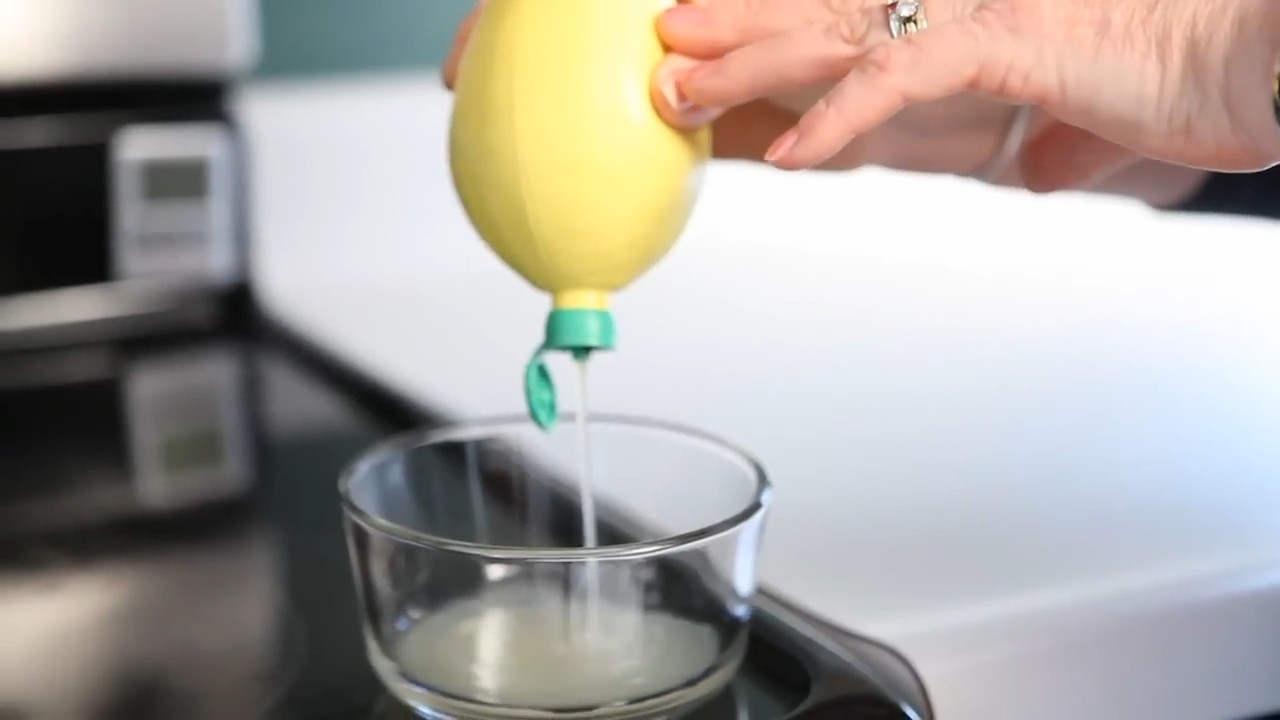
1. Prepare the Lemon: First things first, grab your lemon. You have a couple of options here. You can either cut the lemon in half or slice it into several wedges. I personally prefer wedges because I think it releases more of the lemon’s goodness into the water. If you’re using bottled lemon juice, measure out about 2 tablespoons.
2. Combine Lemon and Water: Now, take your microwave-safe bowl and pour in the cup of water. Add your lemon halves, wedges, or lemon juice to the water. If you’re using lemon pieces, squeeze them slightly to release their juice into the water. This is where the magic starts!
3. Microwave the Mixture: Place the bowl with the lemon water into your microwave. Set the timer for 3 minutes on high. The water will boil, creating steam that will coat the inside of your microwave. This is the key to loosening all that stubborn gunk!
4. Let it Steam: Once the microwave stops, resist the urge to open the door immediately! Let the bowl sit inside the microwave for another 5 minutes. This allows the steam to continue working its magic, softening even the most hardened food splatters. Think of it as a mini-sauna for your microwave!
5. Carefully Remove the Bowl: After the 5 minutes are up, carefully remove the bowl from the microwave. Be cautious, as the bowl and water will be very hot! Use oven mitts or a towel to protect your hands.
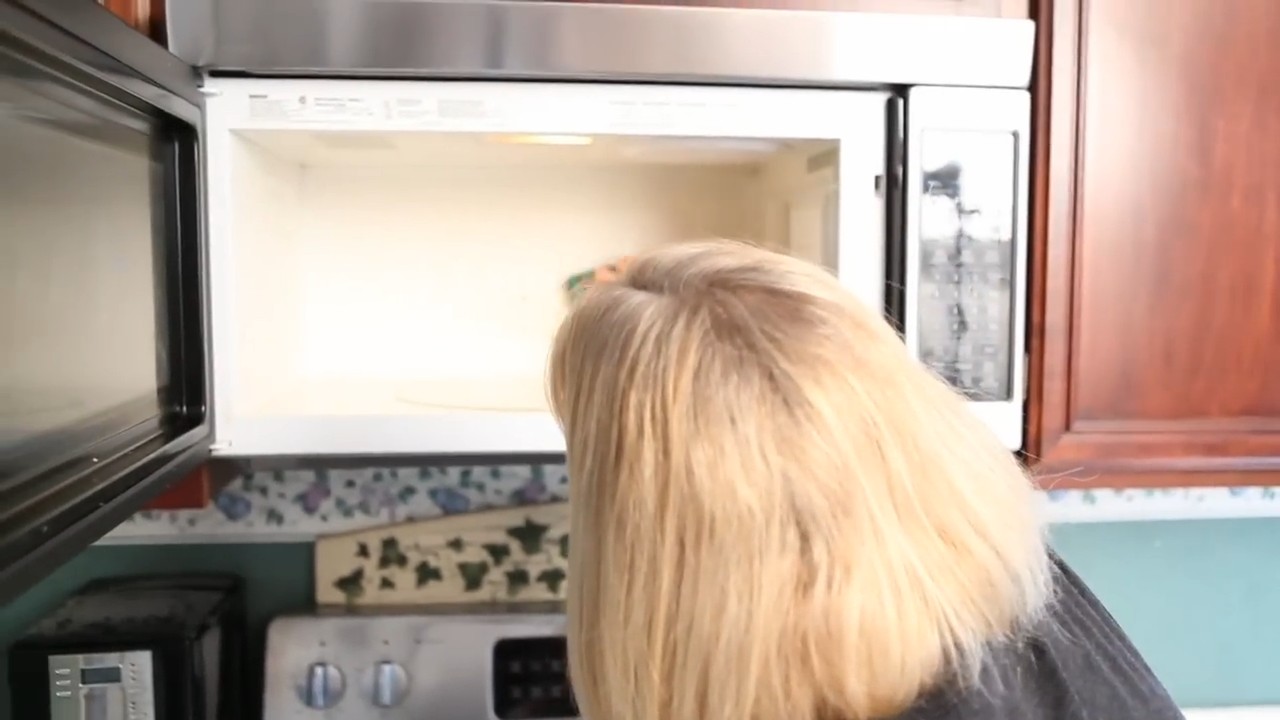
6. Wipe Down the Interior: Now comes the satisfying part! Take your clean sponge or cloth and wipe down the interior of the microwave. You’ll be amazed at how easily the grime comes off. The steam and lemon juice have loosened everything, making it a breeze to clean. Pay special attention to the top, sides, and bottom of the microwave, as well as the turntable.
7. Clean the Turntable and Roller Ring: Remove the turntable and roller ring from the microwave. Wash them with warm, soapy water. Rinse them thoroughly and dry them before placing them back in the microwave. These parts often accumulate food debris, so giving them a good cleaning is essential.
8. Dry the Interior: Once you’ve wiped down the entire interior, use a clean, dry cloth to dry any remaining moisture. This will help prevent water spots and leave your microwave sparkling clean.
9. Enjoy Your Freshly Cleaned Microwave: Step back and admire your work! Your microwave should now be clean, fresh-smelling, and ready for its next culinary adventure.
Troubleshooting and Tips:
* Stubborn Stains: If you encounter any stubborn stains that don’t come off easily, try dipping your sponge or cloth in the lemon water and scrubbing the area a bit more vigorously. You can also let the lemon water sit on the stain for a few minutes before wiping it away.
* Smelly Microwave: If your microwave has a lingering odor, you can repeat the process with a fresh lemon. The lemon’s natural fragrance will help neutralize any unpleasant smells.
* Preventative Measures: To keep your microwave clean, try covering your food with a microwave-safe lid or plastic wrap when heating it up. This will help prevent splatters and make cleaning easier in the long run.
* Lemon Juice Substitute: While fresh lemon is ideal, bottled lemon juice works just fine. Just make sure it’s pure lemon juice and not a lemon-flavored syrup.
* Vinegar Option: If you don’t have a lemon on hand, you can use white vinegar instead. Follow the same steps, substituting the lemon with 2 tablespoons of white vinegar. Vinegar is also a great natural cleaner and deodorizer.
* Frequency: I try to clean my microwave at least once a week, or more often if I’ve had a particularly messy cooking session. Regular cleaning prevents grime from building up and makes the job much easier.
* Safety First: Always be careful when handling hot bowls and water. Use oven mitts or a towel to protect your hands. And never leave the microwave unattended while it’s running.
* Lemon Zest Boost: For an extra boost of lemon fragrance, you can add a few strips of lemon zest to the water along with the lemon juice or wedges. The zest contains essential oils that will enhance the lemony aroma.
* Don’t Overheat: While the 3-minute microwave time works well for most microwaves, you may need to adjust it depending on your microwave’s power. Keep an eye on the water and make sure it doesn’t boil over.
* Reusing the Lemon: After cleaning your microwave, don’t throw away the lemon! You can use it to freshen up your garbage disposal or add it to a pot of simmering water to deodorize your kitchen.
Why This Method Works: The Science Behind the Sparkle
So, why does this simple lemon and water trick work so well? It’s all about the power of steam and citric acid!
* Steam Power: The boiling water creates steam that fills the microwave. This steam penetrates the dried food splatters, softening them and making them easier to wipe away. Think of it like a facial for your microwave, opening up the pores (or, in this case, the food particles) and releasing the grime.
* Citric Acid Magic: Lemons are packed with citric acid, a natural cleaning agent. Citric acid helps to break down grease and grime, making it easier to remove. It also has antibacterial properties, which help to sanitize your microwave. Plus, it leaves behind a fresh, clean scent.
Beyond the Microwave: Other Uses for Lemon Cleaning
The cleaning power of lemons doesn’t stop at the microwave! Here are a few other ways you can use lemons to clean your home:
* Cutting Boards: Rub a lemon half over your wooden cutting board to disinfect it and remove odors.
* Garbage Disposal: Toss a few lemon wedges into your garbage disposal to freshen it up and prevent clogs.
* Chrome Fixtures: Rub a lemon half over chrome fixtures to remove water spots and make them shine.
* Coffee Maker: Run a cycle with a mixture of water and lemon juice to descale your coffee maker.
* Tea Kettle: Boil water with a few lemon slices in your tea kettle to remove mineral deposits.
My Personal Experience: A Microwave Cleaning Journey
I’ve been using this lemon cleaning method for years, and it’s never failed me. Before I discovered this trick, I used to dread cleaning my microwave. It was always a messy, time-consuming chore that involved harsh chemicals and a lot of scrubbing. But now, thanks to the power of lemons, cleaning my microwave is quick, easy, and even a little bit enjoyable!
I remember one time when my microwave was particularly gross. I had accidentally microwaved a bowl of spaghetti sauce without covering it, and the entire inside of the microwave was covered in red splatters. I was convinced that I would never be able to get it clean. But I decided to give the lemon cleaning method a try, and to my surprise, it worked like a charm! The steam and lemon juice loosened all the dried sauce, and I was able to wipe it away with ease. My microwave looked brand new again!
Since then, I’ve become a huge advocate for natural cleaning methods. I love that they’re safe, effective, and environmentally friendly. And the best part is, they often use ingredients that you already have in your kitchen!
So, there you have it! My simple and effective method for cleaning your microwave with a lemon. Give it a try, and I promise you won’t be disappointed. Say goodbye to greasy grime and hello to a sparkling clean microwave! Happy cleaning!
Conclusion
So, there you have it! A simple, effective, and all-natural way to banish microwave grime and odors using just a lemon and a little water. Forget harsh chemicals and hours of scrubbing. This DIY microwave cleaning trick is a game-changer for anyone looking to maintain a sparkling clean kitchen without the fuss.
Why is this a must-try? Because it’s not just about cleaning; it’s about creating a healthier and more pleasant cooking environment. The lemon not only loosens stubborn food splatters but also infuses your microwave with a fresh, citrusy scent that will invigorate your senses every time you open the door. Think of it as a mini aromatherapy session every time you heat up your leftovers!
But the benefits don’t stop there. This method is incredibly cost-effective. Lemons are readily available and relatively inexpensive, making this a budget-friendly alternative to commercial microwave cleaners. Plus, you’re reducing your exposure to potentially harmful chemicals, which is always a win for your health and the environment.
Looking to add a little twist? Consider these variations:
* **Add a few drops of essential oil:** For an extra boost of fragrance, add a few drops of your favorite essential oil to the lemon water mixture. Lavender, eucalyptus, or tea tree oil are all great options for their cleaning and aromatherapy properties. Just be sure to use oils that are safe for use in a microwave.
* **Use lime instead of lemon:** If you prefer the scent of lime, feel free to substitute it for lemon. The cleaning power will be just as effective.
* **Include a splash of vinegar:** For extra stubborn grime, add a tablespoon of white vinegar to the lemon water mixture. Vinegar is a natural degreaser and will help to break down even the toughest food stains.
We’re confident that once you try this DIY microwave cleaning method, you’ll never go back to harsh chemicals again. It’s quick, easy, and leaves your microwave smelling amazing.
Now it’s your turn! Give this simple trick a try and see the difference it makes. We’re eager to hear about your experience. Did it work as well for you as it did for us? Did you try any of the variations? Share your thoughts, tips, and photos in the comments below. Let’s create a community of clean microwave enthusiasts! We believe that a clean microwave is a happy microwave, and a happy microwave leads to a happy kitchen. So, grab a lemon, get cleaning, and let us know how it goes!
Frequently Asked Questions (FAQ)
1. How does the lemon actually clean the microwave?
The magic lies in the combination of heat and steam. When the lemon water mixture is heated in the microwave, it creates steam that loosens the dried food particles stuck to the interior walls. The citric acid in the lemon acts as a natural degreaser and disinfectant, helping to break down grease and kill bacteria. The steam also helps to soften the grime, making it much easier to wipe away. It’s a simple yet effective chemical reaction that harnesses the power of nature to clean your microwave.
2. Can I use bottled lemon juice instead of a fresh lemon?
While fresh lemon is ideal for its natural oils and fragrance, bottled lemon juice can be used in a pinch. However, keep in mind that bottled lemon juice may not be as potent as fresh lemon juice, so you might need to use a slightly larger amount. Also, be sure to use pure lemon juice without any added sugars or preservatives. The best results will always come from using a fresh lemon, though.
3. How long should I microwave the lemon water mixture?
The recommended time is typically 3-5 minutes, but this can vary depending on the power of your microwave. You want the mixture to come to a rolling boil and create plenty of steam. If your microwave is particularly weak, you might need to microwave it for a longer period. Keep a close eye on it to prevent the water from boiling over. The goal is to create a steamy environment inside the microwave.
4. What if the grime is really stubborn and doesn’t come off easily?
For particularly stubborn grime, let the lemon water mixture sit inside the microwave for an additional 5-10 minutes after microwaving. This will allow the steam to further penetrate and loosen the grime. You can also try adding a tablespoon of baking soda to the lemon water mixture for extra cleaning power. Baking soda is a mild abrasive that can help to scrub away tough stains. If all else fails, repeat the process with a fresh lemon water mixture.
5. Is this method safe for all types of microwaves?
This method is generally safe for most types of microwaves, but it’s always a good idea to check your microwave’s manual for any specific cleaning instructions or warnings. Avoid using abrasive scrubbers or harsh chemicals, as these can damage the interior of your microwave. If you have any concerns, test the method on a small, inconspicuous area first.
6. How often should I clean my microwave using this method?
The frequency of cleaning depends on how often you use your microwave and how messy it gets. As a general rule, it’s a good idea to clean your microwave at least once a week to prevent grime from building up. If you frequently heat up messy foods, you might need to clean it more often. Regular cleaning will not only keep your microwave looking and smelling fresh but also prevent the buildup of bacteria and mold.
7. What kind of container should I use for the lemon water mixture?
Use a microwave-safe bowl or container that is large enough to hold the lemon water mixture without overflowing. A glass or ceramic bowl is a good option. Avoid using plastic containers, as they can melt or warp in the microwave. Make sure the container is also easy to handle, as it will be hot after microwaving.
8. Can I use this method to clean the outside of my microwave?
While this method is primarily designed for cleaning the inside of your microwave, you can also use the lemon-infused water to wipe down the outside. Simply dip a clean cloth into the water and wipe down the exterior surfaces. Be sure to dry the surfaces thoroughly afterward. The lemon scent will also help to freshen up your entire kitchen.
9. What other natural cleaning agents can I use in my microwave?
Besides lemon, other natural cleaning agents that you can use in your microwave include vinegar, baking soda, and tea tree oil. Vinegar is a great degreaser and disinfectant, while baking soda is a mild abrasive that can help to scrub away tough stains. Tea tree oil has antibacterial and antifungal properties. You can use these ingredients alone or in combination with each other to create a powerful and natural cleaning solution.
10. What if I don’t like the smell of lemon?
If you’re not a fan of the lemon scent, you can try using other citrus fruits like lime or orange. You can also add a few drops of your favorite essential oil to the water mixture to create a more personalized fragrance. Lavender, eucalyptus, and peppermint are all great options for their cleaning and aromatherapy properties. Just be sure to use oils that are safe for use in a microwave.


Leave a Comment