
Pineapple plant terrace trick – ever dreamt of transforming your balcony or patio into a lush, tropical paradise? I know I have! Imagine stepping outside and being greeted by the sight of vibrant greenery, maybe even a spiky pineapple or two. It sounds idyllic, right?
For centuries, cultivating plants in limited spaces has been a necessity and an art form. From the hanging gardens of Babylon to the modern-day urban farmer, people have always found creative ways to bring nature closer to home. This DIY article dives into a clever technique that allows you to maximize your space and create a stunning display: the pineapple plant terrace trick.
Why do you need this trick? Well, let’s face it, space is often a premium, especially in urban environments. Traditional gardening can be challenging when you’re limited to a small balcony or patio. But with this simple yet effective method, you can grow multiple pineapple plants (and other compatible plants!) in a compact and visually appealing way. Plus, it’s a fantastic conversation starter! This pineapple plant terrace trick not only saves space but also creates a unique and eye-catching feature in your outdoor area. Get ready to impress your friends and neighbors with your green thumb and innovative gardening skills!
Grow Your Own Pineapple: From Kitchen Scrap to Tropical Treat!
Hey there, fellow plant enthusiasts! Ever dreamt of having your own pineapple plant, maybe even harvesting a homegrown pineapple right on your terrace? Well, guess what? It’s totally doable, and I’m here to guide you through the process. It’s easier than you think, and incredibly rewarding. We’re going to take that pineapple top you’d normally toss and turn it into a beautiful, fruit-bearing plant. Let’s get started!
What You’ll Need
Before we dive in, let’s gather our supplies. This is a pretty low-cost project, which is always a win!
* A fresh pineapple with a healthy-looking top (the greener, the better!). Look for one that isn’t overly ripe or bruised.
* A sharp knife.
* A small bowl or glass.
* Water.
* A well-draining potting mix (cactus mix works great!).
* A pot (6-8 inches in diameter to start).
* Optional: Rooting hormone powder.
* Gardening gloves (optional, but recommended).
Preparing the Pineapple Top
This is the most crucial step, so pay close attention! We need to prepare the pineapple top to encourage root growth.
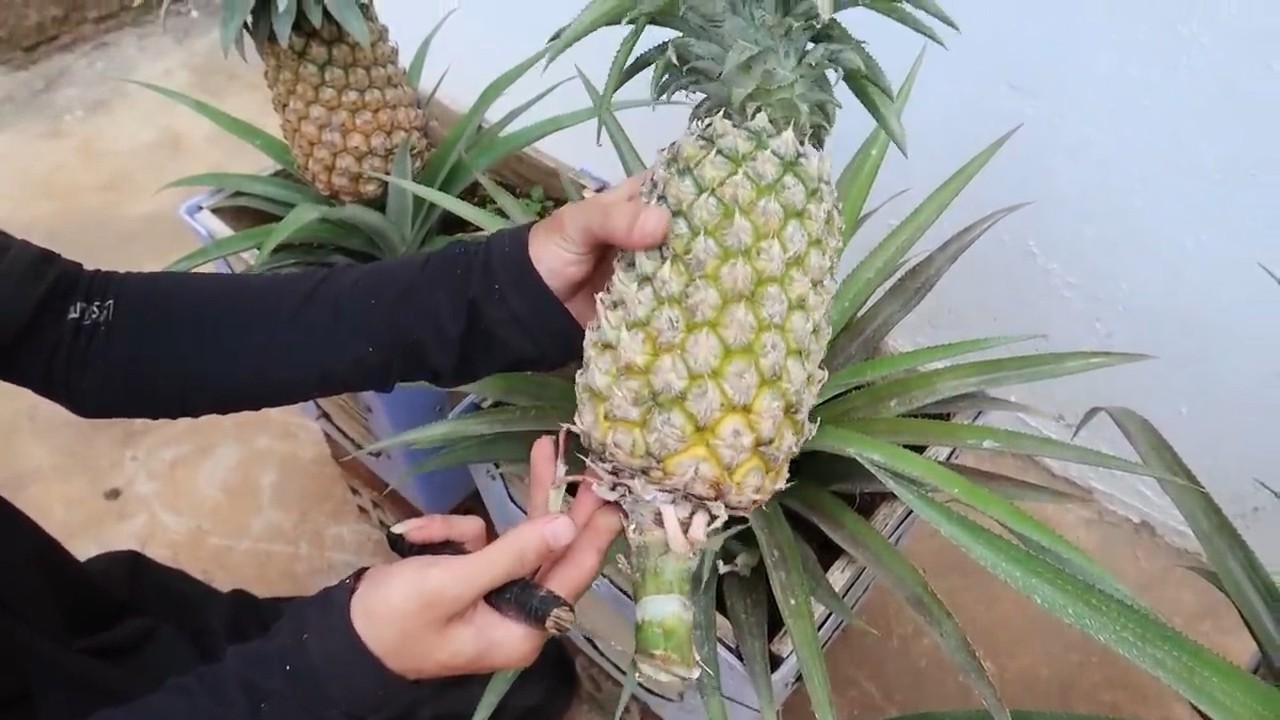
1. Twist or Cut Off the Top: Hold the pineapple body firmly and twist the top off. If it doesn’t twist easily, use your sharp knife to carefully cut it off, leaving about an inch of fruit attached to the base of the leaves.
2. Remove the Excess Fruit: This is important! Any remaining fruit will rot and can prevent root growth. Carefully peel away or cut off all the fruit from the base of the pineapple top. You want to expose the stem where the roots will eventually emerge. Don’t worry if you accidentally remove a few of the bottom leaves in the process.
3. Peel Back the Bottom Leaves: Gently peel back several layers of the bottom leaves, about an inch or two up the stem. This will expose more of the stem and encourage root development. You should see little brown bumps – these are root primordia, where the roots will sprout from.
4. Let it Callus: This is a crucial step to prevent rot. Place the prepared pineapple top in a cool, dry place for 2-3 days. This allows the cut end to callus over, forming a protective layer.
Rooting the Pineapple Top
Now that our pineapple top is prepped, it’s time to get those roots growing! We have two main methods: water rooting and direct planting. I personally prefer water rooting because you can see the roots develop, but direct planting works too.
Water Rooting Method
1. Place in Water: Fill your small bowl or glass with water. The water level should be just high enough to cover the exposed stem, but not the leaves.
2. Find a Sunny Spot: Place the bowl with the pineapple top in a bright, indirect sunlight location. Avoid direct sunlight, which can scorch the leaves.
3. Change the Water Regularly: Change the water every 2-3 days to keep it fresh and prevent algae growth.
4. Be Patient: Root development can take several weeks, sometimes even a month or two. You should start to see small roots emerging from the stem. Don’t get discouraged if it takes a while!
5. Transplant to Soil: Once the roots are about 2-3 inches long, it’s time to transplant your pineapple top to soil.
Direct Planting Method
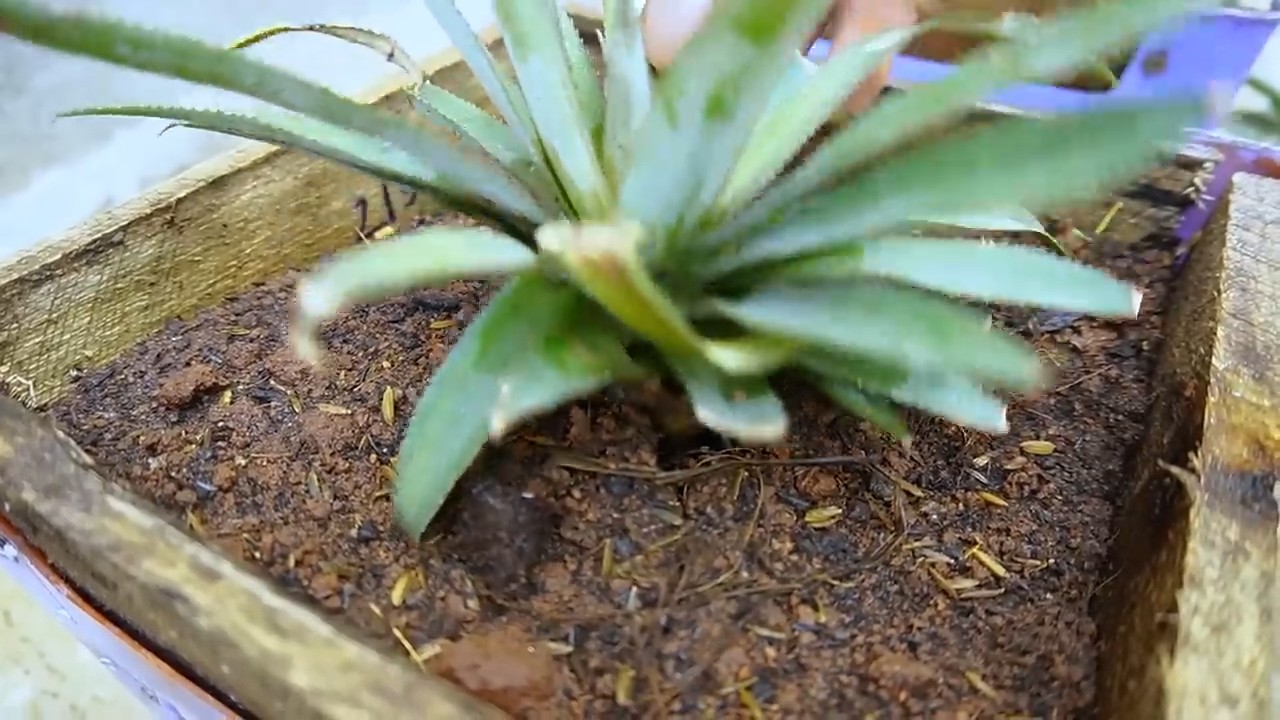
1. Prepare the Pot: Fill your pot with well-draining potting mix.
2. Optional: Dip in Rooting Hormone: If you have rooting hormone powder, dip the calloused end of the pineapple top into the powder. This can help speed up root development.
3. Plant the Pineapple Top: Make a hole in the center of the potting mix and plant the pineapple top, burying the stem up to the base of the leaves.
4. Water Thoroughly: Water the soil thoroughly until water drains out of the bottom of the pot.
5. Find a Sunny Spot: Place the pot in a bright, indirect sunlight location.
Planting and Caring for Your Pineapple Plant
Whether you water-rooted or directly planted, the next steps are the same. Now it’s time to nurture your little pineapple plant!
1. Choose the Right Pot: Start with a pot that’s about 6-8 inches in diameter. As the plant grows, you’ll need to repot it into a larger container. Pineapples can get quite large!
2. Use Well-Draining Soil: Pineapples need well-draining soil to prevent root rot. A cactus or succulent mix works perfectly. You can also amend regular potting mix with perlite or sand to improve drainage.
3. Sunlight is Key: Pineapples thrive in bright sunlight. Aim for at least 6 hours of direct sunlight per day. If you’re growing your pineapple indoors, place it near a sunny window or use a grow light.
4. Watering: Water your pineapple plant when the top inch of soil feels dry to the touch. Water thoroughly until water drains out of the bottom of the pot. Avoid overwatering, as this can lead to root rot. In the winter, you’ll need to water less frequently.
5. Fertilizing: Feed your pineapple plant with a balanced liquid fertilizer every 2-3 months during the growing season (spring and summer). Follow the instructions on the fertilizer label.
6. Temperature: Pineapples prefer warm temperatures, ideally between 65°F and 85°F (18°C and 29°C). Protect your plant from frost and freezing temperatures.
7. Humidity: Pineapples appreciate humidity. If you live in a dry climate, you can increase humidity by misting the leaves regularly or placing the pot on a tray filled with pebbles and water.
8. Repotting: As your pineapple plant grows, you’ll need to repot it into a larger container. Repot when the roots start to outgrow the pot. Choose a pot that’s a few inches larger in diameter.
Encouraging Fruiting
This is where the real magic happens! Getting your pineapple plant to fruit can take some time and patience, but it’s definitely worth the wait.
1. Maturity: Pineapple plants typically take 2-3 years to mature and produce fruit. Be patient!
2. Ethephon Treatment (Optional): If you want to speed up the fruiting process, you can use ethephon, a plant growth regulator that promotes flowering. However, this is optional and not necessary. You can find ethephon at some garden centers or online. Follow the instructions on the product label carefully.
3. Apple Trick (My Favorite!): This is a natural and effective way to encourage fruiting. Place a ripe apple core near the base of the pineapple plant and cover the entire plant with a clear plastic bag. The apple releases ethylene gas, which triggers flowering. Leave the apple core and bag in place for about a week, then remove them.
4. Consistent Care: Continue to provide your pineapple plant with consistent care, including plenty of sunlight, water, and fertilizer.
5. Be Patient (Again!): Even with these methods, it can still take several months for a pineapple to develop.
Harvesting Your Pineapple
Congratulations! You’ve grown your own pineapple! Here’s how to know when it’s ready to harvest:
1. Color Change: The pineapple will start to change color from green to yellow or golden.
2. Aroma: The pineapple will have a sweet, fragrant aroma.
3. Gentle Tug: The pineapple should be easy to twist off the plant. If it’s difficult to remove, it’s not quite ripe yet.
4. Harvesting: Use a sharp knife to cut the pineapple off the plant.
5. Enjoy! Slice up your homegrown pineapple and enjoy the sweet, tropical flavor!
Troubleshooting
Even with the best care, you might encounter some problems along the way. Here are a few common issues and how to address them:
* Root Rot: This is usually caused by overwatering. Make sure your soil is well-draining and avoid watering too frequently. If you suspect root rot, repot the plant in fresh soil and remove any rotten roots.
* Leaf Spot: This can be caused by fungal infections. Improve air circulation around the plant and avoid wetting the leaves when watering. You can also treat with a fungicide if necessary.
* Pests: Pineapples can be susceptible to pests like mealybugs and scale. Inspect your plant regularly and treat any infestations with insecticidal soap or neem oil.
* Yellowing Leaves: This can be caused by a variety of factors, including overwatering, underwatering, nutrient deficiencies, or pests. Check the soil moisture,
Conclusion
So, there you have it! Transforming your humble pineapple top into a thriving terrace plant is not just a fun project; it’s a rewarding journey that brings a touch of the tropics right to your doorstep. We’ve walked you through the simple steps, from carefully extracting the crown to nurturing its roots and finally, watching it flourish into a beautiful, ornamental plant.
But why is this DIY trick a must-try? Beyond the sheer satisfaction of growing something from what would otherwise be kitchen waste, cultivating your own pineapple plant offers a unique connection to nature. It’s a tangible reminder of the power of patience and the beauty of the natural world. Plus, let’s be honest, it’s a fantastic conversation starter! Imagine the look on your friends’ faces when you tell them you grew that stunning pineapple plant from a leftover pineapple top.
And the possibilities don’t end there. Feel free to experiment with different potting mixes. While we recommended a well-draining blend of potting soil, perlite, and peat moss, you could also try incorporating coconut coir or even a bit of compost for added nutrients. Consider the pot itself – terracotta pots are excellent for drainage, but decorative ceramic pots can add a touch of personal style to your pineapple plant terrace.
Furthermore, think about the presentation. Group several pineapple plants of varying sizes together to create a mini-tropical oasis. Add some colorful pebbles or decorative stones around the base of the plants for visual appeal. You could even incorporate other tropical plants, like bromeliads or orchids, to create a truly stunning display.
Don’t be afraid to get creative with your pineapple plant terrace! Try different locations in your home or garden to see where your plant thrives best. Remember that pineapples love sunlight, so a sunny spot is ideal. However, be mindful of intense afternoon sun, which can scorch the leaves.
Ultimately, this DIY project is about more than just growing a plant; it’s about embracing a sustainable lifestyle, connecting with nature, and adding a touch of tropical flair to your surroundings. It’s about understanding the life cycle of a plant and appreciating the simple joys of gardening.
We wholeheartedly encourage you to give this pineapple plant terrace trick a try. It’s a simple, affordable, and incredibly rewarding project that anyone can do. And once you’ve successfully grown your own pineapple plant, we’d love to hear about your experience! Share your photos and stories with us in the comments below. Let’s create a community of pineapple plant enthusiasts and inspire others to embrace the magic of DIY gardening. We are confident that you will love the results.
Frequently Asked Questions (FAQ)
How long does it take for a pineapple top to root?
Rooting time can vary depending on environmental factors like temperature and humidity, but generally, you can expect to see roots emerge within 2-8 weeks. Keep the soil consistently moist (but not waterlogged) and provide plenty of indirect sunlight. Patience is key! Don’t be discouraged if it takes a little longer; sometimes, it just needs a bit more time to get established. You can gently tug on the leaves after a few weeks to see if you feel any resistance, which indicates root development.
What kind of soil is best for a pineapple plant?
Pineapple plants thrive in well-draining soil. A mix of equal parts potting soil, perlite, and peat moss is a good starting point. Perlite helps with drainage, while peat moss retains moisture. You can also add a bit of sand to further improve drainage. Avoid heavy clay soils, as they can retain too much water and lead to root rot. Consider adding some organic matter, like compost, to enrich the soil and provide essential nutrients.
How often should I water my pineapple plant?
Water your pineapple plant when the top inch of soil feels dry to the touch. Avoid overwatering, as this can lead to root rot. During the growing season (spring and summer), you may need to water more frequently than in the dormant season (fall and winter). Ensure the pot has drainage holes to allow excess water to escape. You can also mist the leaves occasionally to increase humidity, especially in dry climates.
How much sunlight does a pineapple plant need?
Pineapple plants need at least six hours of sunlight per day. A sunny windowsill or a spot in the garden that receives plenty of sunlight is ideal. However, be mindful of intense afternoon sun, which can scorch the leaves. If you’re growing your pineapple plant indoors, you may need to supplement with artificial light, especially during the winter months. Rotate the plant regularly to ensure even growth on all sides.
Will my pineapple plant actually produce a pineapple?
While it’s possible for a pineapple plant grown from a top to produce fruit, it can take several years (2-3 years or even longer) and requires specific conditions. The plant needs to be mature enough, and it may need to be exposed to ethylene gas to induce flowering. This can be achieved by placing a ripe apple near the plant and covering it with a plastic bag for a few days. Even with these efforts, there’s no guarantee that your plant will produce fruit. However, even if it doesn’t fruit, the plant itself is a beautiful and rewarding addition to any home or garden.
What are some common problems with pineapple plants?
Some common problems include root rot (caused by overwatering), mealybugs, and scale. Root rot can be prevented by using well-draining soil and avoiding overwatering. Mealybugs and scale can be treated with insecticidal soap or neem oil. Yellowing leaves can indicate a nutrient deficiency or overwatering. Always inspect your plant regularly for signs of pests or diseases and address them promptly.
Can I grow a pineapple plant outdoors?
Yes, you can grow a pineapple plant outdoors in warm climates (USDA zones 9-11). However, it’s important to protect the plant from frost and freezing temperatures. If you live in a colder climate, you can grow your pineapple plant in a pot and bring it indoors during the winter months. Choose a location that receives plenty of sunlight and has well-draining soil.
How do I fertilize my pineapple plant?
Fertilize your pineapple plant every 2-3 months during the growing season with a balanced liquid fertilizer diluted to half strength. Avoid over-fertilizing, as this can damage the plant. You can also use a slow-release fertilizer at the beginning of the growing season. Look for a fertilizer that is specifically formulated for tropical plants.
What do I do if my pineapple plant’s leaves turn brown?
Brown leaves can be caused by several factors, including underwatering, overwatering, sunburn, or nutrient deficiencies. Check the soil moisture and adjust your watering schedule accordingly. If the plant is exposed to intense sunlight, move it to a shadier location. If the leaves are uniformly brown, it could indicate a nutrient deficiency, so try fertilizing with a balanced fertilizer. If only the tips of the leaves are brown, it could be due to dry air, so try misting the leaves more frequently.


Leave a Comment