
Planting garlic cloves might seem intimidating, but trust me, it’s one of the most rewarding things you can do in your home garden! Imagine the satisfaction of harvesting your own pungent, flavorful garlic, ready to elevate your culinary creations. Forget those bland, store-bought bulbs 鈥?homegrown garlic is a whole different experience.
Garlic has a rich history, dating back thousands of years. Ancient Egyptians revered it, feeding it to the pyramid builders for strength and stamina. From traditional medicine to warding off mythical creatures (vampires, anyone?), garlic has always held a special place in human culture. Today, we appreciate it for its incredible flavor and health benefits.
But why should you bother with the DIY aspect of planting garlic cloves? Well, for starters, it’s incredibly easy and cost-effective. Plus, you have complete control over the variety you grow, choosing from a wide range of flavors and sizes. More importantly, in a world where we’re increasingly conscious of where our food comes from, growing your own garlic is a fantastic way to connect with nature and enjoy fresh, organic produce. I’m going to show you some simple tricks and hacks that will make planting garlic cloves a breeze, even if you’re a complete beginner. Get ready to unleash your inner gardener and enjoy the delicious rewards!
Planting Garlic for a Bountiful Harvest: A DIY Guide
Hey there, fellow garden enthusiasts! I’m so excited to share my tried-and-true method for planting garlic. It’s surprisingly easy, and the reward of harvesting your own flavorful garlic is absolutely worth it. Get ready to ditch the store-bought stuff and enjoy the freshest, most pungent garlic you’ve ever tasted!
Choosing the Right Garlic and Timing
Before we get our hands dirty, let’s talk about the two crucial elements: garlic variety and planting time.
* Variety is Key: Not all garlic is created equal! There are two main types: hardneck and softneck.
* Hardneck Garlic: This type is known for its robust flavor and hard stem (hence the name). It’s generally more cold-hardy and produces a flower stalk called a scape, which is also edible and delicious! Hardneck varieties are often recommended for colder climates.
* Softneck Garlic: Softneck garlic is more common in grocery stores. It has a milder flavor and a soft stem that can be braided. It’s better suited for warmer climates and stores for a longer period.
* My Recommendation: I personally prefer hardneck garlic for its intense flavor and the added bonus of scapes. But honestly, experiment and see what grows best in your area and what flavor you prefer! Look for varieties specifically recommended for your region. Local nurseries are a great resource for this.
* Timing is Everything: Garlic needs a period of cold to properly develop. That’s why we plant it in the fall, typically 4-6 weeks before the ground freezes.
* Why Fall Planting?: The cold temperatures trigger the cloves to sprout roots and prepare for growth in the spring. If you plant in the spring, you’ll likely get smaller bulbs.
* My Timing Tip: I usually aim to plant my garlic in late October or early November, depending on the weather forecast. Keep an eye on the long-range forecast for your area.
Preparing the Soil: The Foundation for Success
Garlic loves well-drained, fertile soil. So, let’s get our soil ready for its new residents!
* Sunlight: Choose a spot in your garden that gets at least 6 hours of sunlight per day.
* Soil Testing (Optional but Recommended): A soil test can tell you the pH level and nutrient content of your soil. Garlic prefers a slightly acidic to neutral pH (around 6.0 to 7.0). You can purchase a soil testing kit at most garden centers or send a sample to your local agricultural extension office.
* Amending the Soil:
* Compost: This is my secret weapon! I add a generous amount of compost to the soil to improve drainage, fertility, and overall soil structure. Work it in well with a garden fork or tiller.
* Manure (Aged): Aged manure is another excellent soil amendment. It provides essential nutrients for garlic growth. Make sure it’s well-aged to avoid burning the roots.
* Fertilizer (Optional): If your soil is lacking in nutrients, you can add a balanced fertilizer (e.g., 10-10-10) according to the package directions. I usually skip this step if I’ve added plenty of compost and manure.
* Drainage: Garlic hates soggy soil! If your soil is heavy clay, consider adding sand or perlite to improve drainage. You can also create raised beds to elevate the planting area.
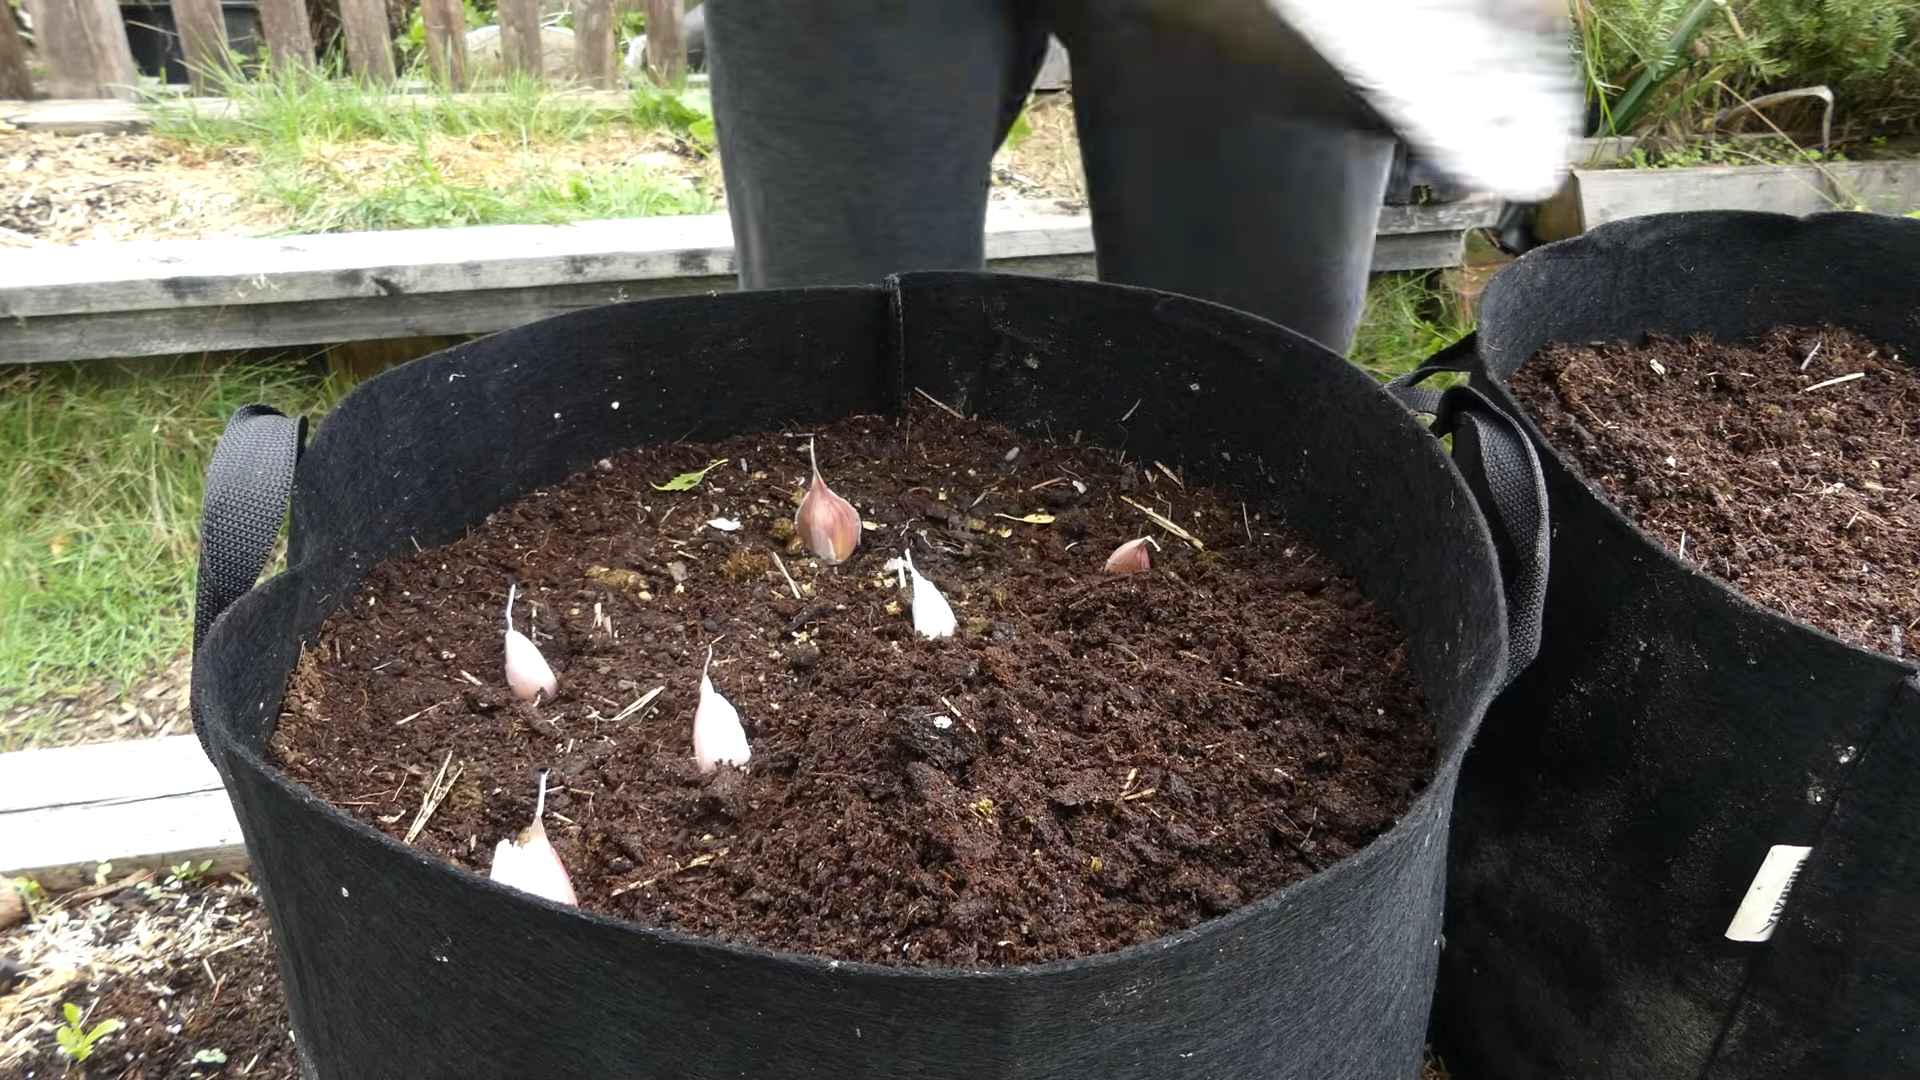
Planting the Garlic Cloves: Getting Down to Business
Now for the fun part! Let’s get those garlic cloves in the ground.
1. Separate the Cloves: Gently separate the cloves from the bulb just before planting. Leave the papery skin on each clove intact. Don’t separate them too early, as they can dry out.
2. Choose the Best Cloves: Select the largest, healthiest cloves for planting. These will produce the biggest bulbs. Discard any cloves that are soft, damaged, or diseased.
3. Planting Depth: Plant the cloves about 2 inches deep for softneck varieties and 3-4 inches deep for hardneck varieties. The deeper planting depth for hardneck garlic helps protect it from winter cold.
4. Spacing: Space the cloves about 6-8 inches apart within rows and 10-12 inches between rows. This gives the garlic plenty of room to grow.
5. Orientation: Plant the cloves with the pointed end facing up and the flat end (where it was attached to the bulb) facing down. This ensures that the roots will grow downward and the shoot will grow upward.
6. Cover and Water: Cover the cloves with soil and gently water the planting area. This helps settle the soil and encourages root growth.
7. Mulch: Apply a thick layer of mulch (straw, hay, or shredded leaves) over the planting area. Mulch helps retain moisture, suppress weeds, and insulate the soil during the winter. I usually use a 4-6 inch layer of straw.
Caring for Your Garlic: Nurturing Your Crop
Once your garlic is planted, it’s time to provide some TLC.
* Watering: Water regularly, especially during dry periods. Garlic needs consistent moisture to thrive. However, avoid overwatering, as this can lead to rot.
* Weeding: Keep the planting area free of weeds. Weeds compete with garlic for nutrients and water. Hand-pull weeds carefully to avoid disturbing the garlic roots.
* Fertilizing (Spring): In the spring, when the garlic starts to actively grow, you can apply a nitrogen-rich fertilizer to boost growth. Fish emulsion or blood meal are good organic options. Follow the package directions carefully.
* Scapes (Hardneck Garlic Only): If you’re growing hardneck garlic, you’ll notice flower stalks (scapes) emerging in the spring or early summer. Cut off the scapes when they start to curl. This encourages the plant to put more energy into bulb development. Plus, scapes are delicious! You can use them in stir-fries, pesto, or grilled.
* Pest and Disease Control: Garlic is generally pest-resistant, but keep an eye out for common garden pests like aphids or onion thrips. Treat any infestations promptly with insecticidal soap or neem oil. Also, watch for signs of fungal diseases like white rot or downy mildew. Ensure good air circulation and avoid overwatering to prevent these diseases.
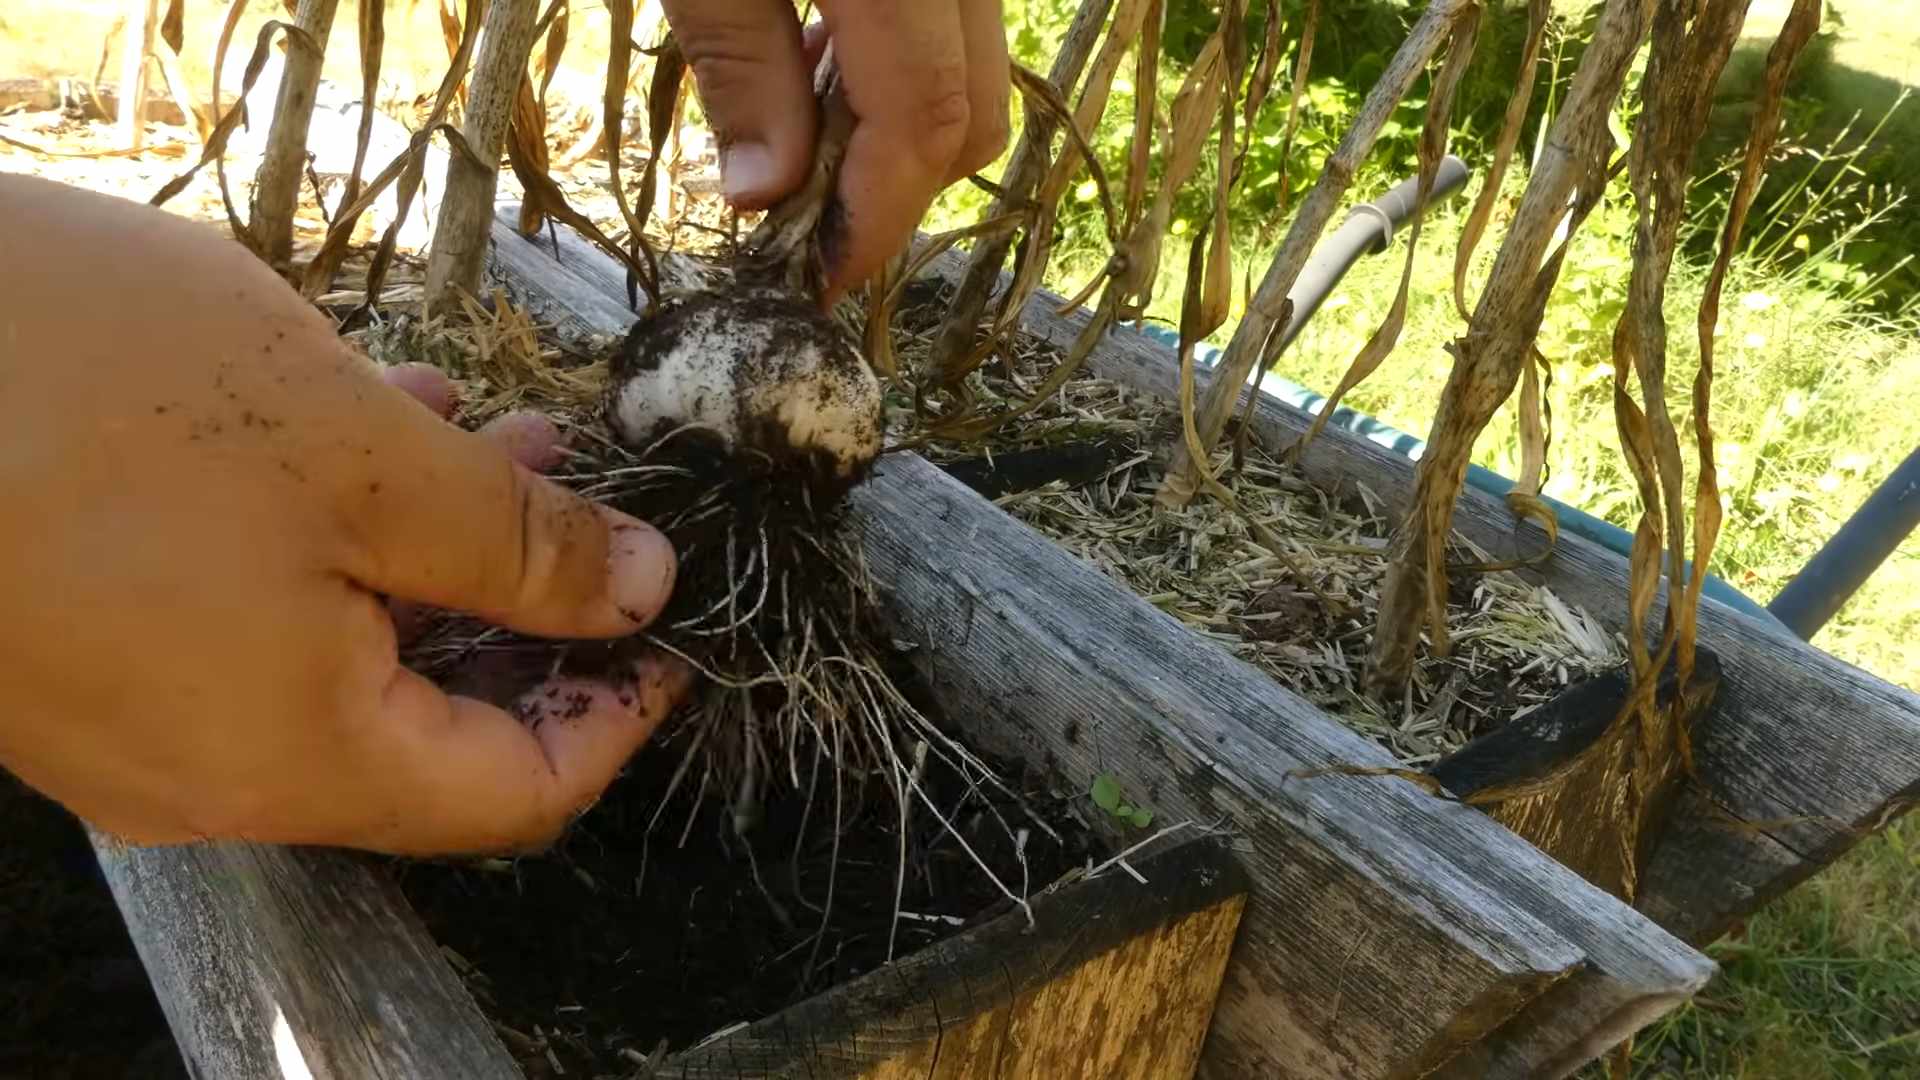
Harvesting Your Garlic: The Grand Finale
The moment we’ve all been waiting for! Harvesting your own garlic is incredibly satisfying.
* Timing: Garlic is typically ready to harvest in mid-summer, about 8-9 months after planting.
* Signs of Maturity: Look for these signs that your garlic is ready to harvest:
* The lower leaves start to turn yellow or brown.
* The bulbs are plump and well-formed.
* The papery skin around the bulb is dry and papery.
* Harvesting Technique: Gently loosen the soil around the bulbs with a garden fork or trowel. Carefully lift the bulbs from the ground, being careful not to damage them.
* Curing: Curing is essential for long-term storage.
* Cleaning: Gently brush off any excess soil from the bulbs. Don’t wash them!
* Bundling: Tie the garlic plants together in bundles of 4-6 bulbs.
* Hanging: Hang the bundles in a well-ventilated, dry, and shady place for 2-4 weeks. This allows the bulbs to dry and cure properly.
* Trimming: Once the bulbs are cured, trim the roots and stalks. Leave about 1-2 inches of stalk above the bulb.
* Storage: Store the cured garlic in a cool, dry, and dark place. Braided softneck garlic can be hung in the kitchen for easy access. Hardneck garlic typically doesn’t store as long as softneck garlic, so use it first.
Troubleshooting: Common Garlic Growing Problems
Even with the best planning, sometimes things don’t go exactly as expected. Here are a few common problems you might encounter and how to address them:
* Small Bulbs: This could be due to several factors:
* Poor Soil: Make sure your soil is fertile and well-drained. Amend with compost and manure.
* Insufficient Sunlight: Garlic needs at least 6 hours of sunlight per day.
* Lack of Water: Water regularly, especially during dry periods.
* Late Planting: Plant garlic in the fall, 4-6 weeks before the ground freezes.
* Poor Quality Cloves: Use the largest, healthiest cloves for planting.
* Rotting Bulbs: This is usually caused by overwatering or poor drainage.
* Improve Drainage: Add
Conclusion
So, there you have it! Planting garlic cloves directly is not just a cost-effective way to grow your own flavorful garlic, but it’s also incredibly rewarding. Imagine the satisfaction of harvesting plump, pungent bulbs that you nurtured from a single clove. Forget those bland, imported garlic heads from the supermarket; with this simple DIY trick, you can enjoy the robust taste of homegrown garlic in all your culinary creations.
This method is a must-try for several reasons. First, it’s incredibly easy. Even if you’re a complete beginner gardener, you can successfully plant garlic cloves. Second, it’s economical. You’re essentially multiplying your garlic supply from a single head, saving you money in the long run. Third, it allows you to control the quality of your garlic. You know exactly what went into growing it, ensuring it’s free from harmful chemicals and pesticides.
But the benefits don’t stop there. Planting garlic cloves is also a fantastic way to connect with nature and experience the joy of growing your own food. It’s a simple act that can bring a sense of accomplishment and satisfaction. Plus, freshly harvested garlic has a flavor that’s simply unmatched by store-bought varieties.
Ready to take your garlic game to the next level? Consider these variations to personalize your garlic-growing experience:
* Experiment with different varieties: There are numerous garlic varieties, each with its unique flavor profile and growing characteristics. Try planting both hardneck and softneck varieties to see which ones thrive in your climate and suit your taste preferences. Hardneck varieties are known for their intense flavor and produce scapes (edible flower stalks), while softneck varieties are better suited for braiding and have a milder flavor.
* Companion planting: Garlic is a great companion plant for many vegetables, as it can help deter pests and improve the overall health of your garden. Plant garlic alongside tomatoes, peppers, eggplant, and brassicas (like broccoli and cabbage) to reap the benefits of companion planting.
* Succession planting: To ensure a continuous supply of fresh garlic, consider succession planting. Plant a few cloves every few weeks during the planting season to stagger your harvest.
* Container gardening: If you don’t have a garden, you can still grow garlic in containers. Choose a large pot with good drainage and use a well-draining potting mix.
Don’t be intimidated by the prospect of growing your own garlic. It’s a simple and rewarding process that anyone can do. So, grab a head of garlic, separate the cloves, and get planting! We’re confident that you’ll be amazed by the results.
We encourage you to try this DIY trick and share your experience with us. Let us know what variety you planted, what challenges you faced, and what tips you discovered along the way. Your feedback will help us improve this guide and inspire others to grow their own garlic. Share your photos and stories on social media using #HomegrownGarlic and #DIYGardening. We can’t wait to see your garlic gardens flourish! Remember, mastering the art of planting garlic cloves is a journey, and every clove planted is a step towards a more flavorful and sustainable future.
FAQ
Frequently Asked Questions About Planting Garlic Cloves
Q: When is the best time to plant garlic cloves?
A: The ideal time to plant garlic cloves is in the fall, typically 4-6 weeks before the ground freezes. This allows the cloves to establish roots before winter sets in. In colder climates, this is usually around October or November. In milder climates, you can plant garlic as late as December. Spring planting is possible, but the bulbs may not be as large.
Q: What type of soil is best for planting garlic?
A: Garlic prefers well-drained, fertile soil that is rich in organic matter. Amend your soil with compost or well-rotted manure before planting to improve drainage and fertility. A slightly acidic to neutral soil pH (around 6.0 to 7.0) is ideal. Avoid planting garlic in heavy clay soil, as it can lead to rot. If you have clay soil, consider planting in raised beds or containers.
Q: How deep should I plant the garlic cloves?
A: Plant garlic cloves about 2-3 inches deep, with the pointed end facing up. Space the cloves about 4-6 inches apart in rows that are 12-18 inches apart. This spacing allows the bulbs to develop properly and provides adequate air circulation.
Q: Do I need to fertilize my garlic plants?
A: Yes, garlic benefits from regular fertilization. Apply a balanced fertilizer (such as 10-10-10) in the spring when the plants begin to actively grow. You can also side-dress with compost or well-rotted manure. Avoid over-fertilizing, as this can lead to excessive foliage growth and smaller bulbs.
Q: How often should I water my garlic plants?
A: Water garlic plants regularly, especially during dry periods. Keep the soil consistently moist, but avoid overwatering, as this can lead to rot. Water deeply and less frequently, rather than shallowly and more often. Mulching around the plants can help retain moisture and suppress weeds.
Q: What are garlic scapes, and what should I do with them?
A: Garlic scapes are the flower stalks that grow from hardneck garlic varieties. They should be removed to encourage the plant to focus its energy on bulb development. Scapes are edible and have a mild garlic flavor. They can be used in stir-fries, pesto, or other dishes. Harvest scapes when they begin to curl.
Q: How do I know when my garlic is ready to harvest?
A: Garlic is typically ready to harvest in late spring or early summer, when the lower leaves begin to turn yellow and brown. The tops of the plants may also start to fall over. To check if the bulbs are ready, carefully dig up a few plants and inspect the bulbs. The bulbs should be plump and well-formed, with papery skins.
Q: How do I cure garlic after harvesting?
A: Curing garlic is essential for long-term storage. After harvesting, gently brush off any excess soil and allow the bulbs to dry in a well-ventilated area for 2-3 weeks. Hang the plants upside down or spread them out on screens or racks. The leaves and stems should dry completely. Once the garlic is cured, trim the roots and stems and store the bulbs in a cool, dry, and dark place.
Q: Can I plant garlic cloves from the grocery store?
A: While you can technically plant garlic cloves from the grocery store, it’s generally not recommended. Grocery store garlic may have been treated with chemicals to prevent sprouting, and it may not be adapted to your local climate. It’s best to purchase garlic cloves specifically for planting from a reputable seed supplier. These cloves are more likely to be disease-free and will produce better results.
Q: What are some common pests and diseases that affect garlic?
A: Common pests that affect garlic include onion thrips, garlic mites, and nematodes. Diseases that can affect garlic include white rot, bulb rot, and downy mildew. To prevent pests and diseases, practice good garden hygiene, such as removing plant debris and rotating crops. You can also use organic pest control methods, such as insecticidal soap or neem oil. Choose disease-resistant garlic varieties whenever possible.
Leave a Comment