
Planting Potatoes Easy Method: Unlock the secrets to a bountiful harvest right in your backyard! Have you ever dreamed of digging up your own homegrown potatoes, bursting with flavor and freshness? I know I have! Forget those bland, store-bought spuds – imagine the satisfaction of serving up a delicious potato dish made entirely from your own efforts. This isn’t just about growing food; it’s about connecting with nature and experiencing the simple joy of nurturing life from seed (or, in this case, a potato!).
Potatoes have a rich history, dating back thousands of years to the Andes Mountains of South America, where they were a staple food for the Inca civilization. Over time, they spread across the globe, becoming a vital part of cuisines worldwide. But you don’t need to be an expert farmer to enjoy the fruits (or tubers!) of your labor.
Many people are intimidated by the thought of growing their own potatoes, thinking it’s too complicated or requires too much space. But I’m here to tell you that planting potatoes using an easy method is totally achievable, even for beginners with limited garden space. This DIY guide will walk you through a simple, step-by-step process that will have you harvesting your own delicious potatoes in no time. Say goodbye to expensive grocery store potatoes and hello to fresh, flavorful, homegrown goodness! Let’s get started!

Planting Potatoes the Lazy Gardener’s Way: No Dig, No Till!
Hey there, fellow garden enthusiasts! I’m so excited to share my favorite method for planting potatoes – it’s incredibly easy, requires minimal effort, and yields a fantastic harvest. Forget back-breaking digging and tilling; this no-dig, no-till approach is perfect for beginners and seasoned gardeners alike. I’ve been using this method for years, and I’m always amazed at how well it works. So, grab your seed potatoes, and let’s get planting!
What You’ll Need
Before we dive in, let’s gather our supplies. This is a pretty low-key project, so you probably have most of these items already:
* **Seed Potatoes:** These are potatoes specifically grown for planting. You can buy them from a garden center or online. Make sure they are certified disease-free.
* **Straw or Hay:** This is the key to our no-dig method. You’ll need a good amount to create a thick layer. Straw is generally preferred as it decomposes slower than hay and is less likely to contain weed seeds.
* **Compost or Well-Rotted Manure:** This will provide essential nutrients for your growing potatoes.
* **Optional: Organic Fertilizer:** A slow-release organic fertilizer can give your potatoes an extra boost.
* **Watering Can or Hose:** For keeping your potatoes hydrated.
* **Garden Gloves:** To protect your hands.
* **Sharp Knife (for cutting seed potatoes):** If your seed potatoes are large, you’ll need to cut them into smaller pieces.
* **Shovel or Garden Fork (optional, for initial soil preparation):** While this is a no-dig method, you might want to loosen the soil surface slightly if it’s very compacted.
Preparing Your Seed Potatoes
This step is crucial for maximizing your potato yield. You want to encourage “eyes” (small sprouts) to form on your seed potatoes before planting. This process is called “chitting.”
* **What is Chitting?** Chitting is simply pre-sprouting your seed potatoes. It gives them a head start and results in earlier and more abundant harvests.
* **How to Chit Your Potatoes:**
1. **Choose Your Potatoes:** Select healthy seed potatoes that are firm and free from blemishes.
2. **Place in a Bright, Cool Location:** Arrange your potatoes in a single layer in an egg carton, tray, or box. The ideal temperature is around 50-60°F (10-15°C). A cool, bright windowsill or garage is perfect. Avoid direct sunlight, which can dry them out.
3. **Wait for Sprouts:** Over the next few weeks (usually 2-4 weeks), you’ll notice small, green or purple sprouts (eyes) forming on the potatoes.
4. **Turn Regularly:** Turn the potatoes every few days to ensure even sprouting.
5. **Ready to Plant:** Once the sprouts are about 1/2 to 1 inch long, your potatoes are ready to plant.
* **Cutting Large Seed Potatoes (If Necessary):**
1. **Why Cut?** If your seed potatoes are large (bigger than an egg), you can cut them into smaller pieces. Each piece should have at least 1-2 healthy “eyes.”
2. **Use a Clean, Sharp Knife:** This is important to prevent the spread of disease.
3. **Cut into Chunks:** Cut the potato into chunks, ensuring each chunk has at least one or two eyes.
4. **Cure the Cut Surfaces:** After cutting, let the potato chunks sit for 1-2 days in a cool, dry place. This allows the cut surfaces to “cure” and form a protective layer, preventing rot.
Planting Your Potatoes: The No-Dig Method
Now for the fun part! This is where the magic happens.
1. **Choose Your Location:** Select a sunny spot in your garden that gets at least 6-8 hours of sunlight per day. Potatoes need plenty of sunshine to thrive.
2. **Prepare the Ground (Optional):** While this is a no-dig method, I like to loosen the soil surface slightly with a garden fork, especially if it’s compacted. This helps the potato roots penetrate the soil more easily. You can also remove any large weeds or debris.
3. **Lay Down a Layer of Compost or Manure:** Spread a 2-3 inch layer of compost or well-rotted manure over the planting area. This will provide essential nutrients for your potatoes.
4. **Place Your Seed Potatoes:** Arrange your seed potatoes on top of the compost layer, spacing them about 12 inches apart. Make sure the sprouts (eyes) are facing upwards.
5. **Cover with Straw or Hay:** Now, the most important step! Cover the seed potatoes with a thick layer of straw or hay. The layer should be at least 12 inches thick. This layer will act as mulch, suppressing weeds, retaining moisture, and keeping the soil cool.
6. **Water Thoroughly:** Water the straw or hay layer well to help it settle and to provide moisture to the seed potatoes.
Hilling (Kind Of) and Ongoing Care
While we’re not doing traditional hilling, we will be adding more straw as the potato plants grow. This helps to encourage more potato production along the stems.
1. **Monitor Growth:** Keep an eye on your potato plants as they grow. You’ll start to see green shoots emerging through the straw in a few weeks.
2. **Add More Straw (As Needed):** As the plants grow taller, add more straw around the base of the plants. This will help to keep the developing potatoes covered and protected from sunlight. Potatoes exposed to sunlight will turn green and become toxic.
3. **Water Regularly:** Potatoes need consistent moisture, especially during dry periods. Water deeply whenever the soil feels dry to the touch.
4. **Fertilize (Optional):** If you want to give your potatoes an extra boost, you can apply a slow-release organic fertilizer according to the package directions.
5. **Watch for Pests and Diseases:** Keep an eye out for common potato pests and diseases, such as potato beetles and blight. Take action promptly if you notice any problems. Organic pest control methods are always a good option.
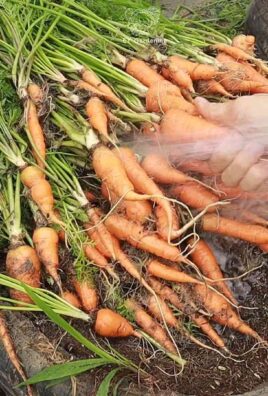
Harvesting Your Potatoes
The moment we’ve all been waiting for! Harvesting your potatoes is the most rewarding part of the process.
1. **When to Harvest:** Potatoes are typically ready to harvest about 80-100 days after planting, depending on the variety. You’ll know they’re ready when the plants start to flower and the foliage begins to die back.
2. **Gently Remove the Straw:** Carefully pull back the straw or hay layer to reveal the potatoes underneath.
3. **Harvest the Potatoes:** Gently dig around the plants with your hands or a garden fork to loosen the soil and lift out the potatoes. Be careful not to damage the potatoes.
4. **Cure the Potatoes:** After harvesting, let the potatoes sit in a cool, dry place for a few days to “cure.” This will help to toughen the skins and improve their storage life.
5. **Store Properly:** Store your potatoes in a cool, dark, and well-ventilated place. A root cellar is ideal, but a cool basement or garage will also work.
Troubleshooting
Even with the easiest methods, sometimes things don’t go exactly as planned. Here are a few common issues and how to address them:
* **No Sprouts:** If your seed potatoes don’t sprout, make sure they are getting enough light and warmth. Also, check to see if they are rotting. If they are, discard them and start with fresh seed potatoes.
* **Yellowing Leaves:** Yellowing leaves can be a sign of overwatering, underwatering, or nutrient deficiency. Adjust your watering schedule and consider adding fertilizer.
* **Pests:** Potato beetles are a common pest. Hand-picking them off the plants or using an organic insecticide can help.
* **Disease:** Potato blight is a fungal disease that can cause the leaves to turn brown and the potatoes to rot. Prevent blight by planting disease-resistant varieties and ensuring good air circulation.
Why I Love This Method
I’m a huge fan of this no-dig potato planting method for several reasons:
* **It’s Easy:** Seriously, it’s so simple! Anyone can do it, even if you’re a complete beginner.
* **It Saves Time and Effort:** No digging or tilling required! This saves a ton of time and energy.
* **It’s Good for the Soil:** No-dig gardening helps to improve soil structure and fertility.
* **It Suppresses Weeds:** The thick layer of straw or hay effectively suppresses weeds.
* **It Retains Moisture:** The mulch helps to keep the soil moist, reducing the need for watering.
* **It’s Fun!** There’s something incredibly satisfying about harvesting your own homegrown potatoes.
So, there you have it! My super-easy,
Conclusion
So, there you have it! This easy method for planting potatoes is more than just a gardening hack; it’s a pathway to a bountiful harvest and a deeper connection with the food you eat. We’ve walked you through the simple steps, highlighting how accessible and rewarding this process can be, even for beginner gardeners. Forget back-breaking digging and endless weeding – this method minimizes effort while maximizing results.
Why is this a must-try? Because it simplifies potato cultivation, making it achievable for anyone, regardless of space or experience. The reduced digging translates to less strain on your body, and the contained environment helps control weeds and pests more effectively. Plus, the satisfaction of harvesting your own homegrown potatoes is simply unparalleled. Imagine the delicious meals you can create with fresh, flavorful potatoes grown right in your backyard (or even on your balcony!).
But don’t stop there! Feel free to experiment with different potato varieties. Try planting Yukon Golds for their creamy texture, Russets for their perfect baking qualities, or colorful fingerling potatoes for a unique culinary experience. You can also adjust the size of your container based on your available space and the number of potatoes you want to grow. Consider adding companion plants like marigolds or basil to deter pests and attract beneficial insects.
For those looking to take their potato planting to the next level, consider using a specialized potato grow bag. These bags are designed with drainage and aeration in mind, further optimizing growing conditions. You can also experiment with different soil amendments to improve drainage and nutrient content. Adding compost or well-rotted manure to your soil mix will provide your potatoes with the essential nutrients they need to thrive.
We are confident that this easy method for planting potatoes will revolutionize your gardening experience. It’s a cost-effective, space-saving, and incredibly rewarding way to grow your own food. So, grab some seed potatoes, gather your supplies, and get ready to embark on a potato-growing adventure!
We encourage you to try this method and share your experiences with us. Let us know what varieties you planted, what challenges you faced, and what successes you celebrated. Your feedback will help us refine this method and inspire other gardeners to give it a try. Share your photos and stories on social media using #EasyPotatoPlanting and let’s build a community of happy potato growers! We can’t wait to see your amazing harvests!
Frequently Asked Questions (FAQ)
What kind of container should I use for planting potatoes using this method?
The ideal container should be large enough to accommodate the growing potato plant and its developing tubers. A container that is at least 20 inches in diameter and 18 inches deep is generally recommended. You can use a variety of materials, including plastic pots, wooden crates, or even repurposed containers like old trash cans (with drainage holes drilled in the bottom, of course!). Potato grow bags are also an excellent option, as they are specifically designed for potato cultivation and provide good drainage and aeration. The key is to ensure that the container has adequate drainage to prevent waterlogging, which can lead to rot.
How many seed potatoes can I plant in one container?
The number of seed potatoes you can plant in one container depends on the size of the container and the size of the seed potatoes. As a general rule, you can plant 2-3 seed potatoes in a container that is 20 inches in diameter. If you are using smaller seed potatoes, you may be able to plant more. However, it’s important to avoid overcrowding, as this can limit the growth of the plants and reduce the yield. Make sure each seed potato has enough space to develop without competing for resources.
What kind of soil should I use for planting potatoes?
Potatoes prefer well-draining, slightly acidic soil. A good potting mix that is specifically formulated for vegetables is a great option. You can also create your own soil mix by combining equal parts of garden soil, compost, and peat moss or coco coir. Adding compost to your soil mix will provide your potatoes with essential nutrients and improve drainage. Avoid using heavy clay soil, as it can become waterlogged and inhibit root growth.
How often should I water my potato plants?
Water your potato plants regularly, especially during dry periods. The soil should be kept consistently moist, but not waterlogged. Check the soil moisture by sticking your finger into the soil about an inch deep. If the soil feels dry, it’s time to water. Avoid overwatering, as this can lead to root rot. During hot weather, you may need to water your plants more frequently.
How much sunlight do potato plants need?
Potato plants need at least 6-8 hours of sunlight per day to thrive. Choose a location that receives plenty of direct sunlight. If you are growing your potatoes in containers, you can move them around to ensure they get enough sunlight. If you live in a particularly hot climate, you may need to provide some afternoon shade to prevent the plants from overheating.
When is the best time to harvest my potatoes?
The best time to harvest your potatoes depends on the variety and the growing conditions. Generally, potatoes are ready to harvest when the foliage begins to die back. This usually occurs about 2-3 months after planting. You can also check for maturity by digging up a few potatoes and examining their size and skin. The skin should be firm and not easily rubbed off. To harvest, simply tip the container over and carefully remove the potatoes from the soil.
What are some common pests and diseases that affect potato plants?
Some common pests that affect potato plants include aphids, potato beetles, and flea beetles. Diseases that can affect potato plants include early blight, late blight, and potato scab. You can prevent pests and diseases by practicing good sanitation, such as removing weeds and debris from around your plants. You can also use organic pest control methods, such as insecticidal soap or neem oil. If you suspect your plants have a disease, consult with your local garden center or agricultural extension office for advice.
Can I grow potatoes in a small space using this method?
Yes, this method is ideal for growing potatoes in small spaces, such as balconies, patios, or small gardens. The container gardening approach allows you to control the growing environment and maximize space utilization. You can even grow potatoes indoors if you have a sunny window or grow lights.
What are some variations I can try with this potato planting method?
There are many variations you can try with this potato planting method. You can experiment with different potato varieties, soil amendments, and companion plants. You can also try using different types of containers, such as grow bags or stacked tires. Some gardeners even use a “potato tower” method, where they gradually add soil to the container as the plants grow, encouraging the development of more tubers along the stem.
How do I store my harvested potatoes?
Store your harvested potatoes in a cool, dark, and dry place. A root cellar is ideal, but a basement or garage can also work. Avoid storing potatoes in the refrigerator, as this can cause them to develop a sweet taste. Store potatoes away from apples and onions, as these fruits and vegetables release ethylene gas, which can cause potatoes to sprout. Properly stored potatoes can last for several months.


Leave a Comment