
Planting Potatoes Trick: Unlock the secrets to a bountiful harvest right in your backyard! Have you ever dreamed of digging up your own homegrown potatoes, bursting with flavor and freshness? Well, get ready to turn that dream into reality with this simple yet incredibly effective DIY guide. Forget complicated gardening techniques and expensive equipment; I’m about to share a game-changing planting potatoes trick that will revolutionize your potato-growing game.
Potatoes have a rich history, dating back thousands of years to the Andes Mountains, where they were first cultivated. They’ve since become a staple food around the world, nourishing communities and cultures. But you don’t need to be a seasoned farmer to enjoy the fruits (or rather, tubers!) of your labor.
In today’s fast-paced world, many of us crave a connection to nature and a sense of self-sufficiency. Growing your own food, even in a small space, can be incredibly rewarding. This planting potatoes trick is perfect for beginners and experienced gardeners alike, offering a low-effort, high-yield approach to growing delicious potatoes. Plus, knowing exactly where your food comes from and how it was grown gives you peace of mind. So, let’s dive in and discover how to make the most of your potato-growing adventure!
Kartoffeln anbauen leicht gemacht: Mein DIY-Trick für eine reiche Ernte
Hey Leute! Ich liebe es, mein eigenes Gemüse anzubauen, und Kartoffeln sind da keine Ausnahme. Aber ich habe festgestellt, dass der traditionelle Anbau manchmal etwas mühsam sein kann, besonders wenn der Platz begrenzt ist oder der Boden nicht ideal ist. Deshalb möchte ich euch heute meinen DIY-Trick zeigen, wie ihr Kartoffeln in Säcken oder Kübeln anbauen könnt – eine super einfache und effektive Methode, die auch Anfängern gelingt!
Was du brauchst:
* Saatkartoffeln: Wähle Sorten, die dir schmecken und für den Anbau im Kübel geeignet sind (z.B. ‘Annabelle’, ‘Sieglinde’, ‘Laura’).
* Große Säcke oder Kübel: Am besten eignen sich Jutesäcke, Kartoffelsäcke oder große Plastikkübel (mindestens 50 Liter Fassungsvermögen). Achte darauf, dass sie Löcher im Boden haben, damit das Wasser ablaufen kann.
* Pflanzerde: Eine gute Mischung aus Gartenerde, Kompost und Sand ist ideal. Du kannst auch spezielle Kartoffelerde kaufen.
* Kompost oder organischer Dünger: Für eine gute Nährstoffversorgung.
* Gießkanne: Zum Bewässern.
* Geduld: Kartoffeln brauchen Zeit zum Wachsen!
Vorbereitung ist alles: Die Saatkartoffeln vorkeimen
Bevor wir mit dem Pflanzen loslegen, ist es wichtig, die Saatkartoffeln vorzukiemen. Das beschleunigt das Wachstum und sorgt für eine frühere Ernte.
1. Die Kartoffeln auswählen: Suche dir gesunde, feste Kartoffeln aus, die keine Anzeichen von Fäulnis oder Krankheiten aufweisen.
2. Die Kartoffeln vorbereiten: Lege die Kartoffeln etwa 2-3 Wochen vor dem geplanten Pflanztermin an einen hellen, kühlen Ort (ca. 10-15°C). Ein Kellerraum oder eine Garage eignet sich gut.
3. Die Kartoffeln platzieren: Lege die Kartoffeln in Eierkartons oder flache Kisten, sodass sie nicht übereinander liegen.
4. Warten und beobachten: Nach einigen Tagen werden sich kleine, grüne Triebe (Keime) bilden. Diese sind ein Zeichen dafür, dass die Kartoffeln bereit zum Pflanzen sind.
Schritt-für-Schritt-Anleitung: Kartoffeln im Sack anpflanzen
Jetzt geht’s ans Eingemachte! Hier ist meine detaillierte Anleitung, wie du deine Kartoffeln im Sack anpflanzt:
1. Den Sack vorbereiten: Rolle den Sack oder Kübel etwas herunter, sodass er etwa 20-30 cm hoch ist. Das erleichtert das Befüllen.
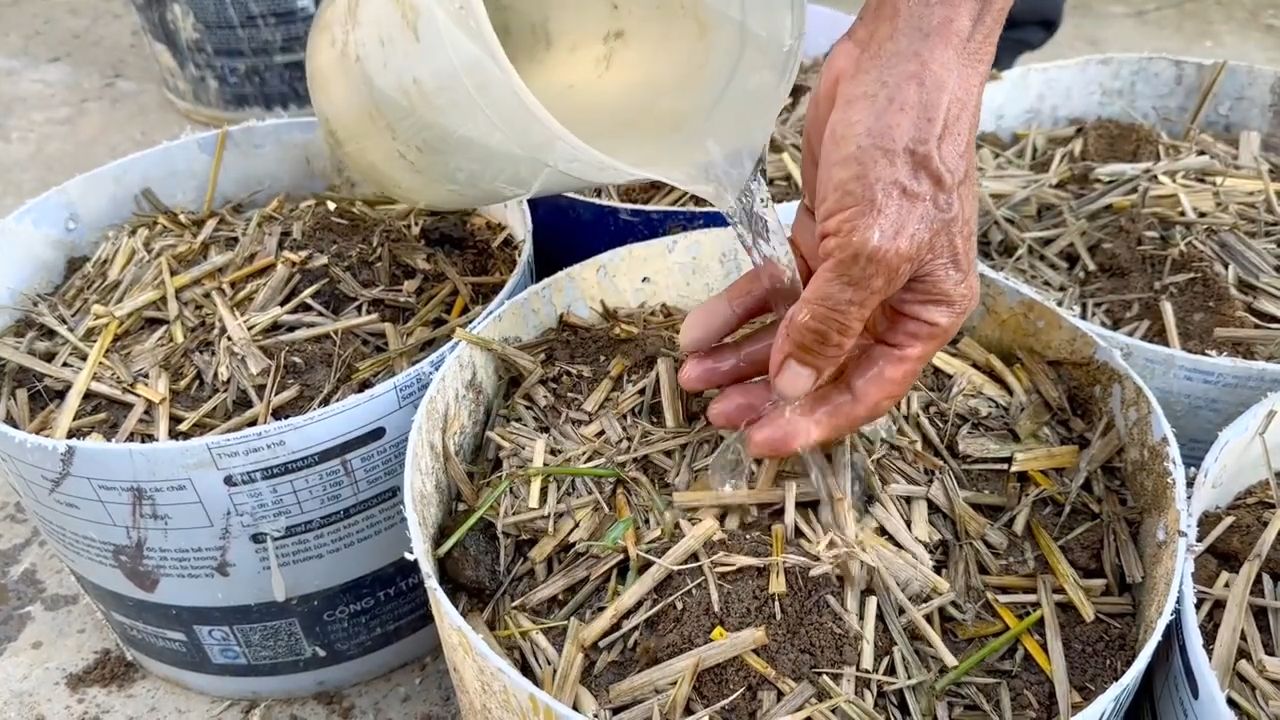
2. Die erste Erdschicht einfüllen: Fülle den Sack mit einer etwa 15-20 cm hohen Schicht Pflanzerde. Mische etwas Kompost oder organischen Dünger unter die Erde.
3. Die Saatkartoffeln platzieren: Lege 3-4 vorgekeimte Saatkartoffeln mit den Trieben nach oben auf die Erde. Achte darauf, dass sie genügend Abstand zueinander haben (ca. 10-15 cm).
4. Mit Erde bedecken: Bedecke die Kartoffeln mit einer weiteren Schicht Erde (ca. 10 cm).
5. Angießen: Gieße die Erde vorsichtig an, sodass sie gut durchfeuchtet ist. Vermeide Staunässe.
6. Der Standort: Stelle den Sack an einen sonnigen und warmen Ort. Kartoffeln lieben die Sonne!
Das Anhäufeln: Der Schlüssel zum Erfolg
Das Anhäufeln ist ein wichtiger Schritt beim Kartoffelanbau im Sack. Dadurch werden die Kartoffelpflanzen stabiler und bilden mehr Knollen.
1. Das erste Anhäufeln: Sobald die Kartoffelpflanzen etwa 20 cm hoch sind, häufelst du sie mit Erde an. Fülle den Sack so weit auf, dass nur noch die obersten Blätter herausschauen.
2. Das zweite Anhäufeln: Wiederhole den Vorgang, sobald die Pflanzen wieder etwa 20 cm gewachsen sind.
3. Regelmäßiges Gießen: Achte darauf, dass die Erde immer feucht ist, aber nicht zu nass. Gieße am besten morgens oder abends, um Verdunstung zu vermeiden.
4. Düngen: Dünge die Kartoffelpflanzen regelmäßig mit einem organischen Dünger oder Komposttee. Das sorgt für eine gute Nährstoffversorgung und eine reiche Ernte.
Schutz vor Schädlingen und Krankheiten
Auch Kartoffeln können von Schädlingen und Krankheiten befallen werden. Hier sind ein paar Tipps, wie du deine Pflanzen schützen kannst:
* Kartoffelkäfer: Sammle die Käfer und ihre Larven regelmäßig ab. Du kannst auch natürliche Insektizide verwenden.
* Kraut- und Braunfäule: Diese Pilzkrankheit tritt vor allem bei feuchtem Wetter auf. Achte auf eine gute Belüftung und entferne befallene Blätter sofort. Du kannst auch vorbeugend mit einem Fungizid behandeln.
* Drahtwürmer: Diese Schädlinge fressen an den Kartoffelknollen. Lockere den Boden regelmäßig auf und verwende Nematoden zur Bekämpfung.
Die Ernte: Der Lohn der Mühe
Nach etwa 3-4 Monaten sind deine Kartoffeln erntereif. Das erkennst du daran, dass die Blätter gelb werden und absterben.
1. Die Ernte vorbereiten: Gieße die Erde vor der Ernte nicht mehr, damit sie etwas abtrocknen kann.
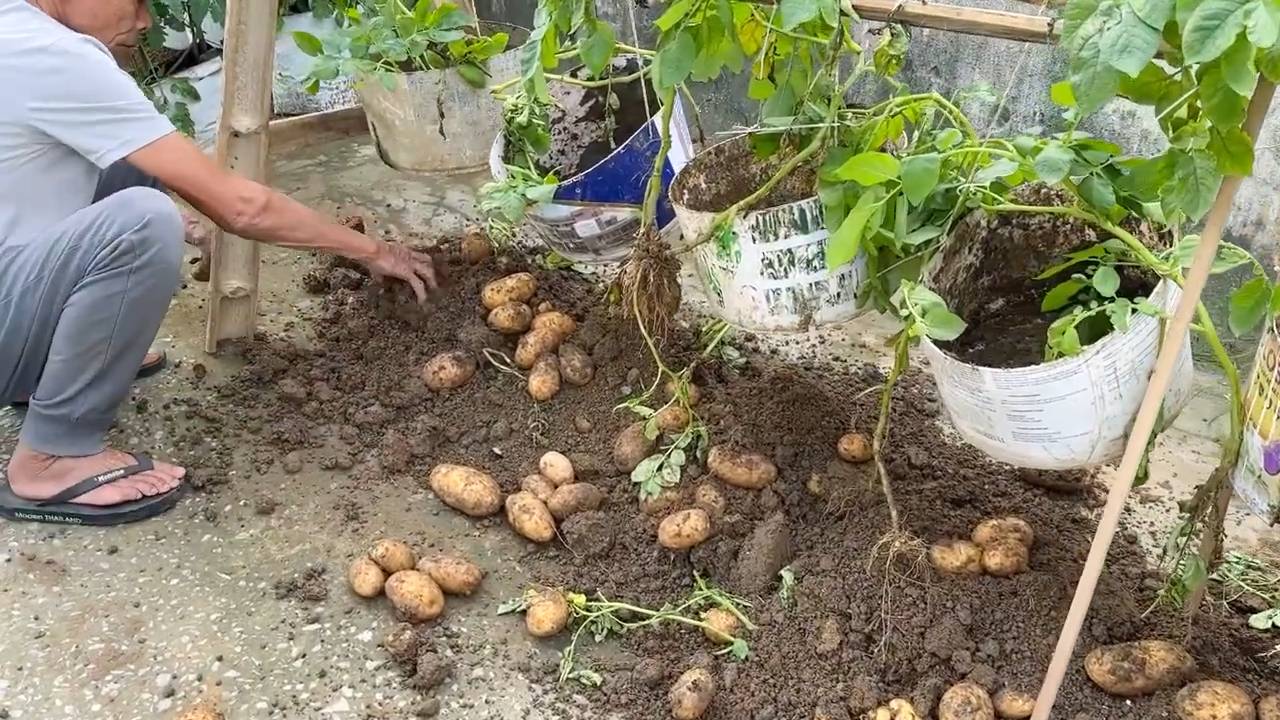
2. Den Sack leeren: Kippe den Sack vorsichtig um und suche die Kartoffeln heraus.
3. Die Kartoffeln sortieren: Sortiere die Kartoffeln nach Größe und Beschädigung. Beschädigte Kartoffeln solltest du sofort verbrauchen.
4. Die Lagerung: Lagere die Kartoffeln an einem kühlen, dunklen und trockenen Ort. Ein Kellerraum eignet sich gut.
Zusätzliche Tipps für eine erfolgreiche Kartoffelernte
* Die richtige Sorte wählen: Informiere dich, welche Kartoffelsorten für den Anbau im Kübel geeignet sind und welche in deiner Region gut wachsen.
* Die Erde verbessern: Mische der Pflanzerde Kompost oder organischen Dünger bei, um die Nährstoffversorgung zu verbessern.
* Regelmäßig gießen und düngen: Kartoffeln brauchen viel Wasser und Nährstoffe, besonders während der Wachstumsphase.
* Auf Schädlinge und Krankheiten achten: Kontrolliere deine Pflanzen regelmäßig und bekämpfe Schädlinge und Krankheiten frühzeitig.
* Nicht zu früh ernten: Warte, bis die Blätter gelb werden und absterben, bevor du die Kartoffeln erntest.
Warum ich diese Methode liebe
Ich liebe diese Methode, weil sie so einfach und platzsparend ist. Auch wenn du keinen Garten hast, kannst du so frische Kartoffeln auf deinem Balkon oder deiner Terrasse anbauen. Außerdem macht es einfach Spaß, zu sehen, wie die Pflanzen wachsen und gedeihen. Und das Beste: Der Geschmack von selbst angebauten Kartoffeln ist einfach unschlagbar!
Ich hoffe, meine Anleitung hat dir geholfen und inspiriert, deine eigenen Kartoffeln anzubauen. Viel Erfolg und eine reiche Ernte!
Conclusion
So, there you have it! This simple yet incredibly effective planting potatoes trick is more than just a gardening hack; it’s a pathway to a bountiful harvest and a deeper connection with the food you eat. We’ve walked you through the process, highlighting the benefits of this method – from maximizing space and yield to simplifying the harvesting process.
Why is this a must-try? Because it empowers you to grow your own delicious, nutritious potatoes, even if you’re short on space or time. Imagine the satisfaction of digging into the earth and unearthing a treasure trove of homegrown potatoes, ready to be transformed into your favorite dishes. Think creamy mashed potatoes, crispy roasted potatoes, or hearty potato soup – all made with potatoes you nurtured from seed to table.
But the beauty of this planting potatoes trick lies not only in its efficiency but also in its adaptability. Feel free to experiment with different potato varieties to discover your favorites. Try using different types of containers, from traditional garden pots to repurposed buckets or even grow bags. Consider adding companion plants like marigolds or basil to deter pests and attract beneficial insects.
For those looking to optimize their potato growing even further, consider these variations:
* Layering with Compost: As your potato plants grow taller, continue to add layers of compost and soil, burying more of the stem. This encourages even more potato production along the buried stem.
* Fertilizing Regularly: Potatoes are heavy feeders, so be sure to fertilize them regularly with a balanced fertilizer or compost tea. This will provide them with the nutrients they need to thrive.
* Choosing the Right Soil: While this method is adaptable, potatoes prefer well-draining soil that is rich in organic matter. Amend your soil with compost or other organic materials to improve its texture and fertility.
* Sunlight is Key: Ensure your potato plants receive at least six hours of sunlight per day for optimal growth and potato production.
This planting potatoes trick is a game-changer for both novice and experienced gardeners alike. It’s a sustainable, rewarding, and delicious way to bring fresh produce to your table.
We wholeheartedly encourage you to give this method a try. Don’t be afraid to get your hands dirty, experiment with different techniques, and most importantly, have fun! We’re confident that you’ll be amazed by the results.
And once you’ve experienced the joy of harvesting your own homegrown potatoes, we’d love to hear about it! Share your experiences, tips, and photos with us in the comments below. Let’s build a community of potato-growing enthusiasts and inspire others to embrace the magic of gardening. Happy planting!
Frequently Asked Questions (FAQ)
What kind of potatoes are best for this planting trick?
The best potatoes for this method are seed potatoes, which are potatoes specifically grown for planting. You can find them at most garden centers or online retailers. Choose varieties that are known to be productive and well-suited to your climate. Popular choices include Yukon Gold, Russet, and Red Pontiac. However, you can also use potatoes from the grocery store, but make sure they are organic and haven’t been treated with sprout inhibitors. If using grocery store potatoes, look for ones that have already started to sprout.
How often should I water my potato plants?
Water your potato plants regularly, especially during dry periods. The soil should be consistently moist but not waterlogged. Check the soil moisture by sticking your finger about an inch deep into the soil. If it feels dry, it’s time to water. Avoid overwatering, as this can lead to root rot. Generally, watering deeply once or twice a week is sufficient, but adjust based on your local climate and weather conditions.
What if my potato plants start to flower?
Flowering is a natural part of the potato plant’s life cycle and doesn’t necessarily indicate anything negative. However, some gardeners believe that removing the flowers can encourage the plant to focus its energy on producing more potatoes. This is a matter of personal preference, and there’s no definitive evidence to suggest that removing flowers significantly increases potato yield. If you choose to remove the flowers, simply pinch them off as they appear.
How do I know when my potatoes are ready to harvest?
The timing of your potato harvest depends on the variety of potato you’re growing and when you planted them. Generally, potatoes are ready to harvest when the foliage starts to turn yellow and die back. This usually occurs about 80-100 days after planting. You can also gently dig around the base of the plant to check the size of the potatoes. If they are the size you desire, you can begin harvesting. For “new potatoes,” you can harvest them earlier, when the plants are still green, for smaller, more tender potatoes.
Can I use any type of container for this method?
While you can use a variety of containers, it’s important to choose one that is large enough to accommodate the growing potato plants and their developing tubers. A container that is at least 12 inches in diameter and 12 inches deep is recommended. Make sure the container has drainage holes to prevent waterlogging. You can use plastic pots, terracotta pots, grow bags, or even repurposed containers like buckets or trash cans. Just ensure the container is clean and free of any harmful chemicals.
What if I don’t have access to compost?
Compost is an excellent soil amendment for growing potatoes, but if you don’t have access to it, you can use other organic materials to enrich the soil. Well-rotted manure, leaf mold, or peat moss can be used as substitutes. You can also purchase commercially available potting mixes that are specifically formulated for growing vegetables. Look for mixes that are rich in organic matter and have good drainage.
How do I store my harvested potatoes?
Proper storage is essential for preserving the quality of your harvested potatoes. After harvesting, brush off any excess soil and allow the potatoes to cure for a few days in a cool, dry, and dark place. This allows the skins to harden, which helps prevent spoilage. Store the cured potatoes in a cool, dark, and well-ventilated area, such as a root cellar or basement. Avoid storing potatoes near apples or onions, as these fruits and vegetables release gases that can cause potatoes to sprout or spoil. Properly stored potatoes can last for several months.
What are some common pests and diseases that affect potato plants?
Potato plants can be susceptible to various pests and diseases, including aphids, potato beetles, blight, and scab. Regularly inspect your plants for signs of infestation or disease. If you notice any problems, take action promptly to prevent them from spreading. Organic pest control methods, such as introducing beneficial insects or using insecticidal soap, can be effective for controlling pests. For diseases, ensure good air circulation around the plants and avoid overwatering. If necessary, use a fungicide to control fungal diseases.
Can I grow potatoes in this way indoors?
While it’s possible to grow potatoes indoors using this method, it can be challenging to provide them with the necessary conditions for optimal growth. Potatoes require a lot of sunlight, so you’ll need to provide them with supplemental lighting if you’re growing them indoors. You’ll also need to ensure that the container is large enough and that the soil is well-draining. Indoor potato plants may not produce as many potatoes as those grown outdoors, but it can still be a fun and rewarding experience.
Is this planting potatoes trick suitable for all climates?
This planting potatoes trick is generally suitable for most climates, but you may need to adjust your planting schedule based on your local growing season. In colder climates, you may need to start your potatoes indoors a few weeks before the last frost. In warmer climates, you can plant potatoes directly outdoors in the spring or fall. Be sure to choose potato varieties that are well-suited to your climate and growing conditions.

Leave a Comment