
Rooftop Garden Kale Setup: Imagine stepping onto your roof and being greeted by a lush, vibrant garden bursting with fresh, leafy kale. Sounds dreamy, right? Well, it doesn’t have to be just a dream! I’m here to guide you through creating your very own rooftop kale oasis with some simple DIY tricks and hacks.
For centuries, urban dwellers have sought ways to bring nature closer, and rooftop gardens have a rich history, from the Hanging Gardens of Babylon to modern-day green roofs. But let’s be honest, sometimes the idea of setting up a rooftop garden feels overwhelming. Where do you even begin, especially when you want to grow something as specific as kale?
That’s where this guide comes in! We’ll break down the process of a rooftop garden kale setup into manageable steps, covering everything from choosing the right containers and soil to providing the perfect sunlight and nutrients. Growing your own kale isn’t just about having fresh, healthy greens at your fingertips; it’s about connecting with nature, reducing your carbon footprint, and adding a touch of beauty to your urban landscape. Plus, knowing exactly where your food comes from is incredibly rewarding. So, let’s get started and transform your rooftop into a kale-filled paradise!

Dein eigener Dachgarten-Kohl: Eine DIY-Anleitung
Hallo Gartenfreunde! Ich freue mich riesig, euch heute zu zeigen, wie ihr euren eigenen Dachgarten-Kohl anbauen könnt. Es ist einfacher, als ihr denkt, und das Ergebnis ist super befriedigend – frischer, knackiger Kohl direkt von eurem Dach! Lasst uns loslegen!
Was du für deinen Dachgarten-Kohl brauchst
Bevor wir loslegen, hier eine Liste mit allem, was du brauchst. Keine Sorge, die meisten Sachen sind leicht zu bekommen:
* **Kohl-Setzlinge oder Samen:** Ich empfehle, mit Setzlingen zu beginnen, besonders wenn du neu im Gärtnern bist. Es ist einfach schneller und unkomplizierter. Du kannst aber auch Samen verwenden, wenn du geduldig bist. Achte darauf, Sorten zu wählen, die für den Anbau in Containern geeignet sind, wie z.B. Zwerg-Grünkohl oder ‘Red Russian’ Grünkohl.
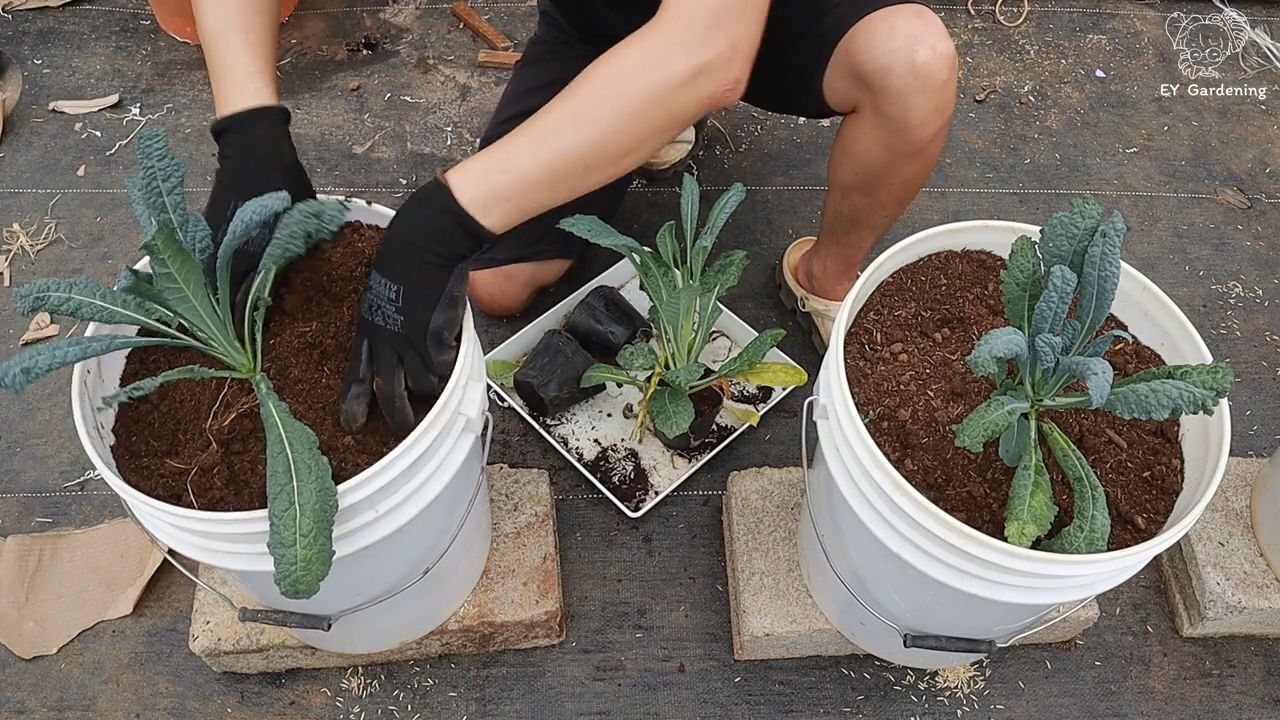
* **Geeignete Behälter:** Du brauchst Behälter mit guter Drainage. Große Töpfe, Pflanzkästen oder sogar recycelte Behälter (mit Löchern!) funktionieren gut. Die Behälter sollten mindestens 30 cm tief und breit sein, damit die Kohlpflanzen genügend Platz zum Wachsen haben.
* **Hochwertige Blumenerde:** Verwende eine gut drainierende Blumenerde, die reich an organischen Stoffen ist. Vermeide Gartenerde, da diese zu schwer ist und die Drainage beeinträchtigen kann. Ich mische gerne Blumenerde mit Kompost für einen zusätzlichen Nährstoffschub.
* **Kompost oder organischer Dünger:** Kohl ist ein Starkzehrer, daher ist eine gute Nährstoffversorgung wichtig. Kompost ist eine tolle natürliche Option, aber du kannst auch einen organischen Dünger speziell für Gemüse verwenden.
* **Gießkanne oder Gartenschlauch:** Zum regelmäßigen Gießen deiner Kohlpflanzen.
* **Gartenschere:** Zum Ernten und Entfernen von beschädigten Blättern.
* **Mulch (optional):** Mulch hilft, die Feuchtigkeit im Boden zu halten und Unkraut zu unterdrücken. Stroh, Holzhackschnitzel oder Grasschnitt eignen sich gut.
* **Schutz vor Schädlingen (optional):** Je nach Region können Kohlweißlinge oder andere Schädlinge ein Problem sein. Ein Insektenschutznetz kann helfen, deine Pflanzen zu schützen.
Die Vorbereitung: Der Schlüssel zum Erfolg
Bevor wir mit dem Pflanzen beginnen, ist es wichtig, alles vorzubereiten. Eine gute Vorbereitung spart Zeit und Mühe und erhöht die Erfolgschancen.
1. **Behälter vorbereiten:** Stelle sicher, dass deine Behälter sauber sind und über ausreichend Drainagelöcher verfügen. Wenn du recycelte Behälter verwendest, reinige sie gründlich mit Seifenwasser.
2. **Erde mischen:** Mische deine Blumenerde mit Kompost oder organischem Dünger. Das Verhältnis sollte etwa 2:1 (Blumenerde zu Kompost) betragen.
3. **Standort wählen:** Wähle einen sonnigen Standort auf deinem Dachgarten. Kohl braucht mindestens 6 Stunden Sonnenlicht pro Tag. Achte auch darauf, dass der Standort windgeschützt ist, da starke Winde die Pflanzen beschädigen können.
4. **Bewässerung planen:** Überlege dir, wie du deine Pflanzen bewässern wirst. Ein Gartenschlauch ist ideal, aber eine Gießkanne tut es auch. Stelle sicher, dass du einen einfachen Zugang zu Wasser hast.
Schritt-für-Schritt-Anleitung: Kohl pflanzen und pflegen
Jetzt kommt der spannende Teil: das Pflanzen und Pflegen deines Dachgarten-Kohls!
1. **Behälter befüllen:** Fülle deine vorbereiteten Behälter mit der Erdmischung. Lasse etwa 5 cm Platz bis zum Rand.
2. **Setzlinge pflanzen:** Wenn du Setzlinge verwendest, grabe kleine Löcher in die Erde, die groß genug sind, um die Wurzelballen aufzunehmen. Setze die Setzlinge vorsichtig in die Löcher und fülle sie mit Erde auf. Drücke die Erde leicht an. Achte darauf, dass die Setzlinge nicht zu tief gepflanzt werden – die Oberseite des Wurzelballens sollte bündig mit der Erdoberfläche sein. Wenn du mehrere Setzlinge in einem Behälter pflanzt, achte auf ausreichend Abstand (ca. 30 cm), damit die Pflanzen genügend Platz zum Wachsen haben.
3. **Samen säen:** Wenn du Samen verwendest, säe sie etwa 1 cm tief in die Erde. Bedecke sie leicht mit Erde und gieße sie vorsichtig an. Halte die Erde feucht, bis die Samen keimen.
4. **Angießen:** Gieße die Pflanzen nach dem Pflanzen gründlich an. Das hilft, die Erde zu setzen und die Wurzeln zu befeuchten.
5. **Mulchen (optional):** Trage eine Schicht Mulch um die Pflanzen auf, um die Feuchtigkeit zu halten und Unkraut zu unterdrücken.
6. **Regelmäßig gießen:** Kohl braucht regelmäßige Bewässerung, besonders während trockener Perioden. Gieße die Pflanzen, wenn sich die oberste Erdschicht trocken anfühlt. Vermeide es, die Blätter zu benetzen, da dies Pilzkrankheiten fördern kann. Gieße am besten früh am Morgen oder spät am Abend.
7. **Düngen:** Dünge deine Kohlpflanzen alle paar Wochen mit Komposttee oder einem organischen Dünger. Befolge die Anweisungen auf der Verpackung des Düngers.
8. **Schädlinge kontrollieren:** Überprüfe deine Pflanzen regelmäßig auf Schädlinge wie Kohlweißlinge, Blattläuse oder Schnecken. Entferne Schädlinge von Hand oder verwende ein Insektenschutznetz. Du kannst auch natürliche Schädlingsbekämpfungsmittel wie Neemöl verwenden.
9. **Unkraut entfernen:** Entferne regelmäßig Unkraut, das in deinen Behältern wächst. Unkraut konkurriert mit den Kohlpflanzen um Nährstoffe und Wasser.
10. **Blätter ernten:** Du kannst die äußeren Blätter des Kohls ernten, sobald sie groß genug sind. Schneide die Blätter mit einer Gartenschere ab. Die Pflanze wird weiterhin neue Blätter produzieren.
Herausforderungen und Lösungen
Wie bei jedem Gartenprojekt gibt es auch beim Anbau von Kohl im Dachgarten einige Herausforderungen. Hier sind einige häufige Probleme und wie du sie lösen kannst:
* **Schädlinge:** Kohlweißlinge sind ein häufiges Problem. Sie legen ihre Eier auf die Blätter, und die Raupen fressen dann den Kohl. Du kannst die Eier und Raupen von Hand entfernen oder ein Insektenschutznetz verwenden.
* **Krankheiten:** Pilzkrankheiten können auftreten, wenn die Blätter zu feucht sind. Vermeide es, die Blätter zu benetzen, und sorge für eine gute Belüftung.
* **Nährstoffmangel:** Wenn die Blätter gelb werden, kann dies ein Zeichen für Nährstoffmangel sein. Dünge die Pflanzen mit Komposttee oder einem organischen Dünger.
* **Sonnenbrand:** Wenn die Blätter braun werden, kann dies ein Zeichen für Sonnenbrand sein. Stelle die Pflanzen an einen schattigeren Standort oder verwende ein Schattiernetz.
* **Schlechte Drainage:** Wenn die Erde zu nass ist, kann dies zu Wurzelfäule führen. Stelle sicher, dass deine Behälter über ausreichend Drainagelöcher verfügen und verwende eine gut drainierende Blumenerde.
Erntezeit: Der Lohn deiner Arbeit
Nach einigen Wochen oder Monaten (je nach Sorte) ist es endlich Zeit, deinen Dachgarten-Kohl zu ernten!
* **Wann ernten:** Du kannst die äußeren Blätter des Kohls ernten, sobald sie groß genug sind. Die Pflanze wird weiterhin neue Blätter produzieren. Du kannst auch den ganzen Kopf ernten, wenn er die gewünschte Größe erreicht hat.
* **Wie ernten:** Schneide die Blätter oder den Kopf mit einer Gartenschere ab.
* **Lagerung:** Kohl kann im Kühlschrank bis zu einer Woche gelagert werden.
Zusätzliche Tipps für den erfolgreichen Dachgarten-Kohl
Hier sind noch ein paar zusätzliche Tipps, die dir helfen können, deinen Dachgarten-Kohl erfolgreich anzubauen:
* **Wähle die richtige Sorte:** Einige Kohlsorten sind besser für den Anbau in Containern geeignet als andere. Informiere dich vor dem Kauf über die verschiedenen Sorten und wähle eine, die für deine Bedürfnisse geeignet ist.
* **Starte früh:** Beginne mit dem Anbau deines Kohls im Frühjahr oder Herbst, wenn die Temperaturen milder sind. Kohl
Conclusion
So, there you have it! Transforming your rooftop into a thriving kale haven is not only achievable, but surprisingly simple with this DIY trick. We’ve walked you through the process, highlighting the ease and affordability of creating your own rooftop garden kale setup. Forget expensive pre-made systems and complicated instructions. This method empowers you to take control, customize your garden to your specific space and needs, and enjoy the unparalleled satisfaction of harvesting your own fresh, organic kale.
But why is this DIY approach a must-try? Beyond the cost savings, it’s about connection. Connecting with nature, connecting with your food source, and connecting with a sustainable lifestyle. Store-bought kale simply can’t compare to the vibrant flavor and nutritional punch of kale you’ve nurtured yourself, from seedling to salad. Plus, imagine the bragging rights! You’ll be the envy of your neighbors, showcasing your green thumb and commitment to healthy living.
This method is also incredibly adaptable. Feel free to experiment with different container sizes and materials. Upcycle old buckets, repurpose wooden crates, or even build your own raised beds from reclaimed lumber. The possibilities are endless! Consider companion planting to further enhance your kale’s growth and deter pests. Marigolds, nasturtiums, and garlic are all excellent choices. You can also adjust the soil mix to suit your specific climate and growing conditions. If you live in a particularly hot or dry area, adding more moisture-retentive materials like coco coir or vermiculite can be beneficial.
And don’t limit yourself to just kale! Once you’ve mastered this technique, you can easily adapt it to grow other leafy greens like spinach, lettuce, and chard. You can even try growing herbs like basil, parsley, and cilantro alongside your kale. The key is to choose plants that have similar growing requirements and to provide them with adequate space and sunlight.
We’re confident that you’ll find this DIY rooftop garden kale setup to be a rewarding and enjoyable experience. It’s a chance to get your hands dirty, learn new skills, and create something truly special. So, gather your supplies, follow our simple steps, and get ready to harvest a bounty of delicious, homegrown kale.
We’re eager to hear about your experiences! Share your photos, tips, and questions in the comments below. Let’s build a community of rooftop gardeners and inspire others to embrace the joys of growing their own food. Don’t forget to tag us in your social media posts using #RooftopKaleDIY. Happy gardening!
Frequently Asked Questions (FAQ)
What kind of kale is best for a rooftop garden?
The best type of kale for your rooftop garden depends on your personal preferences and climate. However, some popular and reliable varieties include:
* **Dwarf Blue Curled Vates:** This is a compact variety that’s well-suited for containers and produces tightly curled, blue-green leaves. It’s also relatively cold-hardy.
* **Lacinato (Dinosaur) Kale:** Known for its long, slender, dark green leaves with a slightly bumpy texture, Lacinato kale has a milder flavor than some other varieties.
* **Red Russian Kale:** This variety has flat, fringed leaves with a reddish-purple hue. It’s known for its tender texture and slightly sweet flavor.
* **Redbor Kale:** A visually stunning variety with deeply ruffled, purple leaves. It’s a good choice for adding color to your garden.
Consider your local climate and growing season when choosing a variety. Some kales are more heat-tolerant than others, while others are better suited for colder climates.
How much sunlight does my rooftop kale garden need?
Kale thrives in full sun, which means at least 6 hours of direct sunlight per day.
So, there you have it! Transforming your rooftop into a thriving kale haven is not only achievable, but surprisingly simple with this DIY trick. We’ve walked you through the process, highlighting the ease and affordability of creating your own rooftop garden kale setup. Forget expensive pre-made systems and complicated instructions. This method empowers you to take control, customize your garden to your specific space and needs, and enjoy the unparalleled satisfaction of harvesting your own fresh, organic kale.
But why is this DIY approach a must-try? Beyond the cost savings, it’s about connection. Connecting with nature, connecting with your food source, and connecting with a sustainable lifestyle. Store-bought kale simply can’t compare to the vibrant flavor and nutritional punch of kale you’ve nurtured yourself, from seedling to salad. Plus, imagine the bragging rights! You’ll be the envy of your neighbors, showcasing your green thumb and commitment to healthy living.
This method is also incredibly adaptable. Feel free to experiment with different container sizes and materials. Upcycle old buckets, repurpose wooden crates, or even build your own raised beds from reclaimed lumber. The possibilities are endless! Consider companion planting to further enhance your kale’s growth and deter pests. Marigolds, nasturtiums, and garlic are all excellent choices. You can also adjust the soil mix to suit your specific climate and growing conditions. If you live in a particularly hot or dry area, adding more moisture-retentive materials like coco coir or vermiculite can be beneficial.
And don’t limit yourself to just kale! Once you’ve mastered this technique, you can easily adapt it to grow other leafy greens like spinach, lettuce, and chard. You can even try growing herbs like basil, parsley, and cilantro alongside your kale. The key is to choose plants that have similar growing requirements and to provide them with adequate space and sunlight.
We’re confident that you’ll find this DIY rooftop garden kale setup to be a rewarding and enjoyable experience. It’s a chance to get your hands dirty, learn new skills, and create something truly special. So, gather your supplies, follow our simple steps, and get ready to harvest a bounty of delicious, homegrown kale.
We’re eager to hear about your experiences! Share your photos, tips, and questions in the comments below. Let’s build a community of rooftop gardeners and inspire others to embrace the joys of growing their own food. Don’t forget to tag us in your social media posts using #RooftopKaleDIY. Happy gardening!
Frequently Asked Questions (FAQ)
What kind of kale is best for a rooftop garden?
The best type of kale for your rooftop garden depends on your personal preferences and climate. However, some popular and reliable varieties include:
* **Dwarf Blue Curled Vates:** This is a compact variety that’s well-suited for containers and produces tightly curled, blue-green leaves. It’s also relatively cold-hardy.
* **Lacinato (Dinosaur) Kale:** Known for its long, slender, dark green leaves with a slightly bumpy texture, Lacinato kale has a milder flavor than some other varieties.
* **Red Russian Kale:** This variety has flat, fringed leaves with a reddish-purple hue. It’s known for its tender texture and slightly sweet flavor.
* **Redbor Kale:** A visually stunning variety with deeply ruffled, purple leaves. It’s a good choice for adding color to your garden.
Consider your local climate and growing season when choosing a variety. Some kales are more heat-tolerant than others, while others are better suited for colder climates.
How much sunlight does my rooftop kale garden need?
Kale thrives in full sun, which means at least 6 hours of direct sunlight per day. However, it can tolerate partial shade, especially in hotter climates. If your rooftop receives less than 6 hours of sunlight, try to position your containers in the sunniest spot possible. You may also need to supplement with grow lights, especially during the winter months.
What kind of soil should I use for my rooftop kale garden?
Use a well-draining potting mix that’s rich in organic matter. Avoid using garden soil, as it can be too heavy and compact for containers. A good potting mix will provide adequate drainage and aeration, which are essential for healthy root growth. You can also amend your potting mix with compost, worm castings, or other organic fertilizers to boost its nutrient content.
How often should I water my rooftop kale garden?
Water your kale plants regularly, especially during hot, dry weather. The frequency of watering will depend on the size of your containers, the type of potting mix you’re using, and the weather conditions. Check the soil moisture regularly by sticking your finger into the soil. If the top inch of soil feels dry, it’s time to water. Avoid overwatering, as this can lead to root rot.
How do I fertilize my rooftop kale garden?
Kale is a heavy feeder, so it’s important to fertilize it regularly. You can use a balanced organic fertilizer, such as fish emulsion or compost tea. Apply fertilizer every 2-3 weeks during the growing season. You can also side-dress your plants with compost or worm castings.
How do I protect my rooftop kale garden from pests?
Kale is susceptible to a variety of pests, including aphids, cabbage worms, and flea beetles. To protect your plants, you can use organic pest control methods, such as:
* **Handpicking:** Remove pests by hand and drop them into a bucket of soapy water.
* **Insecticidal soap:** Spray your plants with insecticidal soap to kill aphids and other soft-bodied insects.
* **Bacillus thuringiensis (Bt):** This is a natural bacterium that’s effective against cabbage worms.
* **Row covers:** Cover your plants with row covers to prevent pests from reaching them.
How do I harvest my rooftop kale garden?
You can start harvesting kale leaves when they are about 6-8 inches long. Harvest the outer leaves first, leaving the inner leaves to continue growing. You can harvest kale leaves continuously throughout the growing season.
Can I grow kale in the winter on my rooftop?
Yes, kale is a cold-hardy vegetable that can be grown in the winter in many climates. However, you may need to provide some protection from frost and snow. You can cover your plants with row covers, blankets, or plastic sheeting. You can also move your containers to a sheltered location, such as a garage or greenhouse.
What are some creative ways to use my rooftop-grown kale?
Beyond salads, your rooftop-grown kale can be incredibly versatile! Try adding it to smoothies for a nutritional boost, sautéing it with garlic and olive oil for a simple side dish, or baking it into crispy kale chips. You can also use it in soups, stews, and stir-fries. Don’t be afraid to experiment and find your favorite ways to enjoy your homegrown kale!

Leave a Comment