
Rooftop Guava Growing Success is absolutely achievable, even if you think you don’t have the space! Imagine stepping onto your rooftop and plucking a juicy, sun-ripened guava, bursting with tropical flavor. Sounds like a dream, right? Well, it doesn’t have to be! For centuries, urban dwellers around the world have found creative ways to cultivate their own food, transforming limited spaces into thriving gardens. From the hanging gardens of Babylon to the modern-day balcony farms, the desire to connect with nature and enjoy fresh produce is deeply ingrained in us.
But let’s be honest, growing guava, especially on a rooftop, can seem daunting. Where do you even start? That’s where this DIY guide comes in! I’m going to share my tried-and-true secrets for achieving rooftop guava growing success, even if you’re a complete beginner. We’ll cover everything from choosing the right variety and container to providing the perfect soil and sunlight. Why is this so important? Because store-bought guavas often lack the intense flavor and nutritional value of homegrown ones. Plus, there’s nothing quite like the satisfaction of nurturing a plant from seedling to fruit-bearing beauty. So, get ready to transform your rooftop into a guava paradise!
Guavenanbau auf dem Dach: Dein DIY-Leitfaden für den Erfolg
Hallo Gartenfreunde! Habt ihr euch jemals vorgestellt, eure eigenen tropischen Früchte mitten in der Stadt anzubauen? Mit diesem DIY-Leitfaden zeige ich euch, wie ihr Guaven erfolgreich auf eurem Dach anbauen könnt. Es ist einfacher, als ihr denkt, und das Ergebnis ist unglaublich lohnend! Lasst uns loslegen!
Was du für den Guavenanbau auf dem Dach brauchst
Bevor wir anfangen, hier eine Liste der Dinge, die du benötigst:
* Guavensetzling oder -baum: Wähle eine Sorte, die für den Anbau in Containern geeignet ist. Zwergsorten sind ideal.
* Großer Pflanzkübel: Mindestens 60 cm Durchmesser und Tiefe.
* Hochwertige Blumenerde: Gut durchlässig und reich an organischen Stoffen.
* Drainagematerial: Kies, Blähton oder Tonscherben.
* Dünger: Langzeitdünger für Obstbäume oder organischen Dünger.
* Gießkanne oder Schlauch: Für die Bewässerung.
* Gartenschere: Zum Beschneiden.
* Mulch: Stroh, Rindenmulch oder Kokosfasern.
* Optional: Rankhilfe: Wenn du eine kletternde Guavensorte hast.
* Optional: Schädlingsbekämpfungsmittel: Biologisch oder chemisch, je nach Bedarf.
Die richtige Vorbereitung ist der Schlüssel
Bevor wir den Guavenbaum einpflanzen, müssen wir den Pflanzkübel vorbereiten. Eine gute Vorbereitung ist entscheidend für den Erfolg.
1. Drainage schaffen: Beginne damit, eine Schicht Drainagematerial (Kies, Blähton oder Tonscherben) auf den Boden des Pflanzkübels zu geben. Dies verhindert Staunässe, die für Guavenbäume schädlich sein kann. Eine Schicht von etwa 5-10 cm ist ideal.
2. Erde einfüllen: Fülle den Pflanzkübel mit hochwertiger Blumenerde. Achte darauf, dass die Erde gut durchlässig ist und reich an organischen Stoffen. Du kannst auch Kompost oder gut verrotteten Mist untermischen, um die Nährstoffversorgung zu verbessern. Lass oben etwa 5-10 cm Platz.
3. Gießen: Befeuchte die Erde leicht, bevor du den Guavenbaum einpflanzt. Dies hilft, die Erde zu verdichten und den Wurzeln einen guten Start zu ermöglichen.
Guavenbaum einpflanzen: Schritt für Schritt
Jetzt kommt der spannende Teil: das Einpflanzen des Guavenbaums!
1. Setzling vorbereiten: Nimm den Guavensetzling vorsichtig aus seinem Topf. Lockere die Wurzeln leicht auf, um sie zu stimulieren. Wenn die Wurzeln stark verwurzelt sind, kannst du sie vorsichtig mit den Fingern oder einer kleinen Gartengabel entwirren.
2. Pflanzloch graben: Grabe ein Loch in die vorbereitete Erde, das groß genug ist, um den Wurzelballen des Guavenbaums aufzunehmen. Das Loch sollte etwas breiter und genauso tief sein wie der Wurzelballen.
3. Baum einsetzen: Setze den Guavenbaum vorsichtig in das Loch. Achte darauf, dass der obere Rand des Wurzelballens mit der Oberfläche der Erde im Pflanzkübel abschließt.
4. Mit Erde auffüllen: Fülle das Loch mit Erde auf und drücke sie leicht an, um den Baum zu stabilisieren. Achte darauf, dass keine Luftblasen entstehen.
5. Angießen: Gieße den Guavenbaum gründlich an, bis das Wasser aus den Drainagelöchern am Boden des Pflanzkübels austritt. Dies hilft, die Erde zu setzen und den Wurzeln einen guten Kontakt zur Erde zu ermöglichen.
6. Mulchen: Trage eine Schicht Mulch (Stroh, Rindenmulch oder Kokosfasern) um den Stamm des Guavenbaums auf. Der Mulch hilft, die Feuchtigkeit im Boden zu halten, Unkraut zu unterdrücken und die Bodentemperatur zu regulieren. Achte darauf, dass der Mulch den Stamm des Baumes nicht berührt, um Fäulnis zu vermeiden.
Die richtige Pflege für deinen Guavenbaum
Die richtige Pflege ist entscheidend, damit dein Guavenbaum auf dem Dach gedeiht und Früchte trägt.
1. Bewässerung: Guavenbäume benötigen regelmäßige Bewässerung, besonders während der Wachstums- und Fruchtbildungsphase. Gieße den Baum, wenn die oberste Erdschicht trocken ist. Vermeide Staunässe, da dies zu Wurzelfäule führen kann. In heißen Sommermonaten kann es notwendig sein, täglich zu gießen.
2. Düngung: Dünge den Guavenbaum regelmäßig, um ihn mit den notwendigen Nährstoffen zu versorgen. Verwende einen Langzeitdünger für Obstbäume oder organischen Dünger. Befolge die Anweisungen auf der Verpackung. Dünge den Baum während der Wachstums- und Fruchtbildungsphase häufiger als in der Ruhephase.
3. Beschneidung: Beschneide den Guavenbaum regelmäßig, um seine Form zu erhalten, die Luftzirkulation zu verbessern und die Fruchtbildung zu fördern. Entferne abgestorbene, kranke oder beschädigte Äste. Beschneide den Baum am besten im späten Winter oder frühen Frühling, bevor das neue Wachstum beginnt.
4. Schädlingsbekämpfung: Überprüfe den Guavenbaum regelmäßig auf Schädlinge und Krankheiten. Blattläuse, Spinnmilben und Fruchtfliegen können Probleme verursachen. Verwende bei Bedarf biologische oder chemische Schädlingsbekämpfungsmittel. Achte darauf, die Anweisungen auf der Verpackung sorgfältig zu befolgen.
5. Überwinterung: Guavenbäume sind nicht frosthart. Wenn du in einer Region mit kalten Wintern lebst, musst du den Baum in einen geschützten Bereich bringen oder ihn mit Vlies abdecken, um ihn vor Frost zu schützen. Du kannst den Baum auch in einen kühleren Raum stellen, in dem die Temperatur nicht unter 5 Grad Celsius fällt. Reduziere die Bewässerung während der Überwinterung.
6. Sonnenlicht: Guavenbäume lieben die Sonne! Stelle sicher, dass dein Baum mindestens 6-8 Stunden direktes Sonnenlicht pro Tag bekommt. Ein sonniger Standort auf dem Dach ist ideal.
Herausforderungen und Lösungen
Der Anbau von Guaven auf dem Dach kann einige Herausforderungen mit sich bringen. Hier sind einige häufige Probleme und wie du sie lösen kannst:
* Schädlinge: Blattläuse, Spinnmilben und Fruchtfliegen können den Guavenbaum befallen. Verwende biologische Schädlingsbekämpfungsmittel wie Neemöl oder Insektizidseife. Du kannst auch Nützlinge wie Marienkäfer einsetzen, um die Schädlinge zu bekämpfen.
* Krankheiten: Wurzelfäule kann auftreten, wenn der Boden zu feucht ist. Stelle sicher, dass der Pflanzkübel eine gute Drainage hat und vermeide Staunässe. Entferne befallene Wurzeln und topfe den Baum in frische Erde um.
* Nährstoffmangel: Gelbe Blätter können auf einen Nährstoffmangel hinweisen. Dünge den Baum regelmäßig mit einem ausgewogenen Dünger. Du kannst auch Blattdünger verwenden, um die Nährstoffe direkt auf die Blätter aufzutragen.
* Fruchtfall: Vorzeitiger Fruchtfall kann durch Stress, unzureichende Bewässerung oder Nährstoffmangel verursacht werden. Stelle sicher, dass der Baum ausreichend Wasser und Nährstoffe erhält. Du kannst auch die Früchte ausdünnen, um die Belastung des Baumes zu reduzieren.
* Wind: Starke Winde können den Guavenbaum beschädigen. Stelle den Baum an einen windgeschützten Ort oder verwende eine Rankhilfe, um ihn zu stützen.
Erntezeit: Die Früchte deiner Arbeit genießen
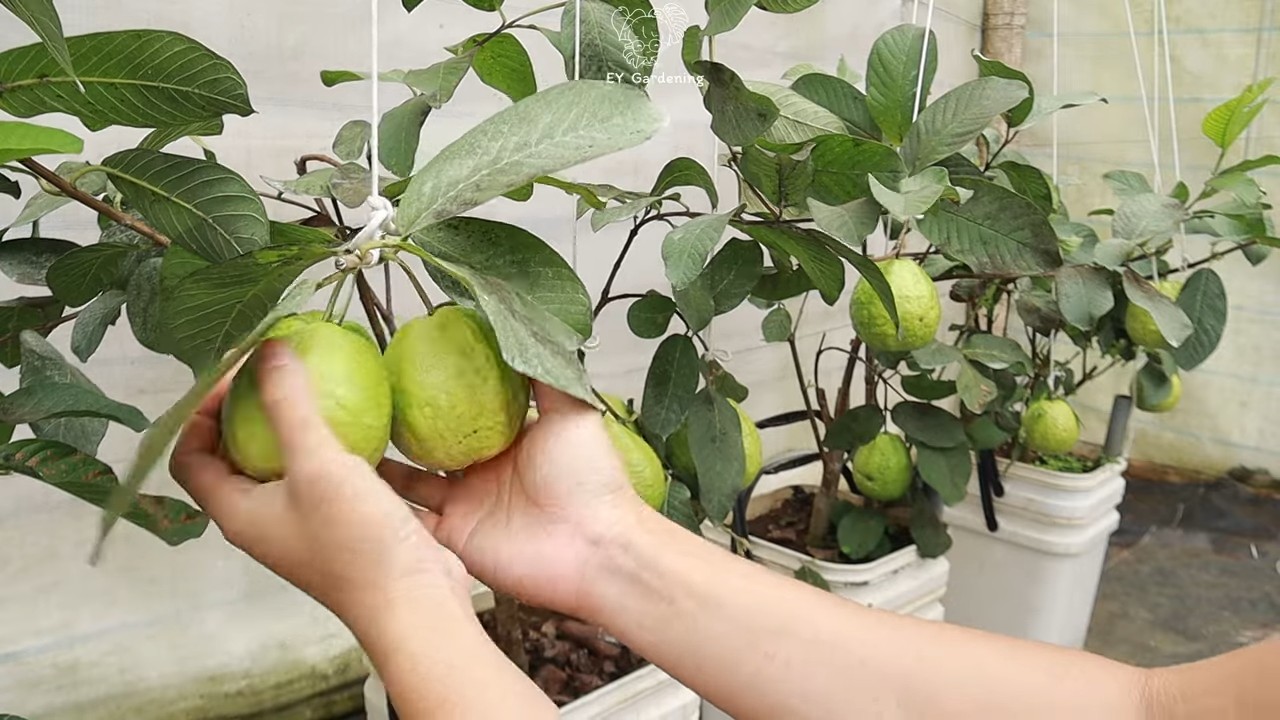
Nach all der harten Arbeit kommt der schönste Teil: die Ernte! Guaven sind reif, wenn sie sich leicht vom Baum lösen lassen und einen angenehmen Duft verströmen. Die Farbe der Frucht kann je nach Sorte variieren.
1. Ernte: Pflücke die reifen Guaven vorsichtig vom Baum. Vermeide es, die Früchte zu quetschen oder zu beschädigen.
2. Lagerung: Reife Guaven können bei

Conclusion
So, there you have it! Transforming your rooftop into a guava paradise is not just a whimsical dream; it’s an achievable reality with a little know-how and dedication. This DIY approach to rooftop guava growing offers a multitude of benefits, from enjoying the freshest, most flavorful fruit imaginable to creating a vibrant, green oasis in the heart of the urban landscape. Forget those bland, store-bought guavas that lack the sun-kissed sweetness of homegrown produce. With this method, you’ll be biting into juicy, aromatic guavas bursting with flavor, knowing you nurtured them from seedling to fruit.
But the advantages extend beyond just taste. Rooftop gardening, especially with fruit trees like guava, contributes significantly to a healthier environment. It helps purify the air, reduces the urban heat island effect, and provides a habitat for beneficial insects and pollinators. Plus, the sheer joy and satisfaction of watching your guava tree thrive, bearing fruit year after year, is an experience that’s hard to quantify.
This DIY trick is a must-try because it empowers you to take control of your food source, connect with nature in a meaningful way, and create a beautiful, productive space where you least expect it. It’s a sustainable, rewarding, and ultimately delicious endeavor.
Don’t be afraid to experiment with different guava varieties to find the ones that best suit your taste and climate. Consider adding companion plants like basil or marigolds to deter pests and attract pollinators. You can also explore different container sizes and materials to optimize your tree’s growth and yield. Perhaps you’ll even want to try grafting different guava varieties onto a single tree for a diverse harvest! The possibilities are endless.
We encourage you to embrace this DIY rooftop guava growing adventure and share your experiences with us. Let us know what varieties you’re growing, what challenges you’ve overcome, and what successes you’ve celebrated. Share your photos, tips, and tricks with the community. Together, we can create a network of rooftop guava growers, sharing knowledge and inspiring others to transform their urban spaces into edible paradises. So, grab your gardening gloves, gather your supplies, and get ready to embark on a journey of flavor, sustainability, and the pure joy of growing your own delicious guavas. Your rooftop guava growing success story starts now!
Frequently Asked Questions (FAQ)
What type of guava tree is best for rooftop growing?
Choosing the right guava variety is crucial for rooftop success. Dwarf varieties like ‘Ruby Supreme’ or ‘Thai White’ are excellent choices because they naturally stay smaller and are well-suited for container growing. These varieties also tend to be more productive in smaller spaces. Consider your local climate when selecting a variety. Some guavas are more cold-hardy than others. Research which varieties thrive in your region to ensure optimal growth and fruit production. Also, look for self-pollinating varieties to ensure fruit set without the need for cross-pollination.
What size container do I need for a guava tree?
The container size is a critical factor in the health and productivity of your rooftop guava tree. Start with a container that is at least 15-20 gallons in size. As the tree grows, you may need to transplant it into a larger container, eventually reaching 25-30 gallons. Ensure the container has adequate drainage holes to prevent waterlogging, which can lead to root rot. The material of the container can also impact the tree’s growth. Terracotta pots are porous and allow for better aeration, but they can dry out quickly. Plastic pots retain moisture better but may require more careful watering. Consider using a fabric grow bag, which allows for excellent drainage and aeration while also preventing the tree from becoming root-bound.
What kind of soil should I use for my guava tree?
Guava trees thrive in well-draining, slightly acidic soil. A good potting mix for guava trees should consist of a blend of peat moss, perlite, and vermiculite. You can also add compost or aged manure to enrich the soil with nutrients. Avoid using garden soil, as it can be too heavy and compact, hindering drainage and root growth. The ideal pH range for guava trees is between 5.5 and 6.5. You can test the soil pH using a soil testing kit and amend it with sulfur to lower the pH or lime to raise it. Regularly replenish the soil with compost or other organic matter to maintain its fertility and structure.
How often should I water my guava tree?
Watering frequency depends on several factors, including the climate, the size of the container, and the age of the tree. Generally, water your guava tree deeply whenever the top inch of soil feels dry to the touch. During hot, dry weather, you may need to water daily. Avoid overwatering, as this can lead to root rot. Ensure the container has adequate drainage to prevent water from pooling at the bottom. During the dormant season (winter), reduce watering frequency. Monitor the tree’s leaves for signs of underwatering (wilting) or overwatering (yellowing). Adjust your watering schedule accordingly.
How much sunlight does a guava tree need?
Guava trees require at least 6-8 hours of direct sunlight per day to thrive and produce fruit. Choose a location on your rooftop that receives ample sunlight throughout the day. If your rooftop doesn’t receive enough sunlight, you may need to supplement with grow lights. Rotate the tree regularly to ensure all sides receive adequate sunlight. Insufficient sunlight can lead to stunted growth, reduced fruit production, and poor fruit quality.
How do I fertilize my guava tree?
Guava trees are heavy feeders and require regular fertilization to maintain their health and productivity. Use a balanced fertilizer with a ratio of 10-10-10 or 14-14-14. Fertilize the tree every 2-3 months during the growing season (spring and summer). Reduce fertilization during the dormant season (winter). You can also supplement with organic fertilizers like compost tea or fish emulsion. Follow the instructions on the fertilizer label carefully to avoid over-fertilizing, which can damage the tree.
How do I protect my guava tree from pests and diseases?
Regularly inspect your guava tree for signs of pests and diseases. Common pests that affect guava trees include aphids, mealybugs, and scale insects. You can control these pests with insecticidal soap or neem oil. Diseases that can affect guava trees include anthracnose and root rot. Prevent these diseases by ensuring good air circulation, proper drainage, and avoiding overwatering. Prune the tree regularly to remove dead or diseased branches. Consider using organic pest control methods to minimize the use of harmful chemicals.
How do I prune my guava tree?
Pruning is essential for maintaining the shape, size, and productivity of your guava tree. Prune the tree in late winter or early spring before new growth begins. Remove any dead, diseased, or crossing branches. Prune to create an open canopy that allows for good air circulation and sunlight penetration. You can also prune to control the size and shape of the tree. Guava trees fruit on new growth, so avoid pruning too heavily, as this can reduce fruit production.
How long does it take for a guava tree to bear fruit?
Guava trees typically start bearing fruit within 2-4 years of planting. The exact time depends on the variety, the growing conditions, and the age of the tree. Grafted trees tend to fruit sooner than seedling trees. Provide the tree with optimal growing conditions, including ample sunlight, well-draining soil, and regular fertilization, to encourage fruit production.
Can I grow guava trees in cold climates?
Guava trees are tropical and subtropical plants that are sensitive to frost. If you live in a cold climate, you can still grow guava trees in containers, but you will need to protect them from frost during the winter months. Move the tree indoors to a sunny location or wrap it in burlap to insulate it from the cold. You can also use a frost blanket to protect the tree from freezing temperatures.


Leave a Comment