
Sack Grown Watermelons: Imagine biting into a juicy, sun-ripened watermelon, bursting with flavor, and knowing you grew it yourself… in a sack! Sounds a bit unconventional, right? But that’s the beauty of home gardening – it’s all about experimenting and finding clever ways to maximize your space and yield. For centuries, gardeners have been innovating, adapting techniques to their environments and resources. From ancient hanging gardens to modern-day urban farms, the spirit of ingenuity thrives.
I’m so excited to share this DIY trick with you because let’s face it, not everyone has acres of land to dedicate to sprawling watermelon vines. That’s where the magic of sack gardening comes in! This method is perfect for small spaces, balconies, or even patios. Plus, it’s a fantastic way to recycle those sturdy sacks you might have lying around.
Why do you need this DIY trick? Because growing your own food is incredibly rewarding! Not only do you get to enjoy fresh, delicious produce, but you also gain a deeper connection to nature and a sense of accomplishment. And with sack grown watermelons, you can enjoy that sweet summer treat even if you’re short on space. So, let’s dive in and discover how to grow your own watermelons in a sack!
Growing Watermelons in Sacks: A DIY Guide to Bumper Crops in Small Spaces
Hey there, fellow gardening enthusiasts! Ever dreamed of harvesting juicy, homegrown watermelons but thought you didn’t have the space? Well, I’m here to tell you that you absolutely can! I’ve been experimenting with growing watermelons in sacks for a few seasons now, and the results have been amazing. It’s a fantastic way to maximize your yield, especially if you’re working with a small yard, balcony, or even just a sunny patio. Let me walk you through my tried-and-true method.
What You’ll Need
Before we dive in, let’s gather our supplies. This is what I’ve found works best:
* Burlap Sacks or Heavy-Duty Grow Bags: These are your watermelon homes! I prefer burlap sacks because they’re breathable and biodegradable, but sturdy grow bags work just as well. Aim for a size of at least 20 gallons, but bigger is always better. Think about the root system of a watermelon plant; it needs room to spread.
* High-Quality Potting Mix: Don’t skimp on this! Watermelons are heavy feeders, so you need a rich, well-draining mix. I like to use a blend of compost, peat moss (or coco coir), perlite, and vermiculite.
* Watermelon Seeds or Seedlings: Choose a variety that’s known to do well in your climate and that fits your space. Bush varieties are generally more compact and suitable for sack growing. I’ve had great success with Sugar Baby and Bush Sugar Baby.
* Slow-Release Fertilizer: This will provide a steady stream of nutrients throughout the growing season. Look for a fertilizer specifically formulated for fruits and vegetables.
* Trellis or Support System: Watermelon vines can get heavy, so you’ll need something to support them. A simple tomato cage, a sturdy trellis, or even just some strong stakes will do the trick.
* Watering Can or Hose: Consistent watering is crucial for watermelon success.
* Gardening Gloves: To keep your hands clean and protected.
* Scissors or a Knife: For cutting twine or making drainage holes.
* Twine or Plant Ties: For securing the vines to the trellis.
* Optional: A soil moisture meter can be helpful for monitoring the soil’s moisture level.
Preparing Your Sacks
This is a crucial step to ensure proper drainage and aeration.
1. Choose Your Location: Watermelons need at least 6-8 hours of direct sunlight per day, so pick a spot that gets plenty of sunshine. Make sure the location is also sheltered from strong winds, which can damage the vines.
2. Prepare the Sacks: If you’re using burlap sacks, you might want to line them with a layer of landscape fabric to prevent the soil from drying out too quickly. This is optional, but I’ve found it helps retain moisture.
3. Create Drainage Holes: This is essential! If your sacks don’t have drainage holes, use scissors or a knife to create several holes in the bottom. This will prevent the soil from becoming waterlogged, which can lead to root rot.
4. Fill the Sacks: Now, it’s time to fill your sacks with the potting mix. Leave a few inches of space at the top. As you fill, gently pat down the soil to remove any air pockets.
Planting Your Watermelon Seeds or Seedlings
Now for the fun part – getting those watermelons started!
1. Starting from Seed: If you’re starting from seed, sow the seeds directly into the sacks. Plant 2-3 seeds per sack, about an inch deep. Water gently after planting.
2. Starting with Seedlings: If you’re using seedlings, gently remove them from their containers and plant them in the center of the sacks. Make sure the top of the root ball is level with the soil surface. Water thoroughly after planting.
3. Thinning (if necessary): If you planted multiple seeds per sack, thin out the seedlings once they’re a few inches tall, leaving only the strongest one.
4. Add Slow-Release Fertilizer: Sprinkle the slow-release fertilizer around the base of the plants, following the instructions on the package. Gently mix it into the top layer of soil.
Caring for Your Watermelon Plants
This is where the real work begins, but it’s also the most rewarding part!
1. Watering: Watermelons need consistent moisture, especially during hot weather. Water deeply whenever the top inch of soil feels dry to the touch. Avoid overwatering, as this can lead to root rot. A soil moisture meter can be really helpful here. I usually water deeply every other day, but I always check the soil first.
2. Fertilizing: In addition to the slow-release fertilizer, you may need to supplement with liquid fertilizer every few weeks. Look for a fertilizer that’s high in potassium and phosphorus, which are essential for fruit development. I like to use a seaweed-based fertilizer.
3. Pruning: Pruning can help improve air circulation and encourage fruit production. Remove any suckers (small shoots that grow from the base of the plant) and any yellowing or diseased leaves.
4. Pollination: Watermelons need to be pollinated in order to produce fruit. If you’re growing your watermelons indoors or in an area with limited bee activity, you may need to hand-pollinate them. To do this, use a small paintbrush to transfer pollen from the male flowers to the female flowers. Female flowers have a small, immature watermelon at the base.
5. Supporting the Vines: As the vines grow, train them to climb the trellis or support system. Use twine or plant ties to secure the vines to the support. This will help prevent the vines from breaking under the weight of the watermelons.
6. Protecting the Fruit: As the watermelons develop, you may need to protect them from pests and diseases. Cover the fruits with netting or burlap to protect them from birds and insects. You can also use organic pesticides or fungicides if necessary.
7. Sun Protection: In extremely hot climates, the watermelons can get sunburned. If this happens, you can shade them with a piece of cloth or cardboard.
Harvesting Your Watermelons
The moment you’ve been waiting for!
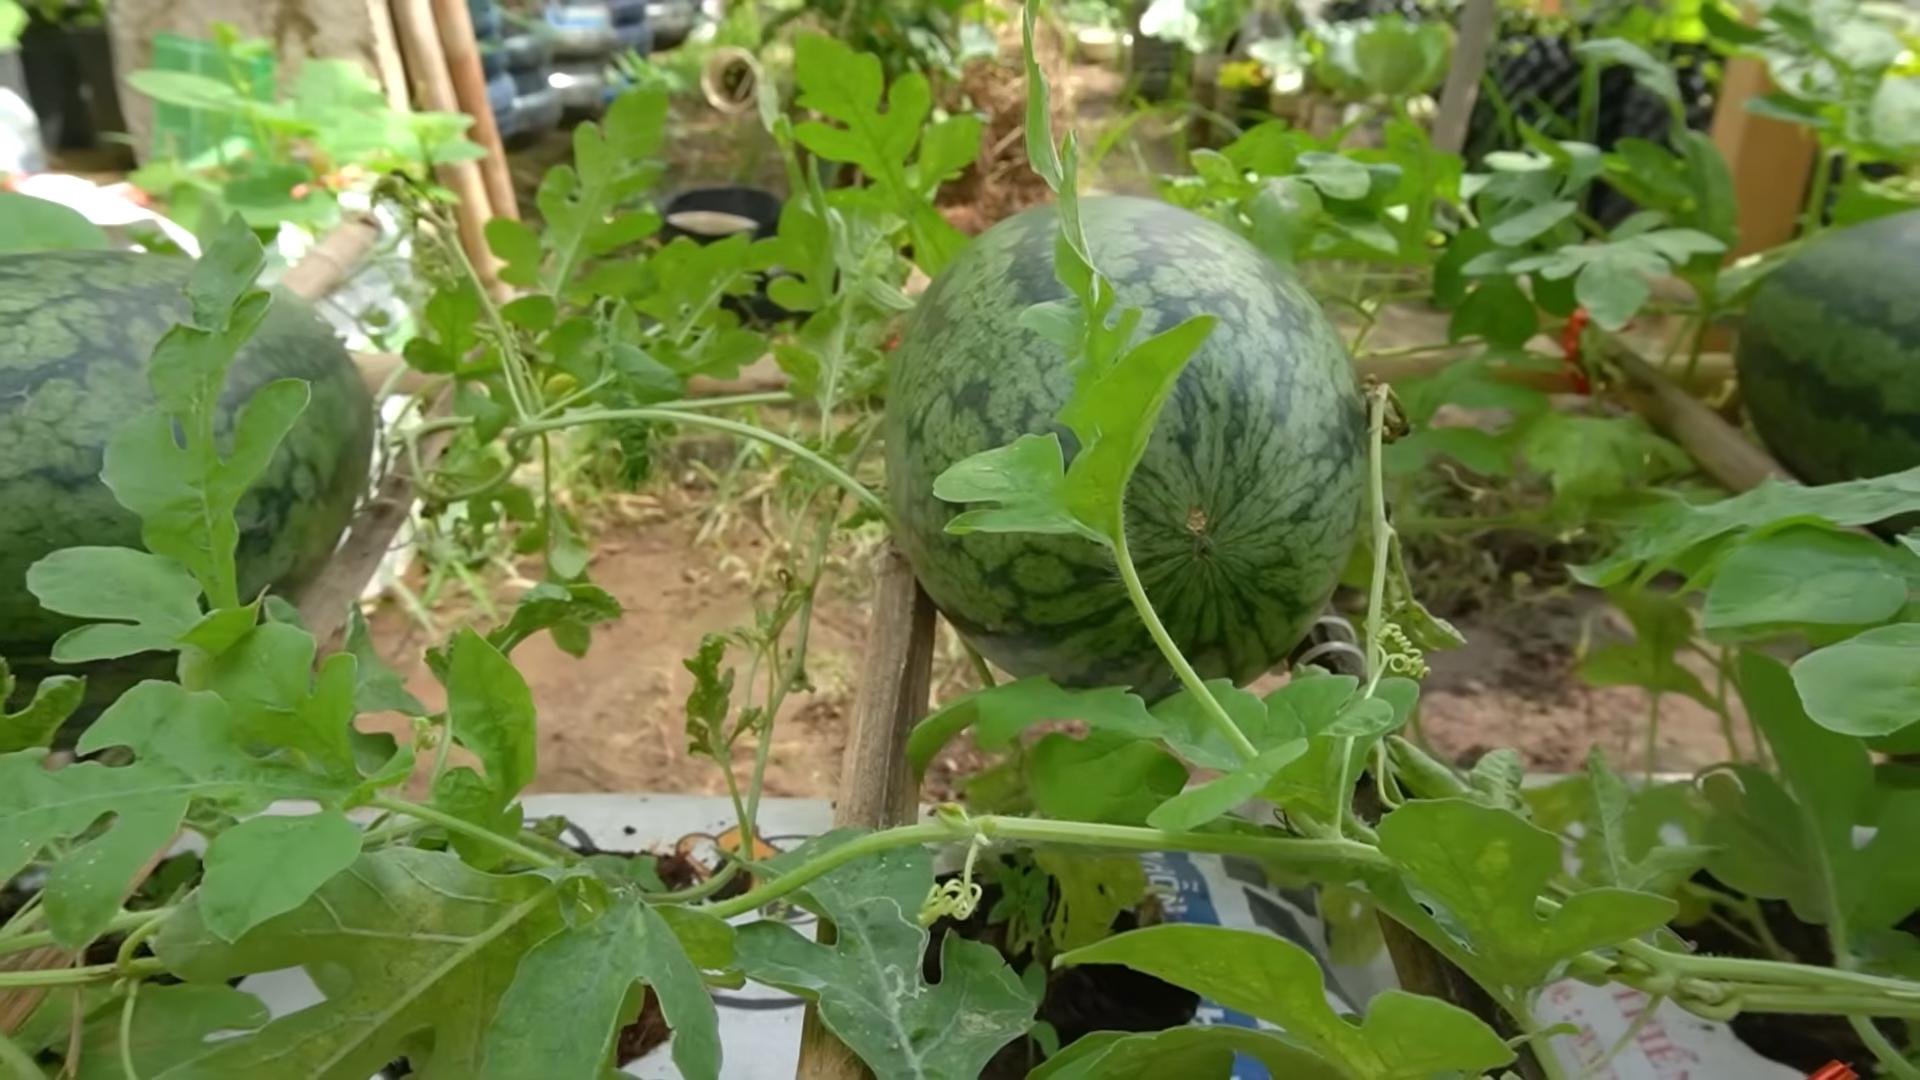
1. Determining Ripeness: Knowing when to harvest your watermelons can be tricky, but there are a few telltale signs. The tendril closest to the fruit should be brown and dry. The bottom of the watermelon (where it rests on the ground) should be yellow or cream-colored. And the watermelon should sound hollow when you thump it.
2. Harvesting: Once you’re confident that your watermelons are ripe, use a sharp knife to cut them from the vine. Leave a few inches of stem attached to the fruit.
3. Enjoy! Now, it’s time to enjoy the fruits (literally!) of your labor. Slice open your homegrown watermelons and savor the sweet, juicy flavor.
Troubleshooting
Even with the best care, you might encounter some challenges along the way. Here are a few common problems and how to deal with them:
* Yellowing Leaves: This could be a sign of overwatering, underwatering, or nutrient deficiency. Check the soil moisture and adjust your watering accordingly. If the problem persists, try fertilizing with a balanced fertilizer.
* Lack of Fruit: This could be due to poor pollination. Try hand-pollinating the flowers or attracting more bees to your garden.
* Pests and Diseases: Keep an eye out for common watermelon pests like aphids, squash bugs, and vine borers. Treat infestations with organic pesticides or insecticidal soap. Prevent diseases by providing good air circulation and avoiding overwatering.
* Fruit Rot: This is usually caused by fungal diseases. Remove any affected fruits and treat the plants with a fungicide.
Choosing the Right Watermelon Variety
Not all watermelons are created equal, especially when it comes to sack growing. Here’s what I look for:
* Bush Varieties: These are compact and well-suited for containers. They don’t produce long, sprawling vines like traditional watermelon varieties.
* Smaller Fruit Size: Choose varieties that produce smaller watermelons, typically under 10 pounds. This will make it easier to support the fruit and prevent the vines from breaking.
* Early Maturity: Look for varieties that mature quickly, especially if you have a short growing season.
Some of my favorite varieties for sack growing include:
* Sugar Baby: A classic bush variety with small, sweet watermelons.
* Bush Sugar Baby: An even more compact version of Sugar Baby.
* Golden Midget: A small, yellow-fleshed watermelon that’s perfect for containers.

Conclusion
So, there you have it! Growing watermelons in sacks might sound unconventional, but as we’ve explored, it’s a game-changer for space-saving gardening, early harvests, and even controlling soil conditions. This method isn’t just a quirky experiment; it’s a practical solution for anyone who dreams of enjoying homegrown watermelon, regardless of their garden size or soil quality.
Why is this DIY trick a must-try? Because it democratizes watermelon cultivation. No longer is this juicy summer fruit reserved for those with sprawling gardens. Sack grown watermelons open the door to balconies, patios, and small yards, allowing even apartment dwellers to experience the joy of nurturing their own produce. The controlled environment within the sack also allows for better management of soil nutrients and moisture, leading to healthier plants and potentially larger, sweeter fruits. Plus, the elevated position of the sack can help protect your precious melons from ground-dwelling pests and diseases.
But the beauty of this method lies in its adaptability. Feel free to experiment with different sack sizes to accommodate various watermelon varieties. Consider using a dark-colored sack to absorb more heat in cooler climates, or a lighter-colored one to reflect sunlight in hotter regions. You can also tailor your soil mix to the specific needs of your chosen watermelon type. For example, adding more compost will provide extra nutrients, while incorporating perlite will improve drainage.
Don’t be afraid to get creative with your support system, either. While a sturdy trellis is ideal, you can also use ropes, netting, or even repurposed materials to cradle your growing melons. The key is to provide adequate support to prevent the fruit from detaching prematurely.
We encourage you to embrace this innovative approach and embark on your own sack grown watermelon adventure. The satisfaction of harvesting a ripe, juicy watermelon that you’ve nurtured from seed to fruit is truly unparalleled. It’s a rewarding experience that connects you to the natural world and provides a delicious, healthy treat for you and your loved ones.
More than just a gardening technique, growing watermelons in sacks is a testament to human ingenuity and our ability to adapt to our surroundings. It’s a reminder that even in the smallest of spaces, we can cultivate abundance and enjoy the fruits (literally!) of our labor.
So, grab a sack, some soil, and a watermelon seedling, and get ready to experience the magic of sack grown watermelons. We’re confident that you’ll be amazed by the results. And most importantly, don’t forget to share your experiences with us! We’d love to hear about your successes, challenges, and any unique variations you’ve tried. Share your photos and stories on social media using #SackGrownWatermelons and let’s inspire others to join the sack gardening revolution! Let’s prove that delicious, homegrown watermelons are within everyone’s reach, no matter where they live.
Frequently Asked Questions (FAQ)
What size sack is best for growing watermelons?
The ideal sack size depends on the watermelon variety you choose. For smaller, personal-sized watermelons like Sugar Baby or Bush Sugar Baby, a 15-20 gallon sack should suffice. However, for larger varieties like Charleston Gray or Jubilee, you’ll need a larger sack, ideally 30-50 gallons. The key is to provide enough space for the roots to develop and support the plant’s growth. A larger sack also holds more soil, which helps retain moisture and nutrients. Remember to choose a sack made from durable material that can withstand the weight of the soil and the growing watermelon. Woven polypropylene sacks are a good option, as they are strong, breathable, and relatively inexpensive.
What type of soil should I use for sack grown watermelons?
Watermelons thrive in well-draining, nutrient-rich soil. A good mix would be equal parts of:
* **Potting soil:** Provides a good base for root growth.
* **Compost:** Adds essential nutrients and improves soil structure.
* **Perlite or Vermiculite:** Enhances drainage and aeration.
You can also add a slow-release fertilizer to provide a steady supply of nutrients throughout the growing season. Avoid using heavy clay soil, as it can become waterlogged and suffocate the roots. Before planting, test the soil pH to ensure it’s within the optimal range of 6.0 to 6.8. You can amend the soil with lime to raise the pH or sulfur to lower it.
How often should I water my sack grown watermelon?
Watermelons need consistent moisture, especially during hot weather and fruit development. Check the soil moisture regularly by sticking your finger a few inches into the soil. If it feels dry, it’s time to water. Water deeply, ensuring that the entire sack is thoroughly moistened. Avoid overwatering, as this can lead to root rot. A good rule of thumb is to water every 2-3 days, but adjust the frequency based on the weather conditions and the size of the sack. Consider using a soaker hose or drip irrigation system to deliver water directly to the roots, minimizing water loss through evaporation.
How do I support the growing watermelon in the sack?
As the watermelon grows, it will become heavy and require support to prevent the vine from breaking or the fruit from detaching prematurely. You can use a variety of methods to provide support, including:
* **Trellis:** A sturdy trellis is ideal for supporting the vine and the fruit. Train the vine to grow along the trellis and use slings or netting to cradle the watermelon.
* **Slings:** You can make slings from old t-shirts, pantyhose, or burlap to support the watermelon. Tie the sling to the trellis or a sturdy support structure.
* **Netting:** Use netting to create a hammock-like support for the watermelon. Secure the netting to the trellis or a frame.
Ensure that the support system is strong enough to handle the weight of the mature watermelon. Check the support regularly and adjust it as needed as the fruit grows.
What are some common pests and diseases that affect sack grown watermelons, and how can I prevent them?
Sack grown watermelons are susceptible to the same pests and diseases as watermelons grown in the ground. Some common problems include:
* **Aphids:** Small, sap-sucking insects that can weaken the plant. Control aphids with insecticidal soap or neem oil.
* **Squash bugs:** Pests that feed on the leaves and stems of watermelon plants. Handpick squash bugs or use insecticidal soap.
* **Powdery mildew:** A fungal disease that causes a white, powdery coating on the leaves. Prevent powdery mildew by providing good air circulation and avoiding overhead watering. Treat with fungicide if necessary.
* **Fusarium wilt:** A soilborne fungal disease that can cause the plant to wilt and die. Prevent Fusarium wilt by using disease-resistant varieties and practicing crop rotation.
To prevent pests and diseases, inspect your plants regularly and take action at the first sign of trouble. Use organic pest control methods whenever possible. Ensure that your plants have good air circulation and are not overcrowded.
Can I grow watermelons in sacks in a greenhouse?
Yes, growing watermelons in sacks in a greenhouse is an excellent way to extend the growing season and protect your plants from harsh weather conditions. Greenhouses provide a controlled environment that allows you to regulate temperature, humidity, and light levels. This can lead to faster growth and higher yields. When growing watermelons in sacks in a greenhouse, ensure that you provide adequate ventilation to prevent the buildup of humidity, which can lead to fungal diseases. You may also need to supplement the natural light with grow lights, especially during the winter months.
How long does it take to grow a watermelon in a sack?
The time it takes to grow a watermelon in a sack depends on the variety, the climate, and the growing conditions. Generally, it takes 70-90 days from planting to harvest. Smaller varieties like Sugar Baby may mature in as little as 70 days, while larger varieties may take up to 90 days or more. To determine when your watermelon is ripe, look for the following signs:
* The tendril closest to the fruit turns brown and dry.
* The underside of the watermelon (where it rests on the ground or sling) turns from white to yellow.
* The watermelon sounds dull and hollow when you thump it.
Harvest your watermelon when it is fully ripe for the best flavor and texture.


Leave a Comment