
Soil Free Potato Growing: Imagine harvesting a bounty of delicious potatoes without ever getting your hands dirty! Sounds like a dream, right? Well, it’s not! For centuries, innovative gardeners have been experimenting with alternative growing methods, and now, I’m excited to share a fantastic DIY trick that lets you grow potatoes without any soil at all.
While traditional potato farming has deep roots in agricultural history, dating back thousands of years in the Andes Mountains, the desire to simplify and optimize the process has always been present. This soil-free method isn’t just a modern fad; it’s a testament to human ingenuity and our constant quest for efficient and sustainable gardening practices. Think of it as a high-tech twist on an age-old staple!
Why should you try this soil free potato growing hack? Well, for starters, it’s incredibly space-saving, perfect for apartment dwellers or anyone with limited garden space. Plus, it eliminates common soil-borne diseases and pests that can plague traditional potato crops. And let’s be honest, who wouldn’t love the satisfaction of pulling perfectly clean, ready-to-cook potatoes from a container? I know I would! This DIY project is easy, fun, and yields a surprisingly abundant harvest. So, let’s dive in and discover how you can grow your own delicious potatoes, completely soil-free!
Growing Potatoes Without Soil: A Fun and Easy DIY Project!
Hey there, fellow gardening enthusiasts! Ever thought about growing potatoes without any soil? Sounds crazy, right? Well, it’s totally doable, and I’m here to walk you through the process. It’s a fun experiment, a great way to save space, and honestly, it’s just plain cool. Get ready to impress your friends and family with your potato-growing prowess!
What You’ll Need
Before we dive in, let’s gather our supplies. This is a pretty low-cost project, which is always a win in my book!
* Seed Potatoes: Choose certified seed potatoes from a reputable source. Avoid using potatoes from the grocery store, as they may be treated to prevent sprouting. I usually go for varieties like Yukon Gold or Red Pontiac, but feel free to experiment!
* A Large Container: Think big! A large trash can (plastic is fine), a sturdy laundry basket, or even a large storage tote will work. The bigger, the better, as it gives the potato plants plenty of room to grow. Aim for at least 20 gallons.
* Straw or Hay: This is our soil substitute! Straw is preferable as it decomposes slower than hay, but either will work. Make sure it’s clean and free of seeds.
* Water: Essential for life, obviously!
* Fertilizer (Optional): A balanced, slow-release fertilizer can give your potatoes a boost, but it’s not strictly necessary. I like to use a fertilizer specifically formulated for potatoes or vegetables.
* Sharp Knife: For cutting the seed potatoes (if needed).
* Gloves: To keep your hands clean.
* Watering Can or Hose: For watering your potato plants.
Preparing Your Seed Potatoes
Okay, let’s get our seed potatoes ready. This step is crucial for healthy potato plants.
1. Chitting (Sprouting) Your Potatoes (Optional but Recommended): This process encourages the potatoes to sprout before planting, giving them a head start. A few weeks before you plan to plant, place your seed potatoes in a cool, bright location (but not in direct sunlight). An egg carton or a tray works well. You’ll notice small sprouts, called “eyes,” starting to grow. This is exactly what we want!
2. Cutting Large Seed Potatoes: If your seed potatoes are large (bigger than an egg), you can cut them into smaller pieces. Each piece should have at least one or two “eyes.” This allows you to get more plants from a single seed potato.
* Use a clean, sharp knife to cut the potato.
* Let the cut pieces air dry for a day or two to allow the cut surfaces to callous over. This helps prevent rot.
3. Choosing Your Best Seed Potatoes: If you have multiple seed potatoes, choose the ones with the most prominent sprouts. These will likely produce the strongest plants.
Setting Up Your Potato Tower
Now for the fun part – building our soil-free potato tower!
1. Prepare the Container: Make sure your container is clean. If you’re using a trash can, drill some drainage holes in the bottom to prevent waterlogging.
2. Layering the Straw: Start with a layer of straw or hay at the bottom of the container, about 6-8 inches deep. This will be the base for our potato plants.
3. Planting the Seed Potatoes: Place your seed potatoes on top of the straw layer, spacing them about 10-12 inches apart. If you’re using cut pieces, make sure the “eyes” are facing upwards.
4. Covering the Potatoes: Cover the seed potatoes with another layer of straw, about 4-6 inches deep.
5. Watering: Water the straw thoroughly. You want it to be moist but not soggy.
6. Adding Fertilizer (Optional): If you’re using fertilizer, sprinkle a small amount over the straw layer. Follow the instructions on the fertilizer package.
The Growing Process: Hilling and Watering
This is where the magic happens! As your potato plants grow, we’ll need to “hill” them with more straw.
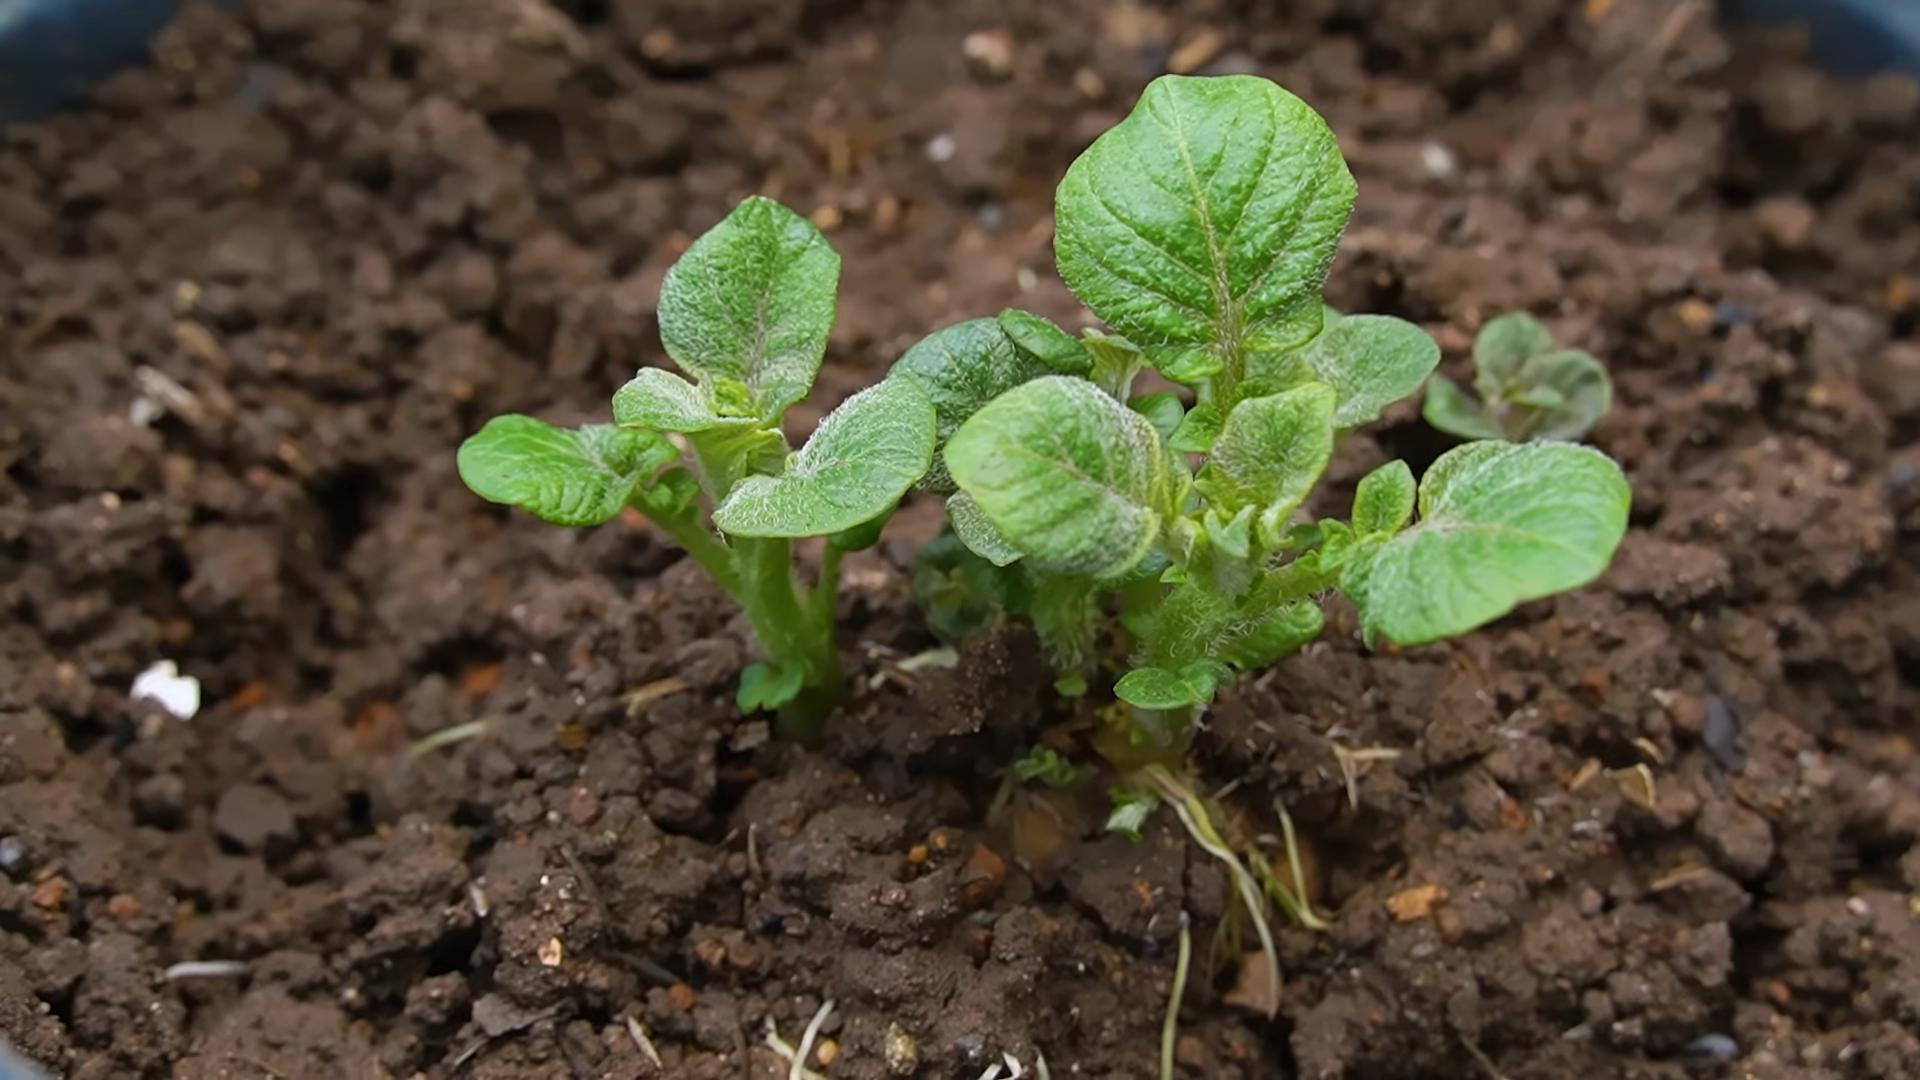
1. Waiting for Sprouts: Be patient! It may take a week or two for the potato plants to emerge from the straw.
2. Hilling with Straw: Once the plants are about 6-8 inches tall, add another layer of straw around them, burying the lower part of the stems. This encourages the plants to produce more potatoes along the buried stems.
3. Repeating the Hilling Process: Continue adding layers of straw as the plants grow, burying the stems each time. This is the key to getting a good harvest. I usually hill every 2-3 weeks.
4. Watering Regularly: Keep the straw moist but not soggy. Water deeply whenever the top inch or two of straw feels dry. The frequency of watering will depend on the weather and the drainage of your container.
5. Fertilizing (Optional): If you’re using fertilizer, apply it according to the package instructions. Avoid over-fertilizing, as this can lead to excessive foliage growth and fewer potatoes.
6. Sunlight: Make sure your potato plants get plenty of sunlight – at least 6-8 hours per day.
Dealing with Pests and Diseases
Even in a soil-free environment, pests and diseases can sometimes be a problem.
1. Monitoring Your Plants: Regularly inspect your potato plants for signs of pests or diseases. Look for things like aphids, potato beetles, or signs of blight.
2. Dealing with Pests: If you find pests, you can try hand-picking them off the plants or using an organic insecticide.
3. Preventing Diseases: Good air circulation and proper watering can help prevent diseases. Avoid overwatering, as this can create a favorable environment for fungal diseases.
4. Using Organic Solutions: If you need to treat your plants for pests or diseases, always use organic solutions whenever possible.
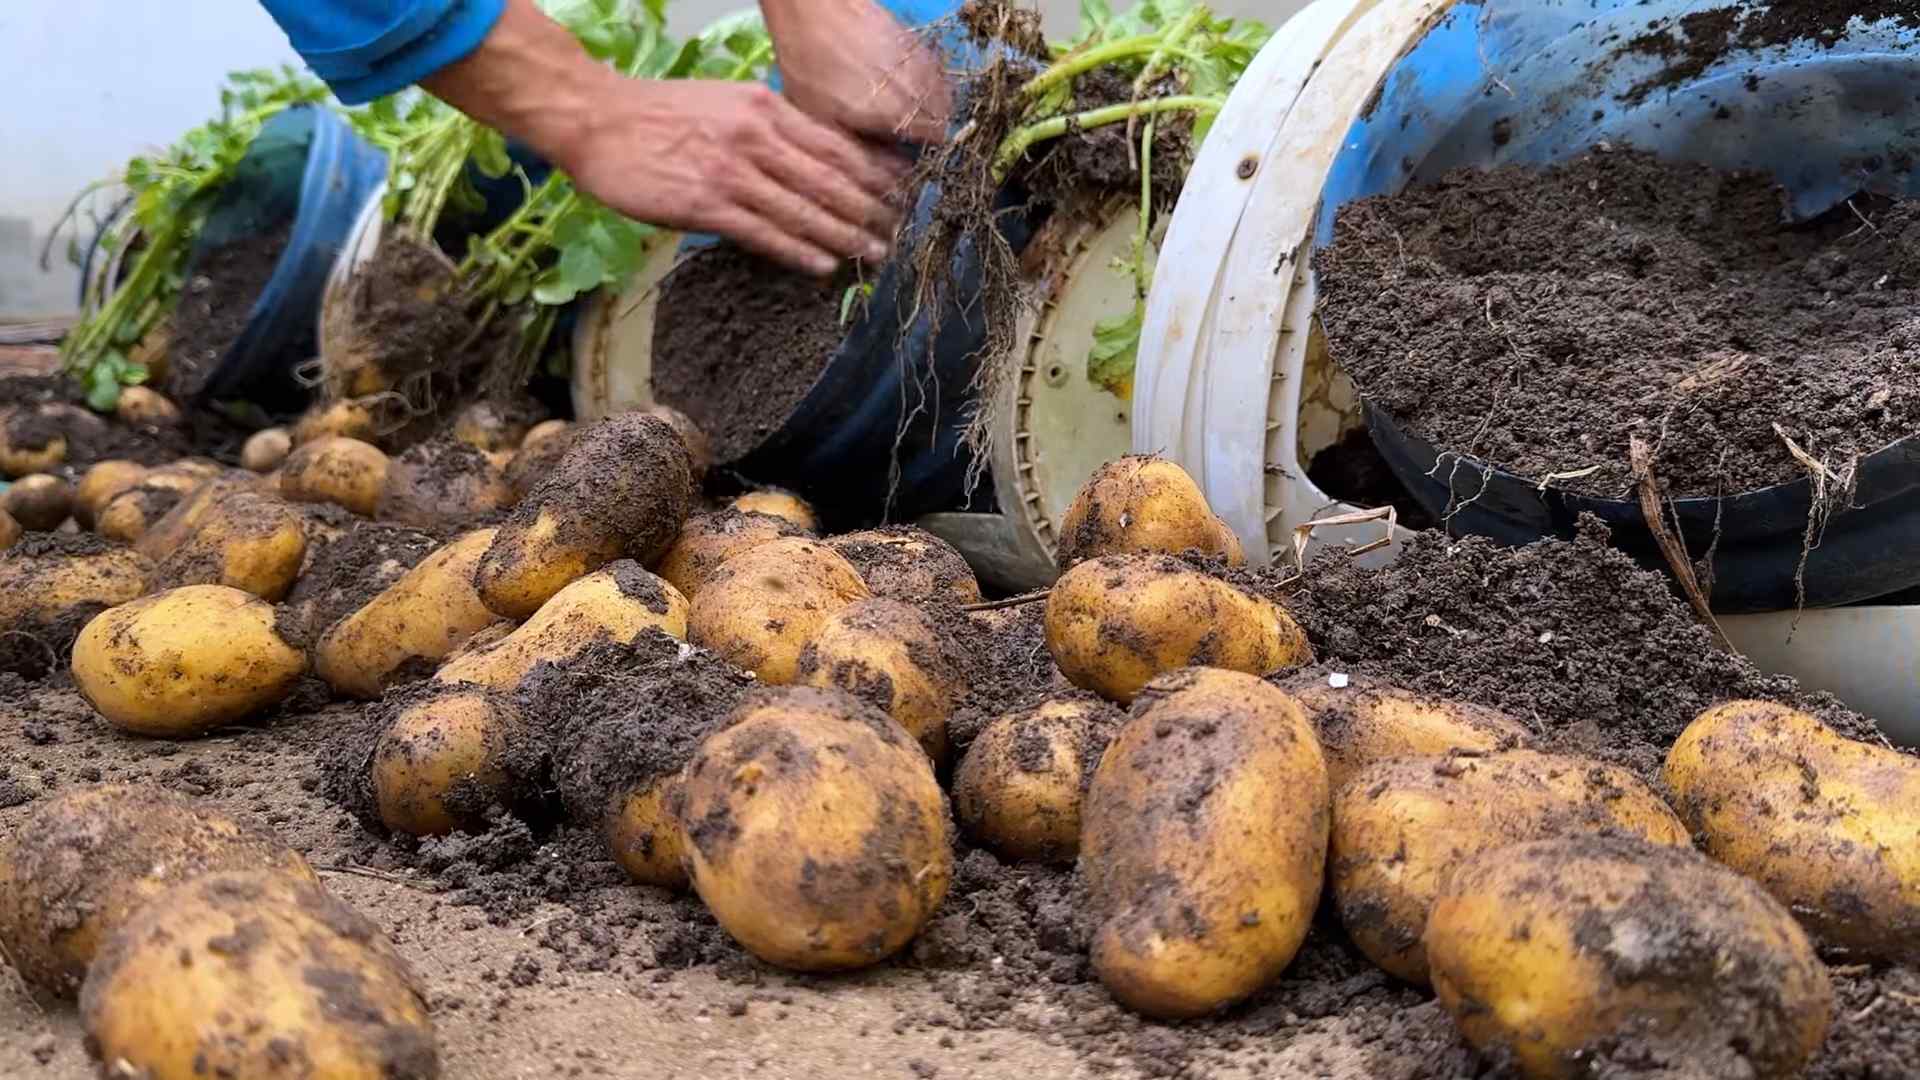
Harvesting Your Potatoes
The moment we’ve all been waiting for – harvesting our potatoes!
1. Knowing When to Harvest: Potatoes are typically ready to harvest about 80-100 days after planting. The foliage will start to turn yellow and die back.
2. Checking for Potatoes: You can gently dig around in the straw to check the size of the potatoes. If they’re big enough for your liking, it’s time to harvest!
3. Harvesting the Potatoes: Carefully remove the straw layer by layer, searching for the potatoes. They’ll be nestled among the straw.
4. Storing Your Potatoes: Store your harvested potatoes in a cool, dark, and dry place. A root cellar is ideal, but a basement or garage will also work.
Troubleshooting
Sometimes things don’t go exactly as planned. Here are a few common problems and how to fix them.
* Plants Not Sprouting: Make sure your seed potatoes are viable and have been properly chitted. Check the moisture level of the straw – it should be moist but not soggy.
* Yellowing Leaves: This could be a sign of overwatering, underwatering, or nutrient deficiency. Adjust your watering schedule and consider adding fertilizer.
* Pests: As mentioned earlier, monitor your plants regularly and take action if you find pests.
* Small Potatoes: This could be due to insufficient sunlight, lack of water, or nutrient deficiency. Make sure your plants are getting enough sunlight and water, and consider adding fertilizer.
Why This Method Works
You might be wondering, “How can potatoes grow without soil?” Well, potatoes are tubers, which are modified stems that store food. They don’t necessarily need soil to grow, as long as they have access to moisture and nutrients. The straw provides a supportive environment for the potatoes to develop, and it helps retain moisture.
Benefits of Soil-Free Potato Growing
* Space-Saving: This method is perfect for small spaces, like balconies or patios.
* Easy to Harvest: Harvesting potatoes from a straw tower is much easier than digging them out of the ground.
* Fewer Pests and Diseases: Soil-borne pests and diseases are less of a problem in a soil-free environment.
* Fun and Educational: It’s a great way to learn about plant growth and experiment with different gardening techniques.
Final Thoughts
Growing potatoes without soil is a rewarding and fun project. It’s a great way to get fresh, homegrown potatoes, even if you don’t have a lot of space. So, give it a try and see what you can grow! Happy gardening!
Conclusion
So, there you have it! Growing potatoes without soil might sound like something out of a science fiction movie, but it’s a surprisingly simple and incredibly rewarding experience. We’ve walked you through the process, highlighting the ease and accessibility of this method. But why should you ditch the dirt and embrace this innovative approach?
Firstly, it’s a game-changer for those with limited space. No sprawling garden required! A simple bucket or container on a balcony, patio, or even indoors is all you need. Secondly, it drastically reduces the risk of soilborne diseases and pests that can plague traditional potato crops. Say goodbye to potato blight and wireworms! Thirdly, harvesting is a breeze. No more digging and sifting through soil – just tip the container and collect your bounty.
But the real magic lies in the control you have over the growing environment. You can easily monitor moisture levels, nutrient availability, and overall plant health, leading to healthier, more productive plants. Plus, it’s a fantastic educational project for kids (and adults!) to learn about plant growth and sustainable gardening practices.
Ready to take your potato growing to the next level? Consider experimenting with different potato varieties. Red potatoes, Yukon Golds, or even fingerling potatoes can all thrive in this soil-free environment. You can also adjust the nutrient solution to cater to the specific needs of your chosen variety. Some gardeners even add a small amount of compost tea to the water for an extra boost of beneficial microbes.
Another exciting variation is to use different types of containers. While buckets are a popular choice, you can also use grow bags, plastic storage bins, or even repurposed containers. Just make sure they have adequate drainage holes.
Don’t be afraid to get creative with your setup. You can even build a vertical potato tower using stacked containers, maximizing your growing space and creating a visually stunning display.
The key to success with this method is consistent monitoring and maintenance. Regularly check the water level, adjust the nutrient solution as needed, and keep an eye out for any signs of pests or diseases. With a little bit of attention, you’ll be rewarded with a bountiful harvest of delicious, homegrown potatoes.
We wholeheartedly encourage you to try this soil-free potato growing method. It’s a fun, easy, and sustainable way to grow your own food, even if you don’t have a traditional garden. Once you experience the joy of harvesting your own potatoes from a bucket, you’ll be hooked!
So, grab a bucket, some seed potatoes, and get ready to embark on a new gardening adventure. And most importantly, don’t forget to share your experiences with us! We’d love to hear about your successes, challenges, and any creative variations you come up with. Share your photos and stories on social media using #SoilFreePotatoes and let’s inspire others to embrace this innovative growing technique. Happy growing!
Frequently Asked Questions (FAQ)
What exactly is soil-free potato growing, and how does it work?
Soil-free potato growing, often referred to as hydroponic or container potato growing, involves cultivating potatoes without using traditional soil. Instead, the potatoes are grown in a nutrient-rich water solution or a soilless growing medium like coco coir or perlite. The potato plant receives all the necessary nutrients and moisture directly from this solution, eliminating the need for soil. This method allows for greater control over the growing environment, reduces the risk of soilborne diseases, and simplifies harvesting. The seed potatoes sprout and develop roots in the solution, and the developing tubers are supported by the container and the growing medium (if used).
What are the benefits of growing potatoes without soil compared to traditional methods?
There are several advantages to soil-free potato growing:
* **Space Efficiency:** Ideal for small spaces like balconies, patios, or even indoors.
* **Disease and Pest Control:** Reduces the risk of soilborne diseases and pests.
* **Easy Harvesting:** Simplifies the harvesting process, eliminating the need for digging.
* **Controlled Environment:** Allows for precise control over nutrients, moisture, and temperature.
* **Faster Growth:** Can potentially lead to faster growth rates due to optimized nutrient delivery.
* **Reduced Weeding:** Eliminates the need for weeding.
* **Educational Value:** A great learning experience for understanding plant growth.
What kind of container should I use for soil-free potato growing?
The ideal container should be large enough to accommodate the growing potato plant and developing tubers. A 5-gallon bucket is a common and readily available option, but larger containers (10-20 gallons) are even better, especially for larger potato varieties. The container must have drainage holes to prevent waterlogging. Other suitable options include grow bags, plastic storage bins, and repurposed containers. The material of the container isn’t as important as its size and drainage capabilities. Dark-colored containers can help retain heat, which can be beneficial in cooler climates.
What type of seed potatoes are best suited for soil-free growing?
Most potato varieties can be grown using soil-free methods. However, some varieties tend to perform better than others. Early-maturing varieties like Yukon Gold, Red Norland, and fingerling potatoes are often recommended because they have a shorter growing season and are well-suited for container growing. Experimenting with different varieties is encouraged to find what works best in your specific environment. Ensure you are using certified seed potatoes to avoid introducing diseases to your growing system.
What kind of nutrient solution should I use, and how often should I change it?
A balanced hydroponic nutrient solution specifically formulated for vegetables is recommended. These solutions typically contain all the essential macronutrients (nitrogen, phosphorus, potassium) and micronutrients (iron, manganese, zinc, etc.) that potatoes need to thrive. Follow the manufacturer’s instructions for dilution and application rates. The frequency of changing the nutrient solution depends on the size of the container and the growth rate of the plants. As a general guideline, change the solution every 1-2 weeks, or more frequently if the plants are growing rapidly. Regularly monitor the pH and EC (electrical conductivity) of the solution to ensure it remains within the optimal range for potato growth. A pH of 5.5-6.5 is generally recommended.
How much light do soil-free potatoes need?
Potatoes need plenty of sunlight to grow and produce tubers. Aim for at least 6-8 hours of direct sunlight per day. If you’re growing indoors, you’ll need to supplement with artificial grow lights. LED grow lights are a popular choice because they are energy-efficient and provide the full spectrum of light that plants need. Position the grow lights close enough to the plants to provide adequate light intensity, but not so close that they burn the leaves.
How often should I water my soil-free potatoes?
The frequency of watering depends on the growing medium (if used), the size of the container, and the environmental conditions. If you’re using a soilless medium like coco coir or perlite, you’ll need to water more frequently than if you’re growing in a purely hydroponic system. The goal is to keep the growing medium consistently moist but not waterlogged. Check the moisture level of the medium regularly by sticking your finger into it. If it feels dry to the touch, it’s time to water. In a hydroponic system, ensure the roots are constantly submerged in the nutrient solution.
How long does it take to grow potatoes without soil?
The time it takes to grow potatoes without soil is similar to traditional methods, typically ranging from 70 to 120 days, depending on the variety. Early-maturing varieties will be ready for harvest sooner than late-maturing varieties. Monitor the plants closely for signs of maturity, such as yellowing leaves and the cessation of flowering. You can also gently feel around the base of the plant to check the size of the tubers.
How do I harvest my soil-free potatoes?
Harvesting soil-free potatoes is incredibly easy. Simply tip the container onto a tarp or other clean surface and gently separate the tubers from the roots and growing medium (if used). Be careful not to damage the potatoes during the harvesting process. Once harvested, brush off any excess growing medium and store the potatoes in a cool, dark, and dry place.
What are some common problems I might encounter, and how can I fix them?
Some common problems include nutrient deficiencies, pest infestations, and diseases. Nutrient deficiencies can be identified by yellowing leaves, stunted growth, or other abnormal symptoms. Adjust the nutrient solution accordingly. Pest infestations can be treated with organic insecticides or by manually removing the pests. Diseases can be prevented by using certified seed potatoes, maintaining good hygiene, and providing adequate ventilation. Regularly inspect your plants for any signs of problems and address them promptly.

Leave a Comment