
Soil Free Rosemary Growing: Imagine fresh, fragrant rosemary sprigs always at your fingertips, ready to elevate your culinary creations. What if I told you that you could achieve this without even getting your hands dirty in soil? Sounds too good to be true? Well, get ready to be amazed! This article unveils a revolutionary DIY trick that will transform how you think about growing rosemary.
Rosemary, with its woody aroma and needle-like leaves, has been cherished for centuries. From ancient Greece, where it was believed to enhance memory, to medieval times, where it symbolized love and remembrance, rosemary boasts a rich cultural history. Traditionally, cultivating this Mediterranean herb involved well-drained soil and plenty of sunshine. But what if you live in an apartment, have limited space, or simply want a cleaner, more convenient method? That’s where our soil-free solution comes in!
Many gardeners struggle with soil-borne diseases, pests, and the sheer messiness of traditional gardening. Soil Free Rosemary Growing eliminates these common problems, offering a hassle-free alternative that’s perfect for beginners and seasoned gardeners alike. I’m going to show you how to bypass the soil altogether and nurture thriving rosemary plants using a simple, inexpensive method. Get ready to unlock the secrets to effortless rosemary cultivation and enjoy the fresh, aromatic benefits of this incredible herb, right in your own home!
Growing Rosemary Without Soil: A DIY Hydroponic Adventure!
Hey there, fellow plant enthusiasts! Ever dreamt of having fresh rosemary at your fingertips, without the hassle of soil? Well, you’re in the right place! I’m going to walk you through a super fun and surprisingly easy DIY project: growing rosemary hydroponically. It’s a fantastic way to get fresh herbs, even if you don’t have a garden, and it’s a really cool science experiment all rolled into one. Let’s get started!
What You’ll Need: The Rosemary Hydroponics Shopping List
Before we dive in, let’s gather our supplies. Don’t worry, you probably have a lot of this stuff lying around already!
* Rosemary Cuttings: You can either take cuttings from an existing rosemary plant (about 4-6 inches long) or buy some from a nursery. Make sure they look healthy and vibrant!
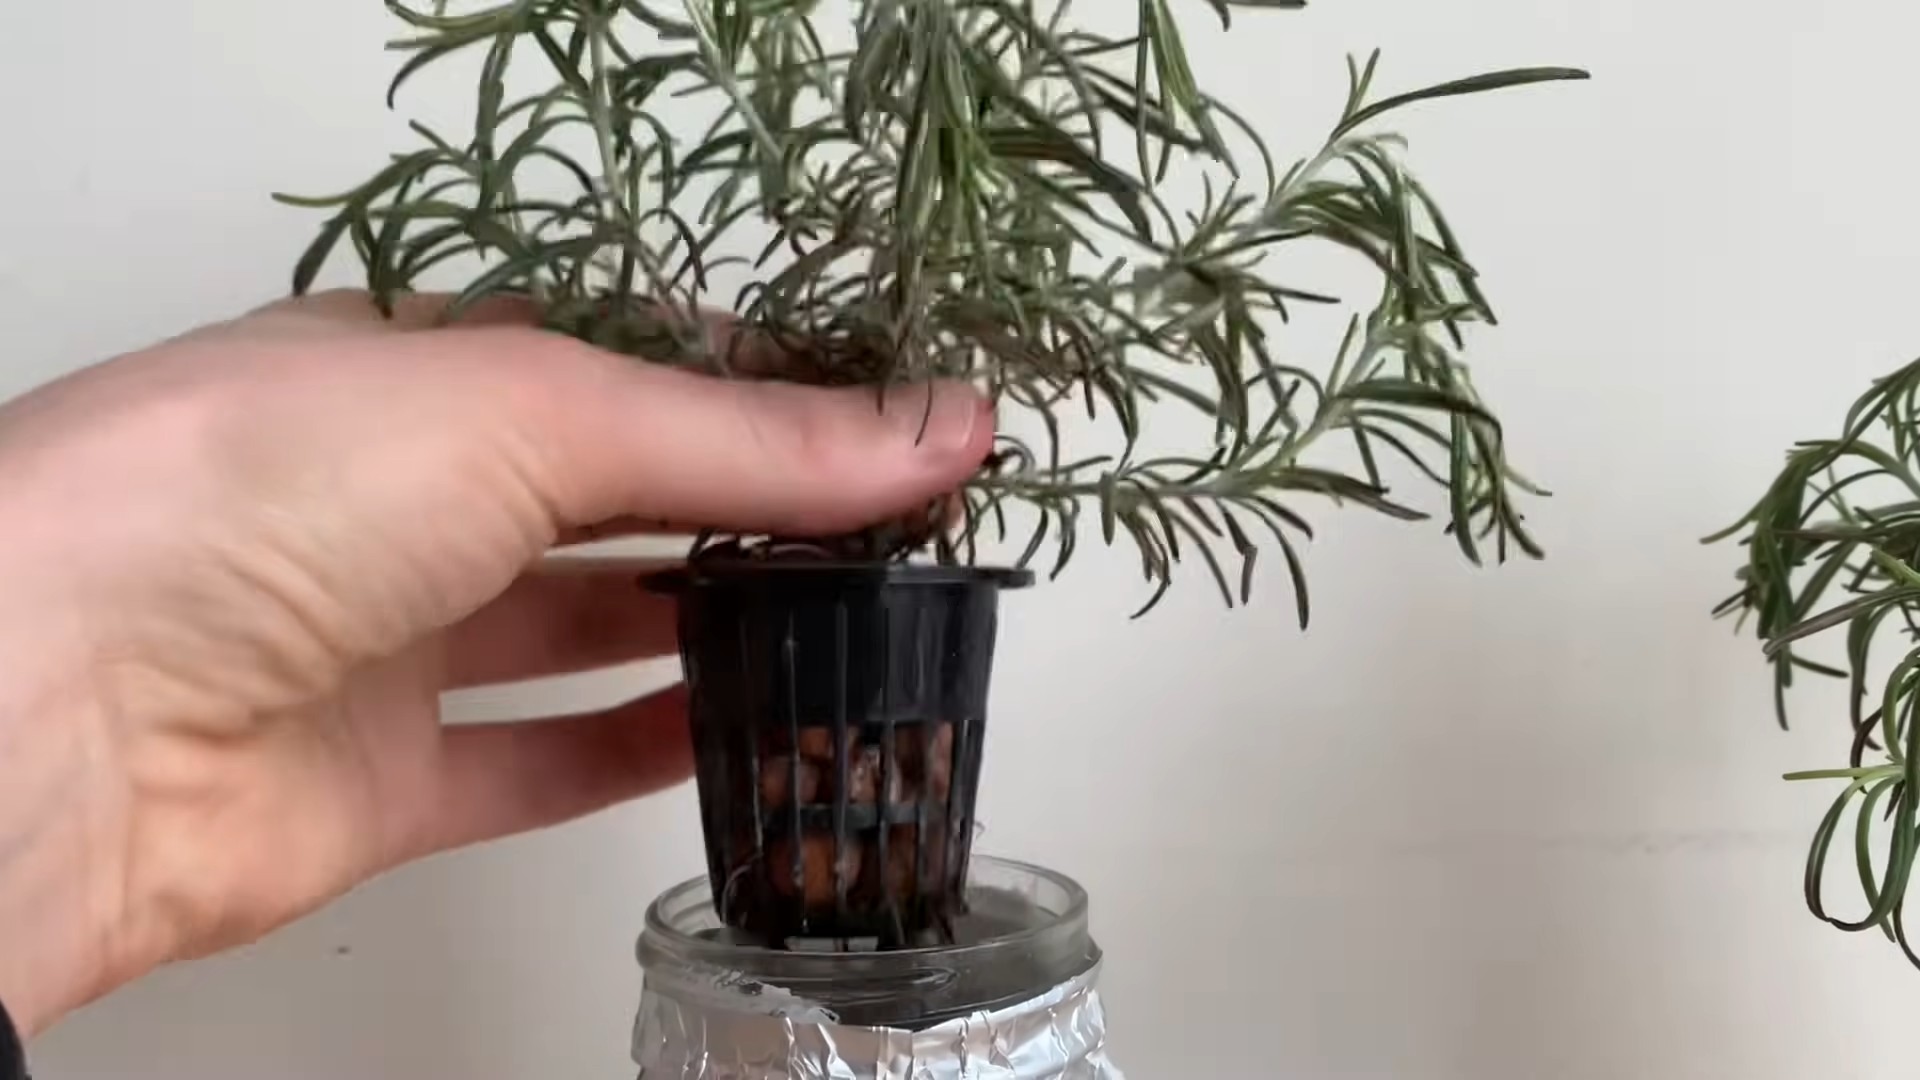
* A Container: A dark-colored plastic container works best (think a storage tote or even a repurposed bucket). The darkness helps prevent algae growth.
* Net Pots: These are small, slotted pots that will hold your rosemary cuttings. You can find them at most garden centers or online.
* Hydroponic Growing Medium: I recommend using rockwool cubes or coco coir. They provide support for the roots and retain moisture.
* Hydroponic Nutrients: You’ll need a balanced hydroponic nutrient solution specifically formulated for herbs. Look for something with a good N-P-K ratio (Nitrogen, Phosphorus, Potassium).
* Air Pump and Air Stone: This is crucial for oxygenating the water and keeping your rosemary happy.
* Airline Tubing: To connect the air pump to the air stone.
* pH Meter or pH Test Strips: Maintaining the correct pH is vital for nutrient absorption.
* pH Up and pH Down Solutions: To adjust the pH of your nutrient solution.
* Measuring Cups and Spoons: For accurately measuring your nutrient solution.
* Scissors or Pruning Shears: For taking rosemary cuttings.
* Rooting Hormone (Optional): This can help speed up the rooting process, but it’s not essential.
* Grow Light (Optional): If you don’t have a sunny spot, a grow light will be your best friend.
Taking Rosemary Cuttings: The First Step to Soil-Free Success
If you’re taking cuttings from an existing rosemary plant, here’s how to do it:
1. Choose Healthy Stems: Select healthy, non-flowering stems that are about 4-6 inches long.
2. Make the Cut: Using clean scissors or pruning shears, make a clean cut just below a leaf node (the point where a leaf grows from the stem).
3. Remove Lower Leaves: Gently remove the leaves from the bottom inch or two of the cutting. This is where the roots will emerge.
4. Optional: Apply Rooting Hormone: Dip the cut end of the stem into rooting hormone powder or liquid. This will encourage root growth.
Preparing Your Hydroponic System: Setting the Stage for Growth
Now that we have our rosemary cuttings, let’s get our hydroponic system ready:
1. Prepare the Container: Clean your container thoroughly with soap and water to remove any dirt or debris.
2. Drill Holes for Net Pots: Drill holes in the lid of your container that are slightly smaller than the diameter of your net pots. The net pots should fit snugly into the holes. The number of holes depends on the size of your container and how many rosemary plants you want to grow. Space them out evenly to allow for good air circulation.
3. Prepare the Growing Medium: If you’re using rockwool cubes, soak them in water for a few hours before using them. This will help them retain moisture. If you’re using coco coir, rinse it thoroughly to remove any excess salts.
4. Place Growing Medium in Net Pots: Fill each net pot with your chosen growing medium.
5. Insert Rosemary Cuttings: Gently insert one rosemary cutting into each net pot, making sure the cut end is buried in the growing medium.
Mixing the Nutrient Solution: The Food Your Rosemary Needs
This is a crucial step, so pay close attention!
1. Read the Instructions: Carefully read the instructions on your hydroponic nutrient solution. Different brands have different concentrations, so it’s important to follow the directions precisely.
2. Mix the Solution: In a separate container, mix the nutrient solution with water according to the instructions. I usually start with half the recommended strength for young cuttings to avoid nutrient burn.
3. Check the pH: Use your pH meter or pH test strips to check the pH of the nutrient solution. Rosemary prefers a pH between 5.5 and 6.5.
4. Adjust the pH: If the pH is too high, add a small amount of pH Down solution. If the pH is too low, add a small amount of pH Up solution. Always add these solutions gradually and recheck the pH after each addition.
5. Fill the Container: Pour the nutrient solution into your container, making sure the bottom of the net pots are submerged in the solution. You don’t want the entire net pot to be submerged, just the bottom portion.
Setting Up the Air Pump: Oxygen is Key!
Rosemary roots need oxygen to thrive, so the air pump is essential:
1. Connect the Air Stone: Attach one end of the airline tubing to the air stone and the other end to the air pump.
2. Place the Air Stone: Place the air stone at the bottom of the container, making sure it’s fully submerged in the nutrient solution.
3. Plug in the Air Pump: Plug in the air pump and make sure it’s working properly. You should see bubbles rising from the air stone.
Providing Light: Sunshine or Artificial Glow
Rosemary needs plenty of light to grow, so choose a location that gets at least 6 hours of direct sunlight per day. If you don’t have a sunny spot, you’ll need to use a grow light.
1. Natural Sunlight: Place your hydroponic system in a sunny window. Rotate the container regularly to ensure all sides of the rosemary plants get equal exposure to sunlight.
2. Grow Light: If you’re using a grow light, position it about 12-18 inches above the rosemary plants. Use a timer to provide 14-16 hours of light per day.
Caring for Your Hydroponic Rosemary: A Little TLC Goes a Long Way
Now that your system is set up, here’s how to keep your rosemary happy and healthy:
1. Monitor the Water Level: Check the water level in the container regularly and add more nutrient solution as needed. The bottom of the net pots should always be submerged.
2. Change the Nutrient Solution: Change the nutrient solution every 1-2 weeks to prevent the buildup of salts and maintain a healthy nutrient balance.
3. Check the pH: Check the pH of the nutrient solution regularly and adjust as needed.
4. Prune Your Rosemary: Prune your rosemary plants regularly to encourage bushier growth. Simply pinch off the tips of the stems.
5. Watch for Pests and Diseases: Keep an eye out for pests and diseases. If you notice any problems, treat them promptly with an appropriate organic solution.
6. Maintain Air Circulation: Ensure good air circulation around your rosemary plants to prevent fungal diseases. A small fan can help with this.
Troubleshooting: Common Issues and Solutions
Even with the best care, you might encounter some challenges along the way. Here are a few common issues and how to address them:
* Yellowing Leaves: This could be a sign of nutrient deficiency. Make sure you’re using a balanced hydroponic nutrient solution and that the pH is within the correct range.
* Slow Growth: This could be due to insufficient light, low temperatures, or nutrient deficiencies. Make sure your rosemary plants are getting enough light and that the temperature is warm enough.
* Root Rot: This is caused by a lack of oxygen in the nutrient solution. Make sure your air pump is working properly and that the air stone is providing adequate aeration.
* Algae Growth: Algae can grow in the nutrient solution if it’s exposed to too much light. Use a dark-colored container to prevent algae growth.
Harvesting Your Rosemary: Enjoy the Fruits (or Herbs!) of Your Labor
Once your rosemary plants have grown to a decent size, you can start harvesting!
1. Harvest Regularly: Harvest rosemary regularly to encourage new growth.
2. Cut the Stems: Use clean scissors or pruning shears to cut the stems.
3. Use Fresh or Dried: You can use the rosemary fresh or dry it for later use. To dry rosemary

Conclusion
So, there you have it! Growing rosemary without soil might sound like something out of a science fiction novel, but it’s surprisingly simple, incredibly rewarding, and a fantastic way to enjoy fresh herbs year-round. This method, often referred to as hydroponic rosemary cultivation, offers a cleaner, more controlled environment for your rosemary, minimizing the risk of pests and diseases that often plague soil-grown plants.
Why is this a must-try? Because it’s not just about growing rosemary; it’s about experiencing a different kind of connection with your plants. You get to witness the root system develop in real-time, observe the plant’s nutrient uptake, and fine-tune the environment to optimize growth. It’s a learning experience, a conversation with nature, and a source of fresh, fragrant rosemary all rolled into one.
Beyond the basic setup, there’s plenty of room for experimentation. Want to add a touch of elegance? Use a decorative glass jar instead of a plastic container. Feeling adventurous? Try incorporating a small air pump and air stone to further oxygenate the nutrient solution. You can even experiment with different nutrient solutions to see which yields the best results for your specific rosemary variety. Consider adding a small, full-spectrum LED grow light if you’re in a particularly dark environment to give your rosemary an extra boost.
This soil-free rosemary growing method is particularly beneficial for those with limited space, such as apartment dwellers or urban gardeners. It eliminates the need for messy soil and bulky pots, allowing you to cultivate fresh herbs on a windowsill, countertop, or even a small shelf.
But the real magic happens when you start using your homegrown rosemary. Imagine adding a sprig of freshly harvested rosemary to your roasted chicken, infusing your olive oil with its distinctive aroma, or brewing a soothing cup of rosemary tea. The possibilities are endless, and the flavor is simply unmatched.
We wholeheartedly encourage you to give this DIY trick a try. It’s a fun, educational, and ultimately delicious way to grow your own herbs. And most importantly, don’t be afraid to experiment and adapt the method to suit your own needs and preferences.
Once you’ve embarked on your soil-free rosemary journey, we’d love to hear about your experience! Share your photos, tips, and challenges in the comments below. Let’s create a community of soil-free rosemary enthusiasts and learn from each other. What nutrient solutions worked best for you? Did you encounter any unexpected challenges? What creative ways have you found to use your homegrown rosemary? Your insights could be invaluable to other aspiring hydroponic gardeners. So, go ahead, get your rosemary cuttings ready, and let’s grow together!
Frequently Asked Questions (FAQ)
What exactly is hydroponics, and is it difficult to learn?
Hydroponics is a method of growing plants without soil, using water-based nutrient solutions to provide the necessary elements for growth. While it might sound intimidating, the basic principles are quite simple. Instead of relying on soil to deliver nutrients, you directly provide them to the plant’s roots through a carefully balanced solution. The difficulty level depends on the complexity of the system you choose. Starting with a simple setup like the one described in this article makes it very accessible for beginners. There are many resources available online and in libraries to help you learn more about hydroponics and its various techniques. Don’t be afraid to start small and gradually expand your knowledge and skills.
What kind of rosemary variety is best suited for soil-free growing?
Most rosemary varieties adapt well to hydroponic systems. However, some varieties, like ‘Blue Boy’ and ‘Roman Beauty,’ are known for their compact growth habit and are often preferred for indoor cultivation. These varieties tend to be less prone to legginess and maintain a more manageable size. Ultimately, the best variety for you will depend on your personal preferences and the space you have available. Experimenting with different varieties can be a fun way to discover which ones thrive best in your specific environment.
What type of water should I use for the nutrient solution?
The best type of water to use is distilled or reverse osmosis (RO) water. These types of water are free from minerals and chemicals that can interfere with the nutrient solution and potentially harm your rosemary plant. Tap water can be used if it’s properly treated to remove chlorine and chloramine. You can let tap water sit out for 24-48 hours to allow chlorine to evaporate, but chloramine requires a water filter. Always test the pH of your water before adding nutrients, as the ideal pH range for rosemary is between 6.0 and 6.5.
How often should I change the nutrient solution?
The frequency of nutrient solution changes depends on several factors, including the size of your container, the growth rate of your rosemary, and the concentration of the nutrient solution. As a general rule, you should change the nutrient solution every 1-2 weeks. This helps to prevent the buildup of salts and other impurities that can negatively impact plant health. Regularly monitor the water level and replenish it as needed with fresh nutrient solution.
What are the signs that my rosemary plant is not getting enough nutrients?
Several signs can indicate a nutrient deficiency in your rosemary plant. Yellowing leaves, stunted growth, and weak stems are common symptoms. The specific nutrient deficiency can often be identified by the pattern of yellowing or discoloration on the leaves. For example, a nitrogen deficiency may cause older leaves to turn yellow, while an iron deficiency may cause yellowing between the veins of younger leaves. If you suspect a nutrient deficiency, consult a plant nutrient deficiency chart and adjust your nutrient solution accordingly.
Can I use regular fertilizer instead of a hydroponic nutrient solution?
While regular fertilizer contains nutrients that plants need, it’s not formulated for hydroponic systems. Regular fertilizer often contains additives and fillers that can clog hydroponic systems and disrupt the nutrient balance. Hydroponic nutrient solutions are specifically designed to provide the essential nutrients in a readily available form for plants grown in water. Using a hydroponic nutrient solution will ensure that your rosemary plant receives the correct balance of nutrients for optimal growth.
How much light does my soil-free rosemary need?
Rosemary thrives in bright, sunny conditions. Ideally, your soil-free rosemary should receive at least 6-8 hours of direct sunlight per day. If you don’t have access to enough natural light, you can supplement with a full-spectrum LED grow light. Position the grow light about 12-18 inches above the plant and adjust the duration of light exposure based on the plant’s response.
My rosemary is growing, but the roots are turning brown. What should I do?
Brown roots can indicate root rot, which is often caused by poor oxygenation or fungal infections. Ensure that your nutrient solution is well-oxygenated by using an air pump and air stone. You can also add a small amount of hydrogen peroxide (3%) to the nutrient solution to help kill any harmful bacteria or fungi. If the root rot is severe, you may need to trim away the affected roots and repot the rosemary in a fresh nutrient solution.
How do I propagate rosemary cuttings for soil-free growing?
Propagating rosemary cuttings for soil-free growing is similar to propagating them for soil. Take a 4-6 inch cutting from a healthy rosemary plant, removing the leaves from the bottom inch of the stem. Place the cutting in a glass of water or directly into your hydroponic system. Ensure that the bottom of the cutting is submerged in water or nutrient solution. Roots should begin to develop within a few weeks. Once the roots are about an inch long, you can transplant the cutting into its permanent hydroponic setup.
Can I grow other herbs alongside my rosemary in the same hydroponic system?
While it’s possible to grow other herbs alongside rosemary, it’s important to consider their individual needs. Rosemary prefers a slightly drier environment than some other herbs, such as basil or mint. If you choose to grow multiple herbs in the same system, select herbs with similar nutrient and environmental requirements. Monitor the plants closely and adjust the conditions as needed to ensure that all plants are thriving.

Leave a Comment