
Spinach continuous harvest trick: Imagine fresh, vibrant spinach gracing your plate, not just once, but repeatedly throughout the growing season! Sounds like a dream, right? Well, it doesn’t have to be! For centuries, gardeners have sought ways to maximize their yields and extend the harvest of their favorite crops. From ancient Roman kitchen gardens to the meticulously planned plots of medieval monasteries, the desire for a constant supply of fresh produce has driven innovation and ingenuity.
Today, with rising grocery costs and a growing awareness of the benefits of locally sourced food, the need for efficient gardening techniques is more pressing than ever. That’s where the spinach continuous harvest trick comes in! This simple yet effective method allows you to enjoy a steady stream of delicious spinach leaves without having to replant every few weeks.
I know, I know, you’re probably thinking, “Is it really that easy?” And the answer is YES! This DIY guide will walk you through the steps to ensure you’re enjoying fresh spinach salads, smoothies, and sautés all season long. Forget those sad, wilted bags from the supermarket – with this trick, you’ll have a constant supply of nutrient-rich greens right at your fingertips. Let’s get started and unlock the secret to a never-ending spinach bounty!
Never Buy Spinach Again: My Continuous Harvest Hack!
Okay, spinach lovers, listen up! I’m about to share a game-changing secret that will keep you swimming in fresh, delicious spinach all season long. Forget those sad, wilted bags from the grocery store. This continuous harvest method is easy, rewarding, and will seriously upgrade your salad game. Trust me, once you try this, you’ll never go back!
What You’ll Need
Before we dive in, let’s gather our supplies. Don’t worry, it’s nothing too crazy!
* Spinach Seeds: Choose a variety that suits your climate. I personally love ‘Bloomsdale Long Standing’ because it’s heat-tolerant and slow to bolt (go to seed).
* Seed Starting Trays or Small Pots: These are essential for getting your seedlings off to a good start.
* Seed Starting Mix: This is lighter and more nutrient-rich than regular potting soil, perfect for delicate seedlings.
* Potting Soil: You’ll need this for transplanting your seedlings into larger containers or your garden bed.
* Fertilizer: A balanced, slow-release fertilizer will keep your spinach plants happy and productive. I use a 10-10-10 formula.
* Gardening Gloves: Protect those hands!
* Trowel or Small Shovel: For transplanting.
* Watering Can or Hose: Gentle watering is key, especially for seedlings.
* Optional: Row Covers or Shade Cloth: These can help protect your spinach from pests and extreme weather.
Phase 1: Starting Your Spinach Seeds Indoors (Highly Recommended!)
Starting your spinach seeds indoors gives them a head start and protects them from harsh weather and pests. This is especially helpful if you live in an area with a short growing season.
1. Prepare Your Seed Starting Trays: Fill your seed starting trays or small pots with seed starting mix. Gently pat it down to remove any air pockets.
2. Sow Your Seeds: Sow 2-3 spinach seeds per cell or pot, about 1/4 inch deep.
3. Water Gently: Water the soil gently until it’s evenly moist but not soggy.
4. Provide Light: Place your seed starting trays under grow lights or in a sunny windowsill. Spinach needs plenty of light to germinate. If using a windowsill, rotate the trays regularly to ensure even growth.
5. Keep the Soil Moist: Check the soil moisture daily and water as needed to keep it consistently moist.
6. Germination Time: Spinach seeds typically germinate in 5-10 days.
7. Thin Seedlings (If Necessary): Once your seedlings have emerged, thin them to one strong seedling per cell or pot. Snip off the weaker seedlings at the soil line with scissors.
Phase 2: Transplanting Your Spinach Seedlings
Once your seedlings have developed a few sets of true leaves (the leaves that look like miniature spinach leaves), they’re ready to be transplanted.
1. Harden Off Your Seedlings: Before transplanting, you need to “harden off” your seedlings. This means gradually exposing them to outdoor conditions over a period of 7-10 days. Start by placing them outside in a sheltered location for an hour or two each day, gradually increasing the amount of time they spend outdoors. This will help them acclimate to the sun, wind, and temperature changes.
2. Prepare Your Planting Area: Choose a location in your garden that receives at least 4-6 hours of sunlight per day. Spinach prefers well-drained soil that is rich in organic matter. Amend your soil with compost or well-rotted manure before planting.
3. Transplant Your Seedlings: Dig small holes in the soil, spacing them about 6-8 inches apart. Gently remove the seedlings from their trays or pots and place them in the holes. Backfill with soil and gently pat it down.
4. Water Thoroughly: Water the newly transplanted seedlings thoroughly to help them settle in.
5. Fertilize: Apply a slow-release fertilizer according to the package directions.
Phase 3: The Continuous Harvest Method – The Key to Endless Spinach!
This is where the magic happens! Instead of harvesting the entire plant at once, we’ll be harvesting only the outer leaves, allowing the plant to continue producing new growth.
1. Wait for Maturity: Allow your spinach plants to grow until they have several mature leaves, typically about 4-6 inches long.
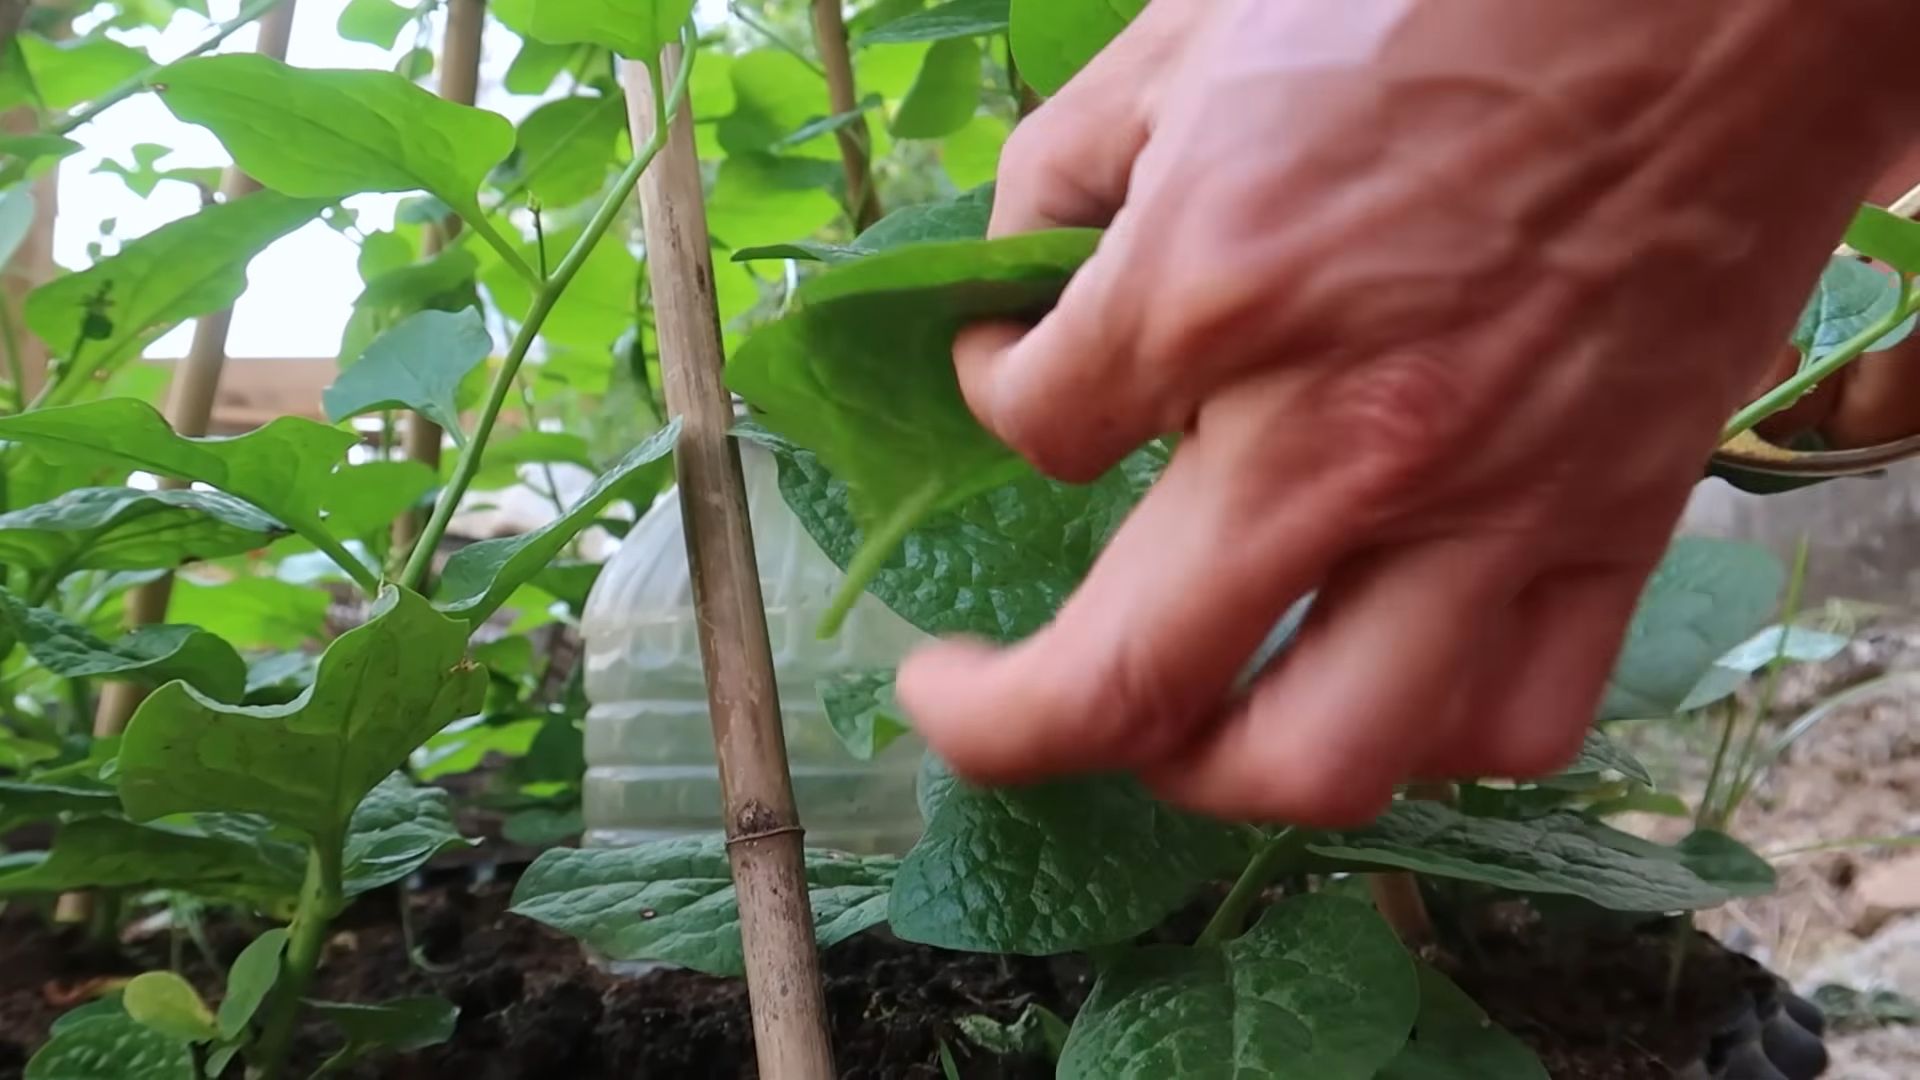
2. Harvest Outer Leaves: Using scissors or your fingers, carefully harvest the outer leaves of the plant, leaving the inner leaves intact. Focus on the larger, more mature leaves.
3. Don’t Damage the Crown: Be careful not to damage the crown of the plant (the central growing point), as this will prevent it from producing new leaves.
4. Harvest Regularly: Harvest your spinach leaves every few days or once a week, depending on how quickly they grow. The more you harvest, the more the plant will produce!
5. Succession Planting: To ensure a continuous supply of spinach throughout the season, sow new seeds every 2-3 weeks. This is called succession planting. You can start the new seeds indoors while you’re harvesting from your existing plants.
Phase 4: Caring for Your Spinach Plants
Proper care is essential for keeping your spinach plants healthy and productive.
1. Watering: Water your spinach plants regularly, especially during dry periods. Spinach needs consistent moisture to thrive. Aim for about 1 inch of water per week.
2. Fertilizing: Fertilize your spinach plants every 4-6 weeks with a balanced fertilizer.
3. Weeding: Keep your garden bed free of weeds, as they can compete with your spinach plants for nutrients and water.
4. Pest Control: Keep an eye out for pests such as aphids, slugs, and snails. Handpick them off the plants or use organic pest control methods. I’ve found that a strong blast of water from the hose can often dislodge aphids.
5. Bolting Prevention: Spinach is prone to bolting (going to seed) in hot weather. To prevent bolting, provide shade during the hottest part of the day. You can use shade cloth or plant your spinach in a location that receives afternoon shade. Also, make sure your plants are well-watered, as drought stress can also trigger bolting. Choosing heat-tolerant varieties like ‘Bloomsdale Long Standing’ also helps.
6. Remove Yellowing Leaves: Remove any yellowing or damaged leaves promptly to prevent the spread of disease.
Troubleshooting Common Spinach Problems
Even with the best care, you might encounter some problems along the way. Here are a few common issues and how to address them:
* Yellowing Leaves: This can be caused by a variety of factors, including nutrient deficiencies, overwatering, underwatering, or disease. Check the soil moisture and nutrient levels and adjust accordingly.
* Aphids: These tiny pests can suck the sap from your spinach leaves, causing them to become distorted and yellow. Spray the plants with a strong blast of water or use insecticidal soap.
* Slugs and Snails: These pests can chew holes in your spinach leaves. Handpick them off the plants or use slug and snail bait.
* Bolting: As mentioned earlier, bolting is when the plant goes to seed prematurely. Prevent bolting by providing shade, watering regularly, and choosing heat-tolerant varieties.
Tips for Maximizing Your Spinach Harvest
Here are a few extra tips to help you get the most out of your spinach plants:
* Plant in the Right Location: Spinach prefers a sunny location with well-drained soil.
* Amend Your Soil: Amend your soil with compost or well-rotted manure before planting to improve its fertility and drainage.
* Water Regularly: Spinach needs consistent moisture to thrive.
* Fertilize Regularly: Fertilize your spinach plants every 4-6 weeks with a balanced fertilizer.
* Harvest Regularly: The more you harvest, the more the plant will produce.
* Succession Plant: Sow new seeds every 2-3 weeks to ensure a continuous supply of spinach.
* Protect from Pests: Keep an eye out for pests and take action to control them.
* Prevent Bolting: Provide shade and water regularly to prevent bolting.
Enjoy Your Fresh Spinach!
Now that you know the secrets to continuous spinach harvesting, you can enjoy fresh, delicious spinach all season long. Use it in salads, smoothies, soups, or any of your favorite recipes. You’ll be amazed at how much better homegrown spinach tastes compared to store-bought! Happy gardening!

Conclusion
So, there you have it! The spinach continuous harvest trick isn’t just a gardening hack; it’s a game-changer for anyone who loves fresh, homegrown greens. Imagine stepping outside your door and snipping off exactly the amount of spinach you need for a salad, smoothie, or side dish, knowing that more will be ready in just a few days. No more wilted spinach languishing in the crisper drawer, no more last-minute trips to the grocery store – just a constant supply of vibrant, nutritious leaves at your fingertips.
This method is a must-try for several compelling reasons. First, it maximizes your yield. By harvesting only the outer leaves, you encourage the plant to focus its energy on producing new growth from the center. This means you get more spinach over a longer period compared to harvesting the entire plant at once. Second, it extends your harvest season. Instead of a single, large harvest, you can enjoy fresh spinach for weeks, even months, depending on your climate and growing conditions. Third, it’s incredibly convenient. You only harvest what you need, when you need it, reducing waste and ensuring you always have the freshest possible spinach.
But the beauty of this technique lies in its adaptability. Feel free to experiment with different spinach varieties to find your favorite flavor and texture. Some varieties, like ‘Bloomsdale Long Standing’ or ‘Giant Nobel,’ are particularly well-suited for continuous harvesting due to their vigorous growth habits. You can also adjust your harvesting frequency based on your needs and the plant’s growth rate. If you’re using spinach frequently, you might harvest a few leaves every other day. If you’re using it less often, you can harvest once a week or even less frequently.
Consider companion planting to further enhance your spinach growing experience. Planting spinach alongside other vegetables like radishes, lettuce, or strawberries can help deter pests and improve soil health. You can also interplant spinach with taller plants like tomatoes or peppers to provide shade during the hottest part of the day.
Don’t be afraid to get creative with your spinach recipes! Beyond salads and smoothies, spinach can be added to soups, stews, omelets, pasta dishes, and even baked goods. Its mild flavor makes it a versatile ingredient that complements a wide range of cuisines.
We wholeheartedly encourage you to give this spinach continuous harvest trick a try. It’s a simple, effective, and rewarding way to enjoy fresh, homegrown spinach all season long. Once you experience the convenience and abundance of this method, you’ll never go back to harvesting spinach the old way.
And most importantly, we want to hear about your experiences! Share your tips, tricks, and successes in the comments below. Let us know what spinach varieties you’re growing, what companion plants you’re using, and what delicious recipes you’re creating with your homegrown spinach. Your feedback will help other gardeners learn and improve their own spinach growing techniques. Together, we can create a community of thriving spinach growers! So, grab your gardening gloves, plant some spinach, and get ready for a continuous harvest of fresh, delicious greens!
Frequently Asked Questions (FAQ)
What exactly is the “spinach continuous harvest trick”?
The spinach continuous harvest trick is a method of harvesting spinach that involves selectively picking the outer, more mature leaves of the plant while leaving the inner, younger leaves to continue growing. This encourages the plant to produce more leaves over a longer period, resulting in a continuous supply of fresh spinach. Instead of cutting the entire plant at once, you’re essentially “pruning” it to stimulate new growth. This extends the harvest season and maximizes the yield from each plant.
What are the benefits of using this harvesting method?
There are several key benefits to using the spinach continuous harvest trick:
* **Increased Yield:** You’ll get more spinach from each plant compared to harvesting the entire plant at once.
* **Extended Harvest Season:** Enjoy fresh spinach for weeks or even months, rather than just a single harvest.
* **Reduced Waste:** Harvest only what you need, when you need it, minimizing spoilage.
* **Fresher Spinach:** Always have access to the freshest possible spinach leaves.
* **Convenience:** No more last-minute trips to the store for spinach.
* **Healthier Plants:** Selective harvesting can promote healthier and more vigorous plant growth.
When should I start harvesting my spinach using this method?
You can start harvesting spinach using the continuous harvest trick when the outer leaves are large enough to use, typically around 4-6 inches in length. The exact timing will depend on the spinach variety, growing conditions, and your personal preferences. Look for leaves that are a good size for salads or cooking. Avoid harvesting too early, as the younger leaves may not have developed their full flavor and nutritional value.
How do I properly harvest the spinach leaves?
To harvest spinach leaves using the continuous harvest trick, gently grasp the outer leaves near the base of the plant. You can either use your fingers to snap them off or use a pair of clean scissors or garden shears to cut them. Be careful not to damage the central bud or the younger leaves. Only harvest the outer leaves, leaving the inner leaves to continue growing. Avoid pulling or tugging on the leaves, as this can damage the plant.
How often should I harvest my spinach?
The frequency of harvesting will depend on the growth rate of your spinach plants and your personal needs. In general, you can harvest a few leaves every few days or once a week. If your plants are growing rapidly, you may need to harvest more frequently. If you’re not using spinach as often, you can harvest less frequently. The key is to monitor your plants and harvest the outer leaves as they reach a usable size.
What if my spinach plant starts to bolt (flower)?
Bolting is a natural process that occurs when spinach plants are exposed to warm temperatures or long days. When a spinach plant bolts, it sends up a flower stalk and the leaves become bitter. To prevent bolting, choose bolt-resistant spinach varieties, plant spinach in the early spring or late summer, and provide shade during the hottest part of the day. If your spinach plant does start to bolt, you can still harvest the leaves, but they may not taste as good. You can also try cutting off the flower stalk to encourage the plant to produce more leaves.
Can I use this method for all types of spinach?
While the spinach continuous harvest trick can be used for most types of spinach, some varieties are better suited for this method than others. Varieties with vigorous growth habits, such as ‘Bloomsdale Long Standing,’ ‘Giant Nobel,’ and ‘Malabar Spinach’ (though technically not a true spinach), are particularly well-suited for continuous harvesting. Experiment with different varieties to find the ones that work best for you.
What are some common problems I might encounter when growing spinach, and how can I solve them?
Some common problems when growing spinach include:
* **Pests:** Aphids, slugs, and leaf miners can damage spinach leaves. Use organic pest control methods, such as insecticidal soap, diatomaceous earth, or handpicking.
* **Diseases:** Downy mildew and other fungal diseases can affect spinach plants. Choose disease-resistant varieties, provide good air circulation, and avoid overwatering.
* **Bolting:** As mentioned earlier, bolting can occur in warm weather. Choose bolt-resistant varieties and provide shade.
* **Nutrient Deficiencies:** Spinach plants need adequate nutrients to grow properly. Amend the soil with compost or fertilizer as needed.
How do I store harvested spinach leaves?
To store harvested spinach leaves, wash them thoroughly and dry them with a salad spinner or paper towels. Store the dry leaves in a plastic bag or container in the refrigerator. Spinach leaves will typically last for 3-5 days in the refrigerator.
Can I freeze spinach leaves that I’ve harvested?
Yes, you can freeze spinach leaves. To freeze spinach, wash the leaves thoroughly and blanch them in boiling water for 1-2 minutes. Drain the spinach and plunge it into ice water to stop the cooking process. Squeeze out any excess water and pack the spinach into freezer bags or containers. Frozen spinach will last for 8-12 months in the freezer.

Leave a Comment