
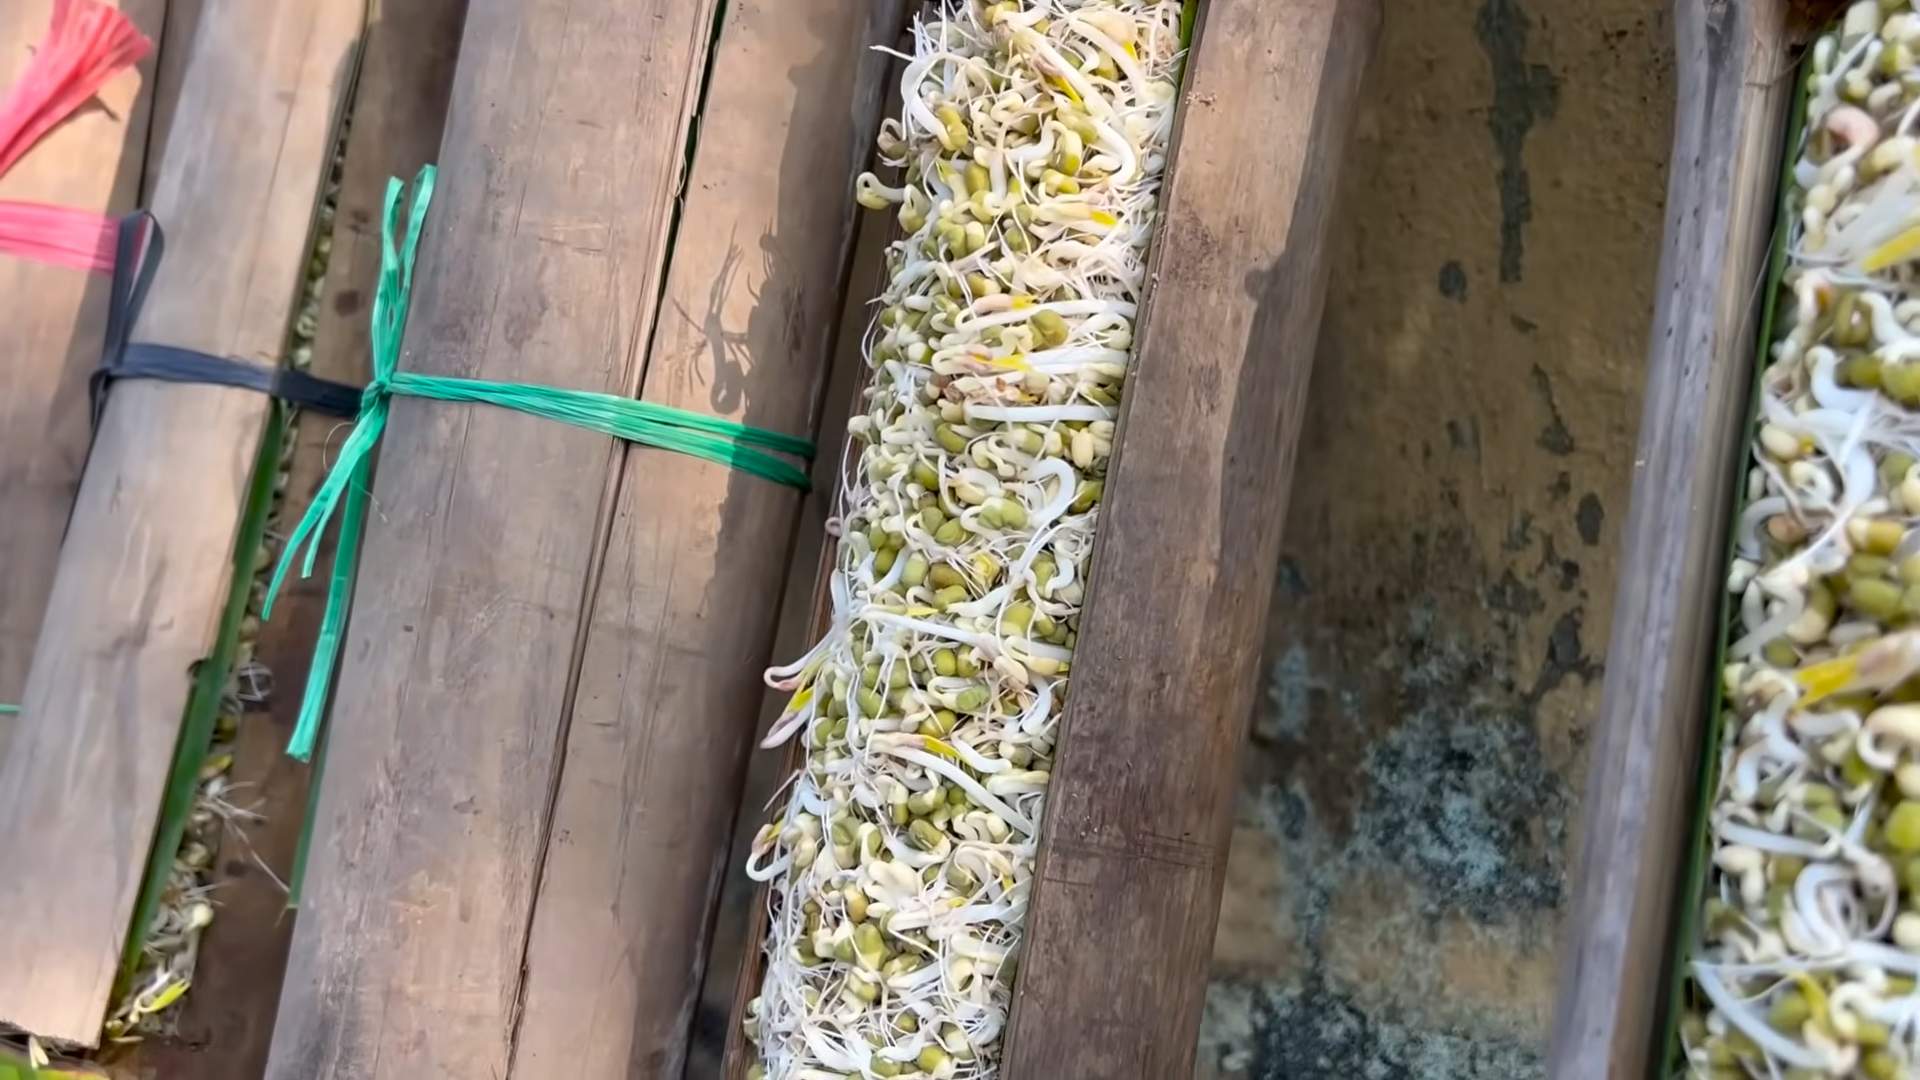
Sprouting Bean Sprouts at Home: It’s easier than you think, and I’m here to show you how! Forget those bland, pre-packaged sprouts from the grocery store. Imagine biting into crisp, fresh bean sprouts you grew yourself, bursting with flavor and packed with nutrients. Sounds amazing, right?
For centuries, cultures across Asia have cherished bean sprouts, not just for their taste, but also for their health benefits. They’re a staple in stir-fries, salads, and soups, adding a delightful crunch and a boost of vitamins, especially during the winter months when fresh produce can be scarce. Think of it as a little bit of spring, right on your kitchen counter!
But why should you bother sprouting bean sprouts at home? Well, for starters, it’s incredibly cost-effective. A handful of dried beans can yield a surprisingly large batch of sprouts. Plus, you control the entire process, ensuring they’re grown without any unwanted additives or chemicals. More importantly, it’s incredibly satisfying! Watching those tiny seeds transform into vibrant sprouts is a mini-miracle, and a fun project for the whole family. So, ditch the store-bought sprouts and let’s get growing! I’m going to share my favorite, foolproof method for sprouting bean sprouts at home, so you can enjoy fresh, delicious sprouts whenever you want.
Sprouting Bean Sprouts at Home: A Beginner’s Guide
Hey there, fellow food enthusiasts! Ever wondered how to get those crunchy, delicious bean sprouts without hitting the grocery store? Well, I’m here to tell you it’s surprisingly easy and incredibly rewarding to sprout your own bean sprouts right in your kitchen. Not only is it a fun project, but you’ll also have a constant supply of fresh, nutritious sprouts to add to your salads, stir-fries, and sandwiches. Let’s dive in!
What You’ll Need
Before we get started, let’s gather our supplies. The beauty of this project is that you probably already have most of these items lying around:
* Sprouting Beans: Mung beans are the most common and easiest to sprout, but you can also use adzuki beans, lentils, or even chickpeas. Just make sure they are specifically sold for sprouting or food use, not for planting.
* A Wide-Mouth Jar: A quart-sized mason jar works perfectly.
* Sprouting Lid or Cheesecloth: You’ll need something to cover the jar and allow for drainage. Sprouting lids are specifically designed for this, but a piece of cheesecloth secured with a rubber band works just as well.
* Water: Clean, filtered water is best.
* A Dark Place: A cupboard or a drawer will do the trick.
* A Bowl or Tray: To catch any drips.
Getting Started: The Soaking Phase
This is where the magic begins! We need to wake up those dormant beans and get them ready to sprout.
1. Rinse the Beans: Place about 1/4 to 1/2 cup of beans in your jar. Rinse them thoroughly with cool water, removing any debris or broken beans. This step is crucial for preventing mold growth.
2. Soak the Beans: Fill the jar with cool water, ensuring the beans are completely submerged. They will expand significantly during soaking, so leave plenty of room.
3. Cover and Soak: Cover the jar with your sprouting lid or cheesecloth and secure it with a rubber band.
4. Darkness is Key: Place the jar in a dark, cool place for 8-12 hours. I usually soak mine overnight.
The Sprouting Process: Rinse and Repeat
Now comes the daily routine that will transform those soaked beans into crunchy sprouts.
1. Drain the Water: After the soaking period, drain all the water from the jar. Make sure to invert the jar completely to remove as much water as possible.
2. Rinse Thoroughly: Rinse the beans with cool water, again making sure to remove any debris.
3. Drain Again: Drain the water completely. This is super important! Excess moisture can lead to mold.
4. Invert and Position: Place the jar upside down at an angle in a bowl or tray. This allows for proper drainage and air circulation. I usually prop it up against something to keep it at an angle.
5. Darkness Again: Return the jar to its dark, cool location.
6. Repeat Daily: Repeat the rinsing and draining process 2-3 times per day for the next 3-5 days, or until the sprouts reach your desired length. The warmer the temperature, the faster they will sprout.
Troubleshooting: Common Issues and Solutions
Even with the best intentions, things can sometimes go awry. Here are a few common problems and how to fix them:
* Mold: This is the biggest fear! Mold usually appears as fuzzy white or gray patches. If you see mold, discard the entire batch immediately. To prevent mold, ensure you are rinsing and draining the beans thoroughly, providing good air circulation, and using clean equipment.
* Slow Sprouting: If your sprouts are taking longer than expected, it could be due to the temperature. Sprouts prefer a slightly warmer environment (around 70-75°F). You can try moving them to a slightly warmer location. Also, make sure your beans are fresh and specifically intended for sprouting.
* Unpleasant Smell: A slightly earthy smell is normal, but a foul or ammonia-like odor indicates spoilage. Discard the batch if you notice this. Again, proper rinsing and draining are key.
* Uneven Sprouting: Some beans may sprout faster than others. This is normal. Just continue the rinsing and draining process until most of the beans have sprouted.
Harvesting and Storing Your Sprouts
Congratulations! You’ve successfully grown your own bean sprouts. Now it’s time to harvest and enjoy the fruits (or rather, sprouts) of your labor.
1. Final Rinse: Give your sprouts one final rinse in cool water. This will help remove any remaining seed hulls.
2. Remove Hulls (Optional): Some people prefer to remove the seed hulls. You can do this by gently agitating the sprouts in a bowl of water. The hulls will float to the top and can be skimmed off. This is a bit tedious, but it can improve the texture of the sprouts.
3. Dry Thoroughly: This is crucial for preventing spoilage during storage. Spread the sprouts out on a clean kitchen towel or paper towels and gently pat them dry. You can also use a salad spinner to remove excess water.
4. Store in the Refrigerator: Place the dried sprouts in a clean, airtight container lined with a paper towel. The paper towel will help absorb any excess moisture. Store them in the refrigerator for up to a week.
5. Enjoy! Add your fresh bean sprouts to salads, sandwiches, stir-fries, soups, or any dish that could use a little extra crunch and nutrition.
Choosing the Right Beans: A Deeper Dive
While mung beans are the easiest to start with, there’s a whole world of sprouting beans out there! Here’s a little more information about some popular options:
* Mung Beans: These are the classic bean sprouts you find in most grocery stores. They have a mild, slightly sweet flavor and a satisfying crunch. They are also a good source of protein, fiber, and vitamins.
* Adzuki Beans: These small, reddish-brown beans have a slightly nutty flavor. They are a good source of protein, fiber, and iron.
* Lentils: Lentil sprouts have a slightly earthy flavor and a tender texture. They are a good source of protein, fiber, and folate.
* Chickpeas: Chickpea sprouts have a slightly nutty flavor and a firm texture. They are a good source of protein, fiber, and iron.
* Alfalfa Seeds: While technically seeds, alfalfa sprouts are a popular choice for salads and sandwiches. They have a mild, slightly grassy flavor and are a good source of vitamins and minerals.
* Broccoli Seeds: Broccoli sprouts are packed with nutrients, including sulforaphane, a compound known for its potential health benefits. They have a slightly peppery flavor.
Important Note: Always make sure to purchase beans or seeds specifically intended for sprouting or food use. Seeds intended for planting may be treated with chemicals that are not safe for consumption.
Beyond the Basics: Tips and Tricks for Sprouting Success
Here are a few extra tips and tricks I’ve learned along the way to help you become a sprouting pro:
* Use Filtered Water: Tap water can sometimes contain chlorine or other chemicals that can inhibit sprouting. Filtered water is always a better choice.
* Maintain a Consistent Temperature: Sprouts prefer a consistent temperature. Avoid placing them near drafts or direct sunlight.
* Don’t Overcrowd the Jar: Using too many beans in the jar can lead to overcrowding and increase the risk of mold. Start with a smaller amount and adjust as needed.
* Experiment with Different Beans: Once you’ve mastered mung beans, try experimenting with other types of beans and seeds. Each variety has its own unique flavor and texture.
* Keep it Clean: Cleanliness is key to preventing mold and other problems. Make sure to thoroughly clean your jar, sprouting lid, and any other equipment you use.
* Taste Test: Taste your sprouts regularly to check for any signs of spoilage. They should taste fresh and crunchy.
* Enjoy the Process! Sprouting bean sprouts is a fun and rewarding project. Don’t be afraid to experiment and learn from your mistakes.
Sprouting in Different Containers: Exploring Alternatives
While a mason jar is the most common and convenient method, you can also sprout beans in other containers. Here are a few alternatives:
* Sprouting Trays: These are multi-tiered trays specifically designed for sprouting. They provide excellent air circulation and drainage.
* Hemp Bags: Hemp bags are a natural and breathable option for sprouting. Simply soak the bag with the beans inside and hang it up to drain.
* Colander: A colander can be used for sprouting larger beans like chickpeas. Just make sure to rinse and drain them regularly.
No matter which method you choose

Conclusion
So, there you have it! Sprouting bean sprouts at home is not only incredibly easy and cost-effective, but it also provides you with a constant supply of fresh, nutritious ingredients right at your fingertips. Forget those limp, often questionable bean sprouts from the grocery store. With just a few simple supplies and a little patience, you can cultivate your own vibrant, crunchy sprouts bursting with flavor and goodness.
This DIY trick is a must-try for several compelling reasons. First, the freshness factor is undeniable. Home-grown sprouts are harvested at their peak, ensuring maximum flavor and nutrient density. Second, you have complete control over the process, guaranteeing that your sprouts are free from harmful chemicals and pesticides. Third, it’s a fantastic way to reduce your grocery bill and minimize food waste. And finally, it’s simply a rewarding experience to watch these tiny seeds transform into a delicious and healthy addition to your meals.
But don’t stop there! Experiment with different types of beans and seeds to discover your favorite sprout varieties. Mung beans are a classic choice, but you can also try adzuki beans, lentils, alfalfa seeds, or even broccoli seeds for a spicier kick. Consider adding your sprouts to salads, sandwiches, stir-fries, soups, or even as a topping for tacos. The possibilities are endless!
For a variation, try sprouting in a jar with a mesh lid for easy rinsing and drainage. Alternatively, you can use a sprouting tray system for larger batches and more efficient sprouting. You can even try sprouting in a dark place for a few days to encourage longer, whiter sprouts, or expose them to sunlight for a day or two to enhance their green color.
We wholeheartedly encourage you to give this DIY trick a try. It’s a simple, sustainable, and incredibly rewarding way to add fresh, healthy ingredients to your diet. Once you experience the satisfaction of growing your own bean sprouts at home, you’ll never go back to store-bought again.
Don’t be afraid to experiment, adapt the process to your preferences, and most importantly, have fun! We’re confident that you’ll be amazed at how easy and rewarding it is to sprout your own bean sprouts.
Now, we want to hear from you! Share your experiences, tips, and variations in the comments below. What types of beans or seeds have you tried sprouting? What are your favorite ways to use your home-grown sprouts? Let’s create a community of sprout enthusiasts and inspire others to embrace this simple and healthy DIY project. We can’t wait to see what you create!
Frequently Asked Questions (FAQ)
What types of beans and seeds are best for sprouting?
The most popular and easiest bean to sprout is the mung bean, which yields the classic bean sprouts you find in many Asian dishes. However, you can also successfully sprout adzuki beans, lentils, chickpeas, green peas, and even some types of seeds like alfalfa, broccoli, radish, and clover. Just be sure to use seeds specifically intended for sprouting, as some seeds sold for gardening may be treated with chemicals. Avoid sprouting kidney beans, as they contain toxins that are only destroyed by thorough cooking.
How long does it take to sprout bean sprouts?
The sprouting time varies depending on the type of bean or seed and the environmental conditions, such as temperature and humidity. Generally, mung beans take about 3-5 days to sprout, while other beans and seeds may take slightly longer. Keep in mind that warmer temperatures will accelerate the sprouting process, while cooler temperatures will slow it down.
What equipment do I need to sprout bean sprouts?
You don’t need any fancy equipment to sprout bean sprouts. A wide-mouth jar, a sprouting lid or cheesecloth secured with a rubber band, and a bowl or stand to invert the jar for drainage are all you need to get started. You can also use a multi-tiered sprouting tray for larger batches and more efficient sprouting.
How often should I rinse the bean sprouts?
Rinsing is crucial for preventing mold and bacteria growth. Rinse your bean sprouts at least twice a day, preferably in the morning and evening. Use cool, clean water and ensure that all the sprouts are thoroughly rinsed. After rinsing, drain the water completely to prevent the sprouts from becoming waterlogged.
How do I prevent mold growth on my bean sprouts?
Proper rinsing and drainage are the keys to preventing mold growth. Make sure to rinse your sprouts thoroughly at least twice a day and drain all the excess water. Avoid overcrowding the jar or sprouting tray, as this can restrict airflow and promote mold growth. If you notice any signs of mold, discard the entire batch of sprouts immediately.
How do I store bean sprouts?
Once your bean sprouts have reached your desired length, you can store them in the refrigerator for up to a week. Rinse them thoroughly and drain them well before storing them in a sealed container lined with a paper towel to absorb excess moisture. Change the paper towel every day or two to keep the sprouts fresh.
Are there any health benefits to eating bean sprouts?
Yes, bean sprouts are packed with nutrients and offer a variety of health benefits. They are a good source of vitamins, minerals, and enzymes, and they are low in calories and fat. Bean sprouts are also a good source of fiber, which can aid in digestion and promote gut health. They are also rich in antioxidants, which can help protect your body against damage from free radicals.
Can I eat bean sprouts raw?
Yes, you can eat bean sprouts raw, but it’s important to rinse them thoroughly before consuming them to remove any potential bacteria. Some people prefer to lightly cook bean sprouts to improve their digestibility and reduce the risk of foodborne illness.
What can I do if my bean sprouts are not sprouting?
If your bean sprouts are not sprouting, there could be several reasons. First, make sure that your beans or seeds are viable and specifically intended for sprouting. Second, ensure that you are rinsing them regularly and draining the water completely. Third, check the temperature of your sprouting environment. Bean sprouts prefer a warm, humid environment. If the temperature is too cold, the sprouting process may be slowed down or even halted. Finally, make sure that your sprouts are not exposed to direct sunlight, as this can inhibit sprouting.
Can I sprout bean sprouts in the dark?
Yes, you can sprout bean sprouts in the dark. In fact, some people prefer to sprout them in the dark for the first few days to encourage longer, whiter sprouts. After a few days, you can expose them to sunlight for a day or two to enhance their green color.
How do I know when my bean sprouts are ready to eat?
Your bean sprouts are ready to eat when they have reached your desired length and have a crisp, crunchy texture. The length of the sprouts is a matter of personal preference, but most people prefer them to be about 1-2 inches long.
What are some creative ways to use bean sprouts in my cooking?
Bean sprouts are incredibly versatile and can be used in a wide variety of dishes. Add them to salads, sandwiches, stir-fries, soups, spring rolls, and even tacos. They can also be used as a topping for noodles, rice, and other dishes. Get creative and experiment with different flavor combinations to discover your favorite ways to use bean sprouts.
Leave a Comment