
Start kale plants at home and unlock a world of fresh, nutritious greens right outside your door! Imagine stepping into your garden and harvesting vibrant, leafy kale for your salads, smoothies, or even a delicious kale chip snack. Sounds amazing, right? For centuries, cultivating your own food has been a source of sustenance and connection to nature. From ancient Roman gardens to the victory gardens of the World Wars, growing your own produce has always been a way to ensure access to healthy food and foster a sense of self-sufficiency.
But let’s be honest, the idea of starting plants from scratch can feel a little daunting. Where do you even begin? That’s where this DIY guide comes in! I’m here to share some simple, effective tricks and hacks that will make starting kale plants at home a breeze, even if you’re a complete beginner. We’ll cover everything from choosing the right seeds to nurturing your seedlings until they’re ready to thrive in your garden.
Why is this so important? Well, store-bought kale can be expensive, and you never really know how long it’s been sitting on the shelf. By learning how to start kale plants at home, you’ll not only save money but also enjoy the freshest, most flavorful kale imaginable. Plus, there’s something incredibly rewarding about nurturing a plant from seed to harvest. So, let’s get our hands dirty and embark on this exciting gardening adventure together!
Starting Kale Plants Indoors: A Beginner’s Guide
Hey there, fellow gardening enthusiasts! I’m so excited to share my tried-and-true method for starting kale plants indoors. It’s a fantastic way to get a head start on the growing season, especially if you live in a region with a shorter growing period. Plus, it’s incredibly rewarding to watch those tiny seeds sprout into vibrant, healthy seedlings. Let’s dive in!
Why Start Kale Indoors?
Before we get our hands dirty, let’s quickly chat about why starting kale indoors is a great idea:
* Extended Growing Season: You can get a jump start on the season by starting your kale indoors 6-8 weeks before the last expected frost. This means you’ll be harvesting delicious kale much sooner!
* Protection from Pests: Indoor seedlings are shielded from common garden pests like slugs, snails, and flea beetles, giving them a stronger start.
* Control Over Environment: You have complete control over the temperature, light, and moisture levels, creating the perfect environment for germination and early growth.
* Cost-Effective: Starting from seed is generally much cheaper than buying established kale plants from a nursery.
Materials You’ll Need
Okay, let’s gather our supplies. Here’s what you’ll need to successfully start your kale seedlings indoors:
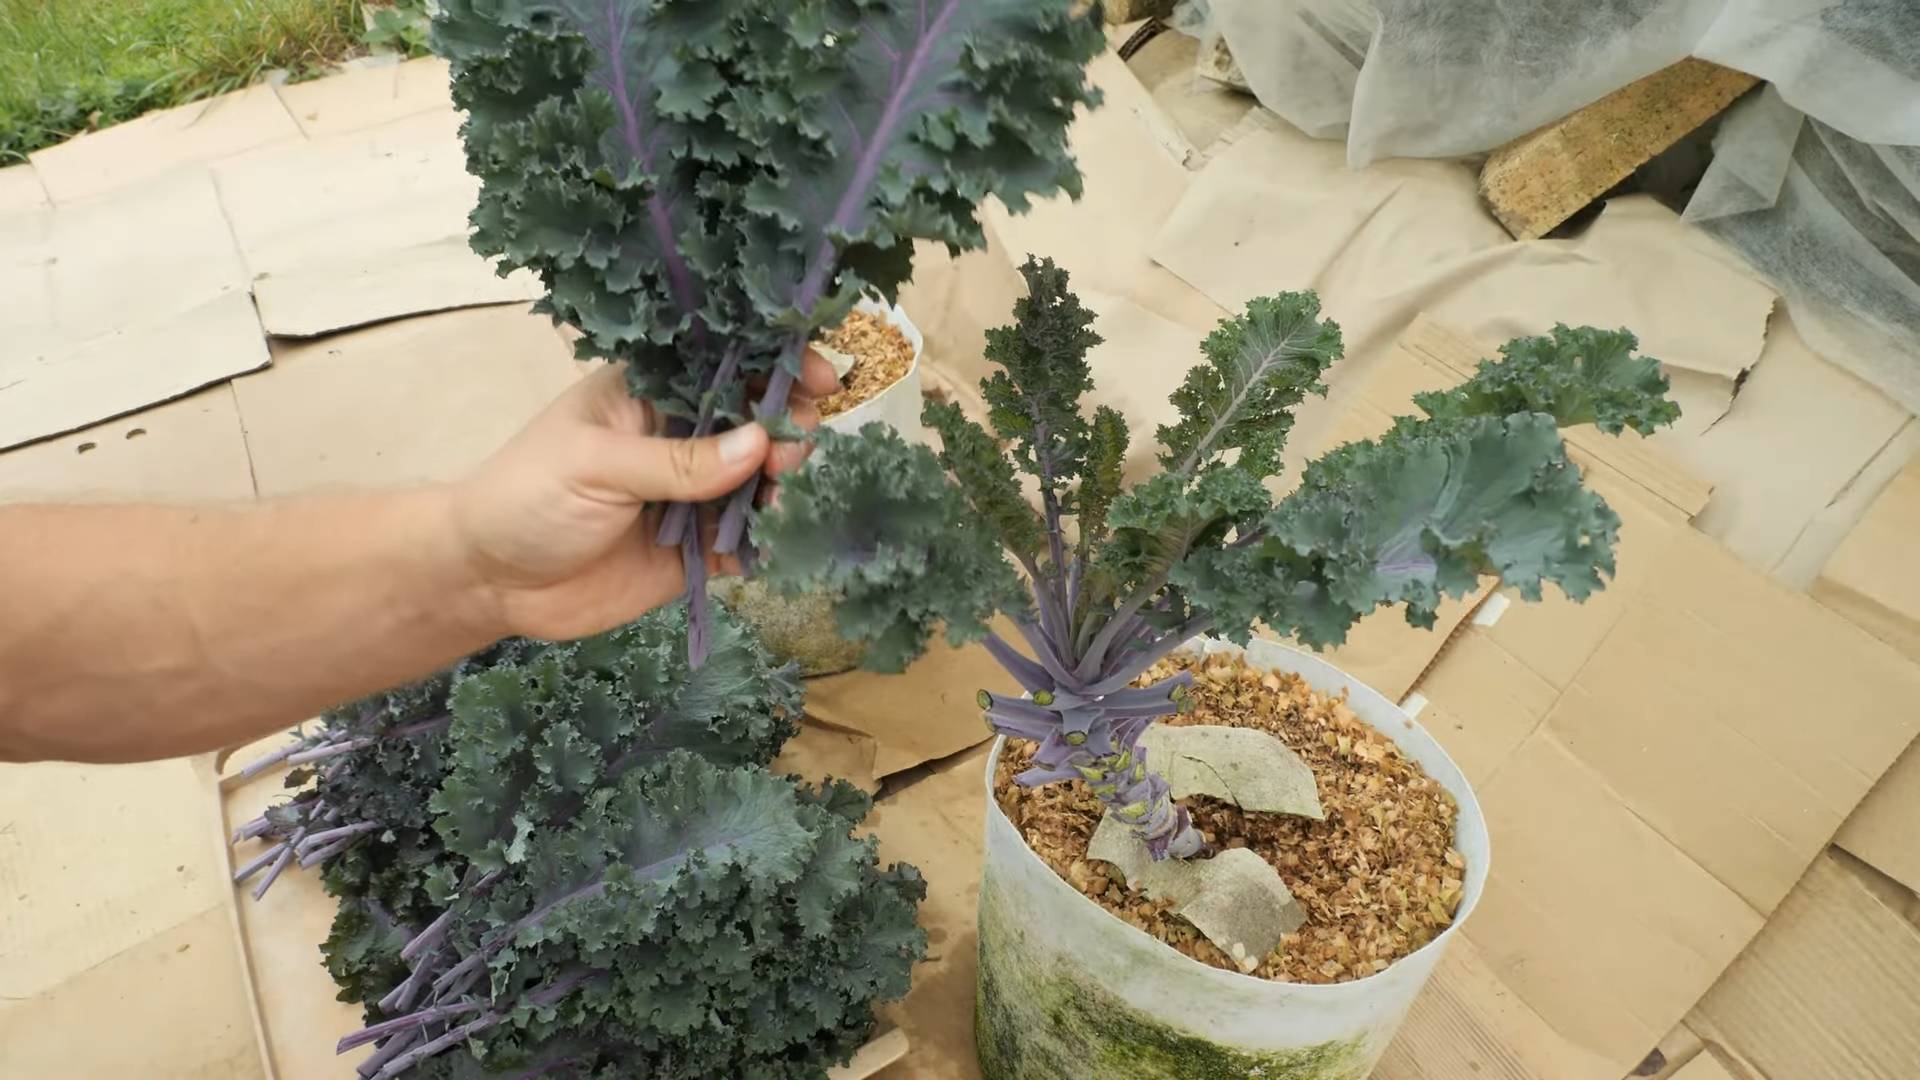
* Kale Seeds: Choose your favorite kale variety! There are so many options, from curly kale to dinosaur kale (lacinato) to red Russian kale.
* Seed Starting Trays or Pots: I prefer using seed starting trays with individual cells, but small pots (2-3 inches in diameter) work just as well. Make sure they have drainage holes!
* Seed Starting Mix: This is crucial! Don’t use regular garden soil, as it’s too heavy and can compact around the delicate seedlings. Seed starting mix is light, airy, and well-draining.
* Watering Can or Spray Bottle: A gentle watering can or spray bottle is essential for keeping the soil moist without disturbing the seeds.
* Grow Lights (Optional but Recommended): While a sunny windowsill can work, grow lights provide consistent and adequate light for healthy seedling development.
* Heat Mat (Optional): Kale seeds germinate best in slightly warmer temperatures (around 70-75°F). A heat mat can help maintain this optimal temperature.
* Plant Labels: Don’t forget to label your trays or pots with the kale variety and the date you planted them. Trust me, you’ll thank yourself later!
* Small Spoon or Dibber: This will help you make small holes in the soil for planting the seeds.
Step-by-Step Instructions: Planting Your Kale Seeds
Alright, let’s get planting! Follow these steps for successful kale seedling germination:
1. Prepare Your Seed Starting Trays or Pots: Fill your seed starting trays or pots with seed starting mix. Gently tap the trays or pots to settle the mix, but don’t pack it down too tightly. You want it to be light and airy.
2. Moisten the Seed Starting Mix: Before planting, thoroughly moisten the seed starting mix. You want it to be damp, but not soggy. I like to use a spray bottle to gently mist the soil until it’s evenly moistened.
3. Make Small Holes: Use a small spoon or dibber to create small holes in the center of each cell or pot. The holes should be about ¼ to ½ inch deep.
4. Sow the Seeds: Place 2-3 kale seeds in each hole. This increases the chances of at least one seed germinating in each cell or pot.
5. Cover the Seeds: Gently cover the seeds with a thin layer of seed starting mix.
6. Water Gently: Water the seeds gently with a watering can or spray bottle. Avoid overwatering, as this can cause the seeds to rot.
7. Label Your Trays or Pots: Don’t forget to label your trays or pots with the kale variety and the date you planted them.
8. Provide Warmth: Place the seed starting trays or pots on a heat mat (if using) or in a warm location. The ideal temperature for kale seed germination is around 70-75°F.
9. Provide Light: Place the seed starting trays or pots under grow lights or in a sunny windowsill. If using a windowsill, rotate the trays or pots regularly to ensure even light exposure.
Caring for Your Kale Seedlings
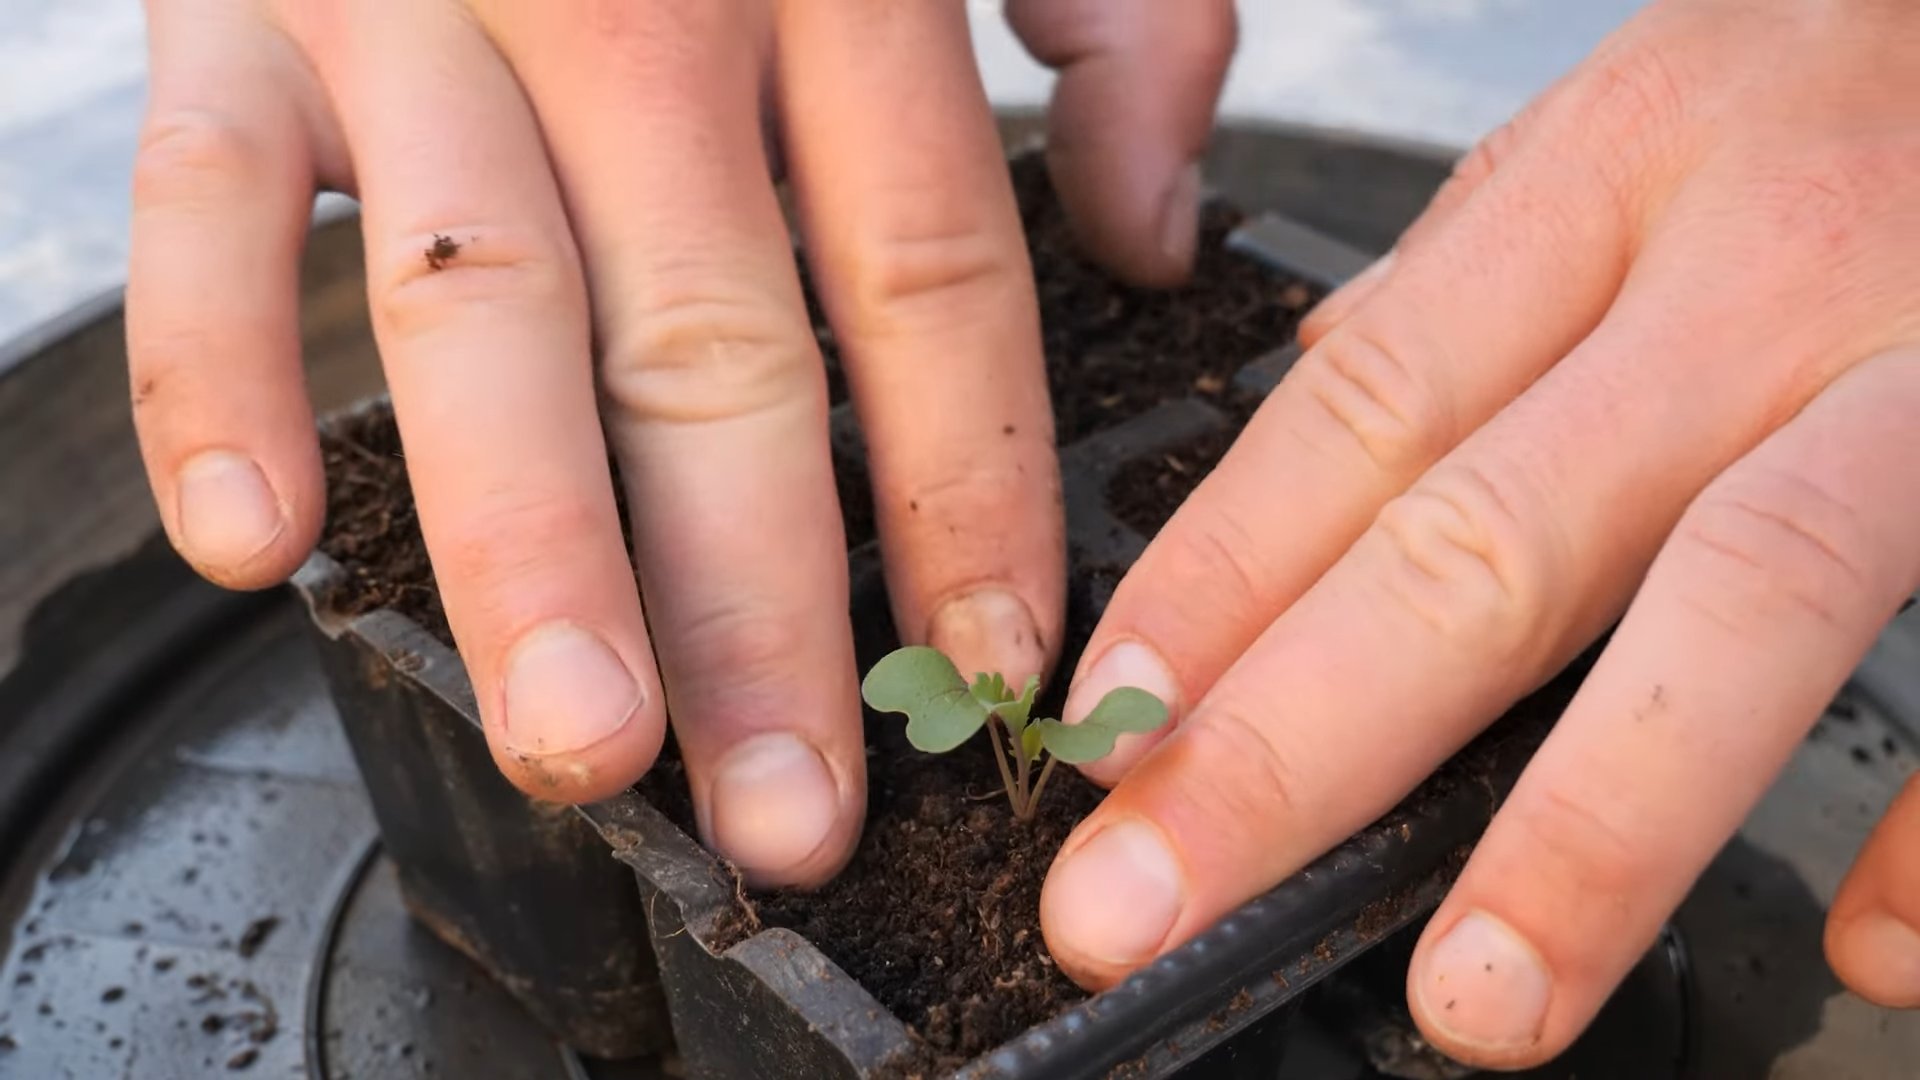
Once your kale seeds have germinated (usually within 5-10 days), it’s time to focus on providing them with the care they need to thrive.
1. Watering: Keep the seed starting mix consistently moist, but not soggy. Water when the top inch of soil feels dry to the touch. Avoid overwatering, as this can lead to damping off, a fungal disease that can kill young seedlings.
2. Lighting: Ensure your seedlings receive adequate light. If using grow lights, position them a few inches above the seedlings and keep them on for 14-16 hours per day. If using a windowsill, rotate the trays or pots regularly to prevent the seedlings from becoming leggy (tall and spindly).
3. Temperature: Maintain a consistent temperature of around 65-70°F. Avoid exposing the seedlings to drafts or extreme temperature fluctuations.
4. Thinning: Once the seedlings have developed their first true leaves (the second set of leaves that appear after the initial seed leaves), thin them to one seedling per cell or pot. Choose the strongest, healthiest-looking seedling and gently snip off the others at the soil line with scissors. Don’t pull them out, as this can disturb the roots of the remaining seedling.
5. Fertilizing: After the seedlings have developed their first true leaves, you can start feeding them with a diluted liquid fertilizer. Use a balanced fertilizer (e.g., 10-10-10) diluted to half strength. Fertilize every 1-2 weeks.
Hardening Off Your Kale Seedlings
Before transplanting your kale seedlings outdoors, it’s essential to “harden them off.” This process gradually acclimates the seedlings to outdoor conditions, preventing shock and ensuring a smoother transition.
1. Start Gradually: Begin by placing the seedlings outdoors in a sheltered location (e.g., a shaded patio or porch) for just a few hours each day.
2. Increase Exposure: Gradually increase the amount of time the seedlings spend outdoors each day, exposing them to more sunlight and wind.
3. Monitor the Weather: Avoid hardening off your seedlings on days with extreme temperatures, strong winds, or heavy rain.
4. Water Regularly: Keep the soil consistently moist during the hardening off process.
5. After a Week or Two: After a week or two of hardening off, your kale seedlings should be ready to be transplanted into your garden.
Transplanting Your Kale Seedlings
Now for the exciting part – planting your kale seedlings in the garden!
1. Choose a Sunny Location: Kale thrives in full sun (at least 6 hours of sunlight per day).
2. Prepare the Soil: Amend the soil with compost or other organic matter to improve drainage and fertility.
3. Dig Holes: Dig holes that are slightly larger than the root balls of your seedlings. Space the holes about 12-18 inches apart.
4. Gently Remove Seedlings: Carefully remove the seedlings from their trays or pots. Gently loosen the root ball if it’s tightly bound.
5. Plant the Seedlings: Place the seedlings in the holes and backfill with soil. Make sure the top of the root ball is level with the surrounding soil.
6. Water Thoroughly: Water the seedlings thoroughly after planting.
7. Mulch: Apply a layer of mulch around the seedlings to help retain moisture and suppress weeds.
8. Protect from Pests: Consider using row covers or other protective measures to protect your young kale plants from pests.
Troubleshooting
Even with the best planning, sometimes things don’t go exactly as expected. Here are a few common problems you might encounter and how to address them:
* Seeds Not Germinating: Make sure your seeds are fresh and viable. Check the expiration date on the seed packet. Also, ensure the soil is warm enough and consistently moist.
* Leggy Seedlings: This usually indicates insufficient light. Provide more light by using grow lights or moving the seedlings to a sunnier location.
* Damping Off: This fungal disease can cause seedlings to collapse and die. Avoid overwatering and ensure good air circulation. You can also use a fungicide specifically designed for seedlings.
* Pest Problems: Keep an eye out for pests like aphids, flea beetles, and cabbage worms. Handpick them off the plants or use organic pest control methods like insecticidal soap or neem oil.
Enjoy Your
Conclusion
So, there you have it! Starting kale plants at home isn’t just a cost-effective alternative to buying seedlings; it’s a deeply rewarding experience that connects you to the food you eat. From selecting the perfect kale variety to nurturing those tiny seeds into robust plants, every step of the process is an opportunity to learn and grow – both literally and figuratively.
Why is this DIY trick a must-try? Because it puts you in control. You choose the seeds, ensuring you’re growing the kale that best suits your taste and your garden’s conditions. You control the growing environment, minimizing the risk of pests and diseases that can plague store-bought seedlings. And perhaps most importantly, you experience the satisfaction of nurturing life from its very beginning. There’s a unique joy in watching those first little sprouts emerge, knowing that you played a vital role in their creation.
But the benefits don’t stop there. Starting your own kale plants allows for greater flexibility in your planting schedule. You can get a head start on the growing season, ensuring a continuous supply of fresh, nutritious kale throughout the year. And let’s not forget the sheer variety you can explore! From the curly leaves of common kale to the vibrant colors of Red Russian or the dinosaur-like texture of Lacinato, the possibilities are endless.
Ready to take your kale game to the next level? Consider these variations and suggestions:
* Succession Planting: Plant a new batch of seeds every few weeks to ensure a continuous harvest throughout the growing season. This is especially useful if you have a large family or enjoy juicing kale regularly.
* Experiment with Varieties: Don’t be afraid to try different kale varieties to find your favorites. Each variety has its own unique flavor and texture, so there’s bound to be one that you absolutely love.
* Companion Planting: Plant kale alongside other beneficial plants, such as marigolds (to deter pests) or onions (to improve flavor). Research companion planting to maximize your garden’s potential.
* Hydroponic Kale: For those with limited space or a desire to experiment, kale can even be grown hydroponically. This method allows you to grow kale indoors, year-round, without the need for soil.
* Seed Saving: Once your kale plants mature, consider saving the seeds for future planting. This is a great way to preserve your favorite varieties and become even more self-sufficient.
Starting kale plants at home is an investment in your health, your garden, and your connection to the natural world. It’s a simple yet profound way to take control of your food supply and experience the joy of growing your own. So, grab some seeds, prepare your soil, and get ready to embark on this exciting journey.
We’re confident that you’ll find the experience incredibly rewarding. And we want to hear all about it! Share your experiences, tips, and photos with us in the comments below. Let’s build a community of kale-loving gardeners and inspire others to discover the magic of starting their own plants from seed. Happy growing!
Frequently Asked Questions (FAQs)
What is the best time of year to start kale seeds indoors?
The ideal time to start kale seeds indoors is typically 4-6 weeks before the last expected frost in your area. This allows the seedlings to develop a strong root system before being transplanted outdoors. Check your local frost dates to determine the best time to start your seeds. If you live in a warmer climate with mild winters, you can start kale seeds in the late summer or early fall for a winter harvest.
What type of soil is best for starting kale seeds?
A well-draining seed starting mix is crucial for successful germination. Avoid using garden soil, as it can be too heavy and may contain pathogens that can harm young seedlings. Look for a seed starting mix that is specifically formulated for starting seeds, or you can create your own by mixing equal parts peat moss, vermiculite, and perlite. The soil should be moist but not soggy.
How often should I water kale seedlings?
Keep the soil consistently moist, but avoid overwatering. Overwatering can lead to damping off, a fungal disease that can kill young seedlings. Water when the top inch of soil feels dry to the touch. Use a gentle watering can or spray bottle to avoid disturbing the delicate seedlings. Bottom watering is also a good option; place the seed trays in a shallow tray of water and allow the soil to absorb the water from the bottom.
How much light do kale seedlings need?
Kale seedlings need plenty of light to grow strong and healthy. If you’re starting seeds indoors, provide them with at least 12-16 hours of light per day. A grow light is ideal, but you can also use a sunny windowsill. However, be aware that seedlings grown on a windowsill may need to be rotated regularly to prevent them from becoming leggy. Once the seedlings have developed their first true leaves, you can gradually acclimate them to outdoor conditions by exposing them to increasing amounts of sunlight each day.
When should I transplant kale seedlings outdoors?
Transplant kale seedlings outdoors when they have developed 4-6 true leaves and the danger of frost has passed. Before transplanting, harden off the seedlings by gradually exposing them to outdoor conditions over a period of 7-10 days. Start by placing them in a sheltered location for a few hours each day, gradually increasing the amount of time they spend outdoors. Choose a sunny location with well-drained soil for transplanting. Space the seedlings 12-18 inches apart.
What are some common pests and diseases that affect kale?
Common pests that affect kale include aphids, cabbage worms, flea beetles, and whiteflies. Diseases that can affect kale include black rot, clubroot, and downy mildew. To prevent pests and diseases, practice good garden hygiene, such as removing weeds and debris, and rotate your crops regularly. You can also use organic pest control methods, such as insecticidal soap or neem oil. Choose disease-resistant varieties of kale whenever possible.
Can I grow kale in containers?
Yes, kale can be successfully grown in containers. Choose a container that is at least 12 inches in diameter and has drainage holes. Use a high-quality potting mix and provide the plants with plenty of sunlight and water. Fertilize regularly with a balanced fertilizer. Container-grown kale may need to be watered more frequently than kale grown in the ground.
How do I harvest kale?
Harvest kale leaves when they are about 6-8 inches long. Start by harvesting the outer leaves, leaving the inner leaves to continue growing. You can harvest kale leaves continuously throughout the growing season. Avoid harvesting more than one-third of the plant at a time, as this can stress the plant.
Is kale a cut-and-come-again crop?
Yes, kale is a cut-and-come-again crop, meaning you can harvest leaves repeatedly over a long period. As you harvest the outer leaves, the plant will continue to produce new leaves from the center. This makes kale a very productive and rewarding crop to grow.
How can I store harvested kale?
Store harvested kale in the refrigerator in a plastic bag or container. It will keep for up to a week. To keep kale fresh for longer, you can blanch it for 2-3 minutes and then freeze it. Frozen kale can be stored for up to 6 months.

Leave a Comment