
Surprise Bean Plant Bloom! Imagine waking up one morning and discovering your humble bean plant, the one you almost forgot about, bursting with vibrant, unexpected blooms! That’s the magic we’re diving into today. For centuries, cultivating beans has been a cornerstone of diets worldwide, from ancient civilizations in the Americas to bustling modern-day kitchens. But beyond their nutritional value, bean plants offer a unique opportunity for home gardeners to experience the sheer joy of a surprise bloom.
Let’s be honest, sometimes our gardens need a little boost, a little something extra to reignite our passion. Maybe your bean plants are looking a bit lackluster, or perhaps you’re simply eager to witness the full potential of your green companions. That’s where these DIY tricks and hacks come in! I’m going to share some simple, yet effective, methods to encourage a surprise bean plant bloom that will not only beautify your garden but also provide you with a bountiful harvest. Get ready to unlock the secrets to a flourishing bean patch and experience the delightful surprise of unexpected blossoms!
Verzaubere deine Freunde mit einer magischen Bohnenpflanze!
Hey Leute! Habt ihr Lust auf ein wirklich cooles DIY-Projekt, das eure Freunde und Familie garantiert zum Staunen bringt? Ich zeige euch heute, wie ihr eine “magische” Bohnenpflanze züchtet, die beim Wachsen eine geheime Botschaft enthüllt! Das ist nicht nur ein super lustiges Experiment, sondern auch ein tolles Geschenk für jeden Anlass. Lasst uns loslegen!
Was du brauchst:
* Bohnensamen: Große Bohnen wie Feuerbohnen oder Schwertbohnen eignen sich am besten, da sie genug Platz für die Gravur bieten.
* Kleine Töpfe oder Behälter: Am besten biologisch abbaubare Töpfe, damit du die Pflanze später einfach umtopfen kannst.
* Blumenerde: Gute Blumenerde ist wichtig für ein gesundes Wachstum.
* Messer oder Schnitzwerkzeug: Ein scharfes Messer oder ein spezielles Schnitzwerkzeug (z.B. Linolschnittwerkzeug) für die Gravur. Sei bitte vorsichtig!
* Bleistift: Zum Vorzeichnen der Botschaft.
* Wasser: Zum Gießen, natürlich!
* Optional: Kleine Schilder oder Etiketten, um die Bohnen zu beschriften, falls du verschiedene Sorten verwendest.
Die Vorbereitung:
Bevor wir mit dem eigentlichen Zauber beginnen, müssen wir ein paar Vorbereitungen treffen.
* Bohnen auswählen: Suche dir die größten und gesündesten Bohnen aus. Je größer die Bohne, desto einfacher ist die Gravur.
* Werkzeug bereitlegen: Stelle sicher, dass dein Messer oder Schnitzwerkzeug scharf und sauber ist.
* Arbeitsplatz vorbereiten: Lege eine Unterlage auf deinen Tisch, um ihn vor Kratzern zu schützen.
Die magische Gravur:
Jetzt kommt der spaßige Teil! Wir gravieren unsere Botschaft in die Bohnen.
1. Botschaft auswählen: Überlege dir, welche Botschaft du auf die Bohne gravieren möchtest. Es können kurze Wörter wie “Liebe”, “Glück”, “Freude” oder kleine Symbole wie ein Herz oder ein Stern sein. Denk daran, dass die Botschaft beim Wachsen der Pflanze sichtbar wird, also wähle etwas Positives und Aufmunterndes!
2. Vorzeichnen: Zeichne deine Botschaft mit einem Bleistift leicht auf die Oberfläche der Bohne. Das hilft dir, beim Gravieren präzise zu sein.
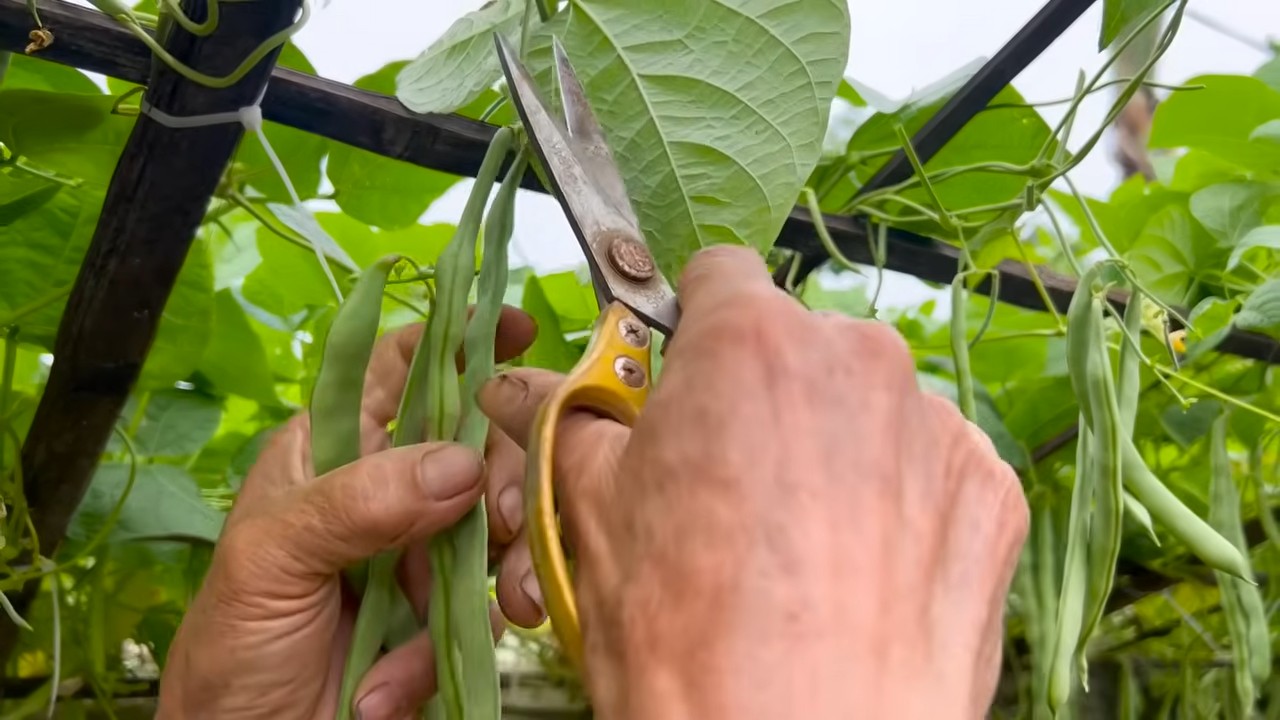
3. Gravieren: Nimm dein Messer oder Schnitzwerkzeug und beginne vorsichtig, die Umrisse deiner Botschaft nachzufahren. Arbeite langsam und behutsam, um die Bohne nicht zu beschädigen. Du musst nicht tief schneiden, es reicht, wenn du die äußere Schicht der Bohne entfernst.
4. Kontrolle: Überprüfe regelmäßig, ob deine Gravur gut lesbar ist. Du kannst die Bohne leicht anfeuchten, um die Gravur besser zu erkennen.
5. Wiederholen: Wiederhole den Vorgang für alle Bohnen, die du bepflanzen möchtest.
Wichtiger Hinweis: Sei beim Gravieren extrem vorsichtig! Das Messer ist scharf und die Bohnen sind klein. Wenn du dich unsicher fühlst, bitte einen Erwachsenen um Hilfe.
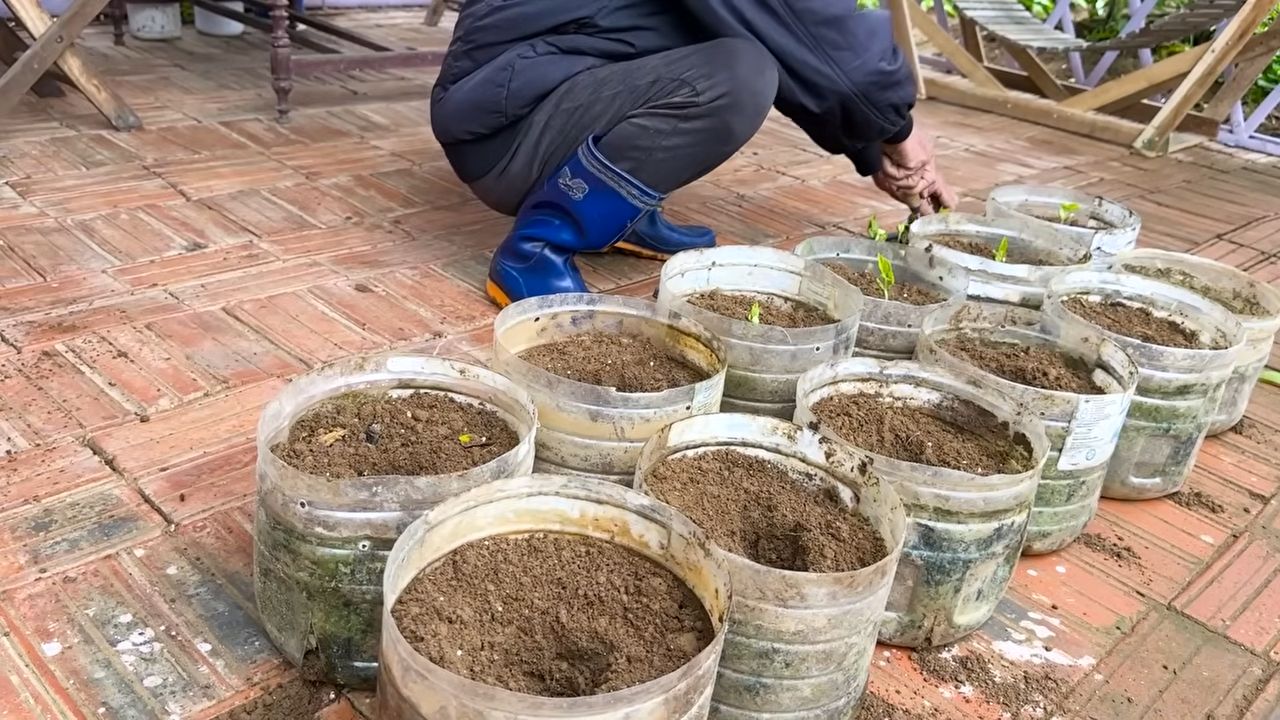
Die Bohnen einpflanzen:
Nachdem wir unsere Bohnen mit magischen Botschaften versehen haben, können wir sie einpflanzen.
1. Töpfe vorbereiten: Fülle deine Töpfe oder Behälter mit Blumenerde. Lass oben etwa 2-3 cm Platz.
2. Bohnen einsetzen: Drücke die Bohnen etwa 2-3 cm tief in die Erde. Achte darauf, dass die gravierte Seite nach oben zeigt.
3. Gießen: Gieße die Erde vorsichtig an, bis sie feucht, aber nicht nass ist.
4. Standort wählen: Stelle die Töpfe an einen warmen und hellen Ort, aber vermeide direkte Sonneneinstrahlung.
Die Pflege:
Damit unsere magischen Bohnenpflanzen gut wachsen, brauchen sie die richtige Pflege.
1. Gießen: Halte die Erde feucht, aber vermeide Staunässe. Gieße regelmäßig, aber nicht zu viel.
2. Licht: Stelle sicher, dass die Pflanzen genügend Licht bekommen. Wenn sie zu wenig Licht bekommen, werden sie lang und dünn.
3. Drehen: Drehe die Töpfe regelmäßig, damit die Pflanzen gleichmäßig wachsen.
4. Beobachten: Beobachte deine Pflanzen genau. Achte auf Anzeichen von Schädlingen oder Krankheiten.
Das Warten und Staunen:
Jetzt heißt es warten und geduldig sein. Es kann einige Tage oder sogar Wochen dauern, bis die Bohnen keimen. Aber wenn sie es tun, wirst du mit einem magischen Anblick belohnt!
* Die ersten Triebe: Die ersten Triebe werden aus der Erde kommen und sich nach oben recken.
* Die Botschaft enthüllen: Wenn die Pflanze wächst, wird die gravierte Botschaft auf der Bohne sichtbar.
* Die Freude teilen: Zeige deine magische Bohnenpflanze deinen Freunden und Familie und teile die Freude!
Zusätzliche Tipps und Tricks:
* Verschiedene Botschaften: Du kannst verschiedene Botschaften auf verschiedene Bohnen gravieren und so eine kleine Sammlung von Glücksbringern erstellen.
* Geschenkidee: Die magische Bohnenpflanze ist eine tolle Geschenkidee für Geburtstage, Weihnachten oder einfach nur so.
* Personalisierung: Du kannst die Töpfe mit Namen oder kleinen Zeichnungen personalisieren, um das Geschenk noch persönlicher zu gestalten.
* Experimentieren: Probiere verschiedene Bohnensorten aus und finde heraus, welche sich am besten für die Gravur eignen.
* Dokumentation: Mache Fotos von deinen Pflanzen, während sie wachsen, und erstelle eine kleine Dokumentation deines Projekts.
Häufige Probleme und Lösungen:
* Die Bohnen keimen nicht: Stelle sicher, dass die Erde feucht genug ist und die Bohnen genügend Wärme bekommen. Manchmal kann es auch einfach an der Qualität der Bohnen liegen.
* Die Pflanzen werden lang und dünn: Das liegt meistens an zu wenig Licht. Stelle die Pflanzen an einen helleren Ort.
* Schädlinge: Kontrolliere deine Pflanzen regelmäßig auf Schädlinge. Bei Bedarf kannst du biologische Schädlingsbekämpfungsmittel verwenden.
* Schimmel: Wenn die Erde zu feucht ist, kann sich Schimmel bilden. Reduziere das Gießen und sorge für eine gute Belüftung.
Noch ein paar kreative Ideen:
* Bohnen-Ketten: Wenn deine Bohnenpflanzen groß genug sind, kannst du sie an einer Schnur befestigen und eine Bohnen-Kette erstellen.
* Bohnen-Kunst: Du kannst die getrockneten Bohnen auch für andere Kunstprojekte verwenden, z.B. für Mosaike oder Collagen.
* Bohnen-Tausch: Tausche deine gravierten Bohnen mit Freunden und Familie und erstelle eine Sammlung von magischen Botschaften.
Ich hoffe, diese Anleitung hat dir gefallen und du hast Lust bekommen, deine eigene magische Bohnenpflanze zu züchten. Es ist ein wirklich lohnendes Projekt, das nicht nur Spaß macht, sondern auch eine schöne Erinnerung schafft. Viel Erfolg und viel Freude beim Gärtnern!
Conclusion
So, there you have it! Transforming ordinary dried beans into a captivating “Surprise Bean Plant Bloom” is more than just a fun activity; it’s a miniature science experiment, a lesson in patience, and a delightful way to bring a touch of nature indoors, regardless of the season. We’ve walked you through the simple steps, highlighting the ease and accessibility of this project. Forget complicated gardening equipment or extensive outdoor space. All you need are a few common household items, a handful of dried beans, and a sprinkle of curiosity.
Why is this a must-try? Because it’s incredibly rewarding to witness the miracle of life unfold before your eyes. From the first sprout pushing through the damp paper towel to the eventual unfurling of leaves, each stage is a testament to the power of nature. It’s a fantastic educational tool for children, teaching them about germination, plant growth, and the importance of nurturing living things. But it’s not just for kids! Adults can also find joy in the simple act of creating and observing this miniature ecosystem.
Looking for variations? Absolutely! Experiment with different types of beans. Pinto beans, kidney beans, and even lentils can be used to create a diverse and visually interesting “Surprise Bean Plant Bloom.” You can also try using different containers. Instead of a glass jar, consider using a clear plastic cup or even a recycled container. Get creative with the presentation! Once the beans have sprouted, you can carefully transfer them to a small pot filled with soil to allow them to continue growing. Add a decorative touch by painting the pot or adding small pebbles around the base of the plants. You could even create a miniature trellis for the bean plants to climb.
The possibilities are endless! The key is to have fun and embrace the unexpected. Remember, this is a learning experience, and not every bean will sprout. Don’t be discouraged if some fail to germinate. Simply replace them and keep trying. The satisfaction of seeing your “Surprise Bean Plant Bloom” flourish will far outweigh any initial setbacks.
We wholeheartedly encourage you to try this DIY trick. It’s a simple, affordable, and incredibly rewarding way to connect with nature and learn something new. Once you’ve created your own “Surprise Bean Plant Bloom,” we’d love to hear about your experience! Share your photos and stories with us in the comments below. Let us know what types of beans you used, what challenges you encountered, and what you learned along the way. Your feedback will not only help us improve this guide but also inspire others to embark on their own bean-sprouting adventures. So, grab your beans, gather your supplies, and get ready to witness the magic of life unfold! We can’t wait to see what you create!
Frequently Asked Questions
What types of beans work best for this project?
While most dried beans will sprout, some varieties tend to be more reliable than others. Kidney beans, pinto beans, and black beans are generally considered to be good choices for a “Surprise Bean Plant Bloom” project. These beans are readily available in most grocery stores and tend to have a high germination rate. However, feel free to experiment with other types of beans, such as lima beans, navy beans, or even lentils. Just keep in mind that the germination rate may vary depending on the type of bean and its age. Avoid using beans that are very old or have been treated with preservatives, as these may not sprout as easily.
How long does it take for the beans to sprout?
The time it takes for the beans to sprout can vary depending on several factors, including the type of bean, the temperature, and the moisture level. Generally, you can expect to see sprouts within 3 to 7 days. Keep in mind that some beans may sprout faster than others. To speed up the germination process, make sure to keep the paper towels consistently moist but not waterlogged. Also, maintain a warm environment, ideally between 65 and 75 degrees Fahrenheit. Avoid placing the jar in direct sunlight, as this can cause the paper towels to dry out too quickly.
What do I do if mold starts to grow?
Mold growth is a common issue when working with damp environments. If you notice mold growing on the paper towels or beans, it’s important to take action to prevent it from spreading. First, carefully remove any beans that are visibly moldy. Then, replace the paper towels with fresh ones. Make sure to rinse the jar thoroughly with soap and water before adding the new paper towels. To prevent mold growth in the future, ensure that the paper towels are not too wet. Overwatering can create a breeding ground for mold. Also, provide adequate ventilation by leaving the jar slightly open. If mold continues to be a problem, consider using a diluted solution of hydrogen peroxide to disinfect the paper towels and beans.
Can I transplant the sprouted beans into soil?
Yes, absolutely! Once the beans have sprouted and developed a few leaves, you can carefully transplant them into a small pot filled with soil. This will allow them to continue growing and developing into larger plants. When transplanting, be gentle with the delicate roots. Dig a small hole in the soil and carefully place the sprouted bean into the hole. Cover the roots with soil and gently pat it down. Water the soil thoroughly after transplanting. Choose a pot that is large enough to accommodate the growing plant. A pot that is at least 6 inches in diameter is a good starting point. Also, make sure the pot has drainage holes to prevent waterlogging.
How much light do the bean plants need?
Bean plants need plenty of light to thrive. Ideally, they should receive at least 6 hours of direct sunlight per day. If you don’t have a sunny windowsill, you can supplement with artificial light. A grow light or even a fluorescent light can provide the necessary light for the plants to grow. Place the light about 6 to 12 inches above the plants. Rotate the plants regularly to ensure that all sides receive adequate light. Without enough light, the bean plants may become leggy and weak.
What kind of soil should I use for transplanting?
When transplanting your sprouted beans, use a well-draining potting mix. Avoid using garden soil, as it can be too heavy and may not provide adequate drainage. A good potting mix will contain a blend of peat moss, perlite, and vermiculite. These ingredients help to retain moisture while also providing good aeration for the roots. You can find potting mix at most garden centers or nurseries. You can also make your own potting mix by combining equal parts peat moss, perlite, and vermiculite.
How often should I water the bean plants after transplanting?
After transplanting, water the bean plants regularly to keep the soil consistently moist but not waterlogged. Check the soil moisture level by sticking your finger into the soil. If the top inch of soil feels dry, it’s time to water. Water the plants thoroughly until water drains out of the drainage holes. Avoid overwatering, as this can lead to root rot. During the growing season, you may need to water the plants more frequently, especially during hot weather.
Can I eat the bean sprouts?
While you can technically eat the bean sprouts, it’s generally not recommended to eat sprouts grown in this manner. The conditions in which they are grown (damp paper towels) can be conducive to bacterial growth, which could pose a health risk. It’s best to admire your “Surprise Bean Plant Bloom” for its aesthetic and educational value rather than consuming the sprouts. If you are interested in eating bean sprouts, it’s best to purchase them from a reputable source that follows proper food safety practices.


Leave a Comment