
Sweet Potatoes in Containers: Imagine harvesting a bounty of vibrant, earthy sweet potatoes right from your own patio! It sounds like a dream, right? Well, it doesn’t have to be! For centuries, cultures around the globe, from South America to Asia, have cherished sweet potatoes not only for their delicious flavor but also for their nutritional powerhouse. These versatile tubers have been a staple, providing sustenance and comfort. But what if you don’t have acres of land to dedicate to a sprawling sweet potato patch? That’s where the magic of container gardening comes in!
In this DIY guide, I’m going to show you how to cultivate your very own sweet potato harvest, even if you’re limited to a balcony, a small yard, or just a sunny windowsill. Many people think growing sweet potatoes requires vast open spaces, but I’m here to debunk that myth. We’ll explore the secrets to successfully growing sweet potatoes in containers, from selecting the right variety to providing the perfect growing conditions. This is a game-changer for urban gardeners and anyone looking to enjoy fresh, homegrown sweet potatoes without the commitment of a traditional garden. Get ready to roll up your sleeves and discover the joy of growing your own delicious and nutritious sweet potatoes!
Süßkartoffeln im Topf anbauen: Dein DIY-Guide für eine reiche Ernte
Ich liebe es, mein eigenes Gemüse anzubauen, und Süßkartoffeln sind da keine Ausnahme! Sie sind nicht nur super lecker und vielseitig, sondern auch überraschend einfach im Topf anzubauen. In diesem Artikel zeige ich dir Schritt für Schritt, wie du deine eigenen Süßkartoffeln im Topf ziehen kannst, selbst wenn du keinen Garten hast. Los geht’s!
Was du brauchst: Die Materialliste
Bevor wir loslegen, stell sicher, dass du alles griffbereit hast. Hier ist eine Liste der Dinge, die du für dein Süßkartoffel-Topf-Projekt benötigst:
* Süßkartoffel-Setzlinge (Slips): Diese kannst du entweder online bestellen, in einem Gartencenter kaufen oder sogar selbst ziehen (dazu später mehr!). Achte darauf, gesunde, kräftige Setzlinge zu wählen.
* Große Töpfe: Süßkartoffeln brauchen Platz! Wähle Töpfe mit einem Durchmesser von mindestens 45 cm und einer Tiefe von 30 cm. Je größer, desto besser, denn dann haben die Knollen mehr Platz zum Wachsen.
* Hochwertige Blumenerde: Verwende eine gut durchlässige Blumenerde, die reich an organischen Stoffen ist. Du kannst auch etwas Kompost oder gut verrotteten Mist untermischen, um die Nährstoffversorgung zu verbessern.
* Wasser: Regelmäßiges Gießen ist entscheidend für den Erfolg.
* Dünger: Ein ausgewogener Dünger (z.B. 10-10-10) hilft den Pflanzen, kräftig zu wachsen.
* Mulch (optional): Mulch hilft, die Feuchtigkeit im Boden zu halten und Unkraut zu unterdrücken. Stroh, Holzhackschnitzel oder Grasschnitt eignen sich gut.
* Gartenschere oder Messer: Zum Schneiden der Setzlinge (falls nötig).
* Gießkanne oder Gartenschlauch: Zum Bewässern der Pflanzen.
* Handschuhe: Zum Schutz deiner Hände.
Süßkartoffel-Setzlinge selbst ziehen (Slips)
Wenn du etwas Zeit und Geduld hast, kannst du deine Süßkartoffel-Setzlinge (Slips) auch selbst ziehen. Das ist gar nicht so schwer, wie es klingt!
1. Die Süßkartoffel vorbereiten: Wähle eine gesunde, unbeschädigte Süßkartoffel aus. Du kannst sie entweder halbieren oder ganz lassen.
2. Die Süßkartoffel ins Wasser stellen: Stecke Zahnstocher in die Seiten der Süßkartoffel, sodass sie etwa zur Hälfte im Wasser hängt. Du kannst sie auch in ein Glas mit Wasser stellen, sodass das untere Ende im Wasser ist.
3. An einen warmen, hellen Ort stellen: Stelle das Glas oder den Behälter an einen warmen, hellen Ort, aber nicht in direktes Sonnenlicht.
4. Wasser regelmäßig wechseln: Wechsle das Wasser alle paar Tage, um Fäulnis zu vermeiden.
5. Warten, bis die Slips wachsen: Nach einigen Wochen sollten sich an der Süßkartoffel Triebe (Slips) bilden. Diese können bis zu 15-20 cm lang werden.
6. Die Slips abtrennen: Wenn die Slips groß genug sind, kannst du sie vorsichtig von der Süßkartoffel abtrennen. Am besten schneidest du sie mit einem scharfen Messer oder einer Gartenschere ab.
7. Die Slips bewurzeln: Stelle die abgetrennten Slips in ein Glas mit Wasser, sodass die unteren Blätter im Wasser sind. Nach einigen Tagen sollten sich Wurzeln bilden.
8. Einpflanzen: Sobald die Slips Wurzeln haben, kannst du sie in deine Töpfe pflanzen.
Süßkartoffeln im Topf pflanzen: Schritt für Schritt
Jetzt kommt der spannende Teil: das Einpflanzen der Süßkartoffel-Setzlinge!
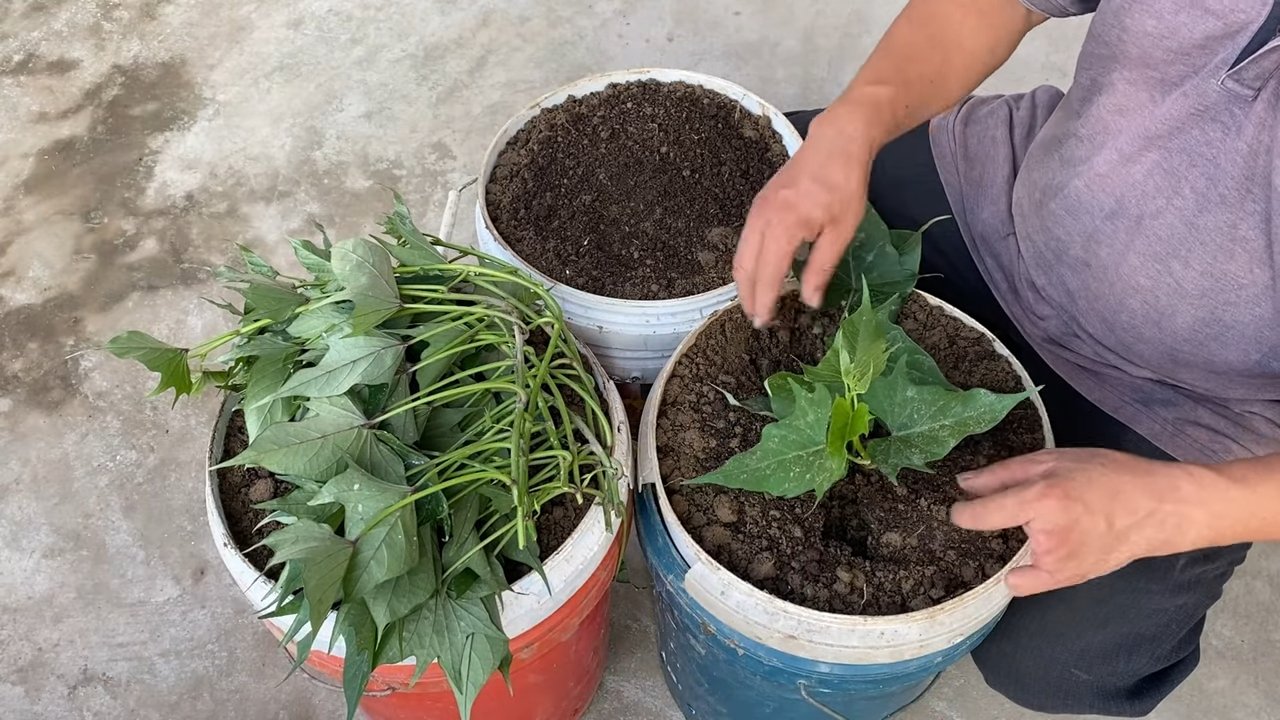
1. Den Topf vorbereiten: Fülle den Topf mit Blumenerde, lass aber etwa 5-7 cm Platz bis zum Rand.
2. Ein Pflanzloch graben: Grabe ein kleines Pflanzloch in die Erde, das groß genug ist, um die Wurzeln des Setzlings aufzunehmen.
3. Den Setzling einsetzen: Setze den Setzling vorsichtig in das Pflanzloch ein und bedecke die Wurzeln mit Erde. Achte darauf, dass die Blätter nicht mit Erde bedeckt sind.
4. Angießen: Gieße den Setzling gründlich an, sodass die Erde gut durchfeuchtet ist.
5. Wiederholen: Wiederhole die Schritte 2-4 für alle deine Setzlinge. Achte darauf, genügend Abstand zwischen den Pflanzen zu lassen (etwa 30-45 cm).
6. Mulchen (optional): Verteile eine Schicht Mulch um die Pflanzen, um die Feuchtigkeit im Boden zu halten und Unkraut zu unterdrücken.
Die richtige Pflege: Gießen, Düngen und mehr
Nach dem Einpflanzen ist die richtige Pflege entscheidend für eine reiche Ernte. Hier sind einige Tipps, die du beachten solltest:
* Gießen: Süßkartoffeln brauchen regelmäßige Bewässerung, besonders während der heißen Sommermonate. Gieße die Pflanzen, wenn sich die oberste Erdschicht trocken anfühlt. Vermeide Staunässe, da dies zu Wurzelfäule führen kann.
* Düngen: Dünge die Pflanzen alle paar Wochen mit einem ausgewogenen Dünger (z.B. 10-10-10). Befolge die Anweisungen auf der Düngerverpackung.
* Sonnenlicht: Süßkartoffeln brauchen viel Sonnenlicht, mindestens 6-8 Stunden pro Tag. Stelle die Töpfe an einen sonnigen Standort.
* Rankhilfe (optional): Süßkartoffeln sind Rankpflanzen. Du kannst ihnen eine Rankhilfe geben, damit sie sich daran festhalten können. Das ist aber nicht unbedingt notwendig.
* Schädlinge und Krankheiten: Achte auf Schädlinge wie Blattläuse oder Kartoffelkäfer. Bei Bedarf kannst du biologische Schädlingsbekämpfungsmittel einsetzen. Süßkartoffeln sind relativ resistent gegen Krankheiten, aber achte trotzdem auf Anzeichen von Pilzbefall.
Die Ernte: Wann ist es so weit?
Die Erntezeit für Süßkartoffeln ist normalerweise im Herbst, etwa 90-120 Tage nach dem Einpflanzen. Hier sind einige Anzeichen, dass deine Süßkartoffeln reif sind:
* Die Blätter werden gelb und sterben ab: Das ist ein natürlicher Prozess, der anzeigt, dass die Pflanze ihre Energie in die Knollen steckt.
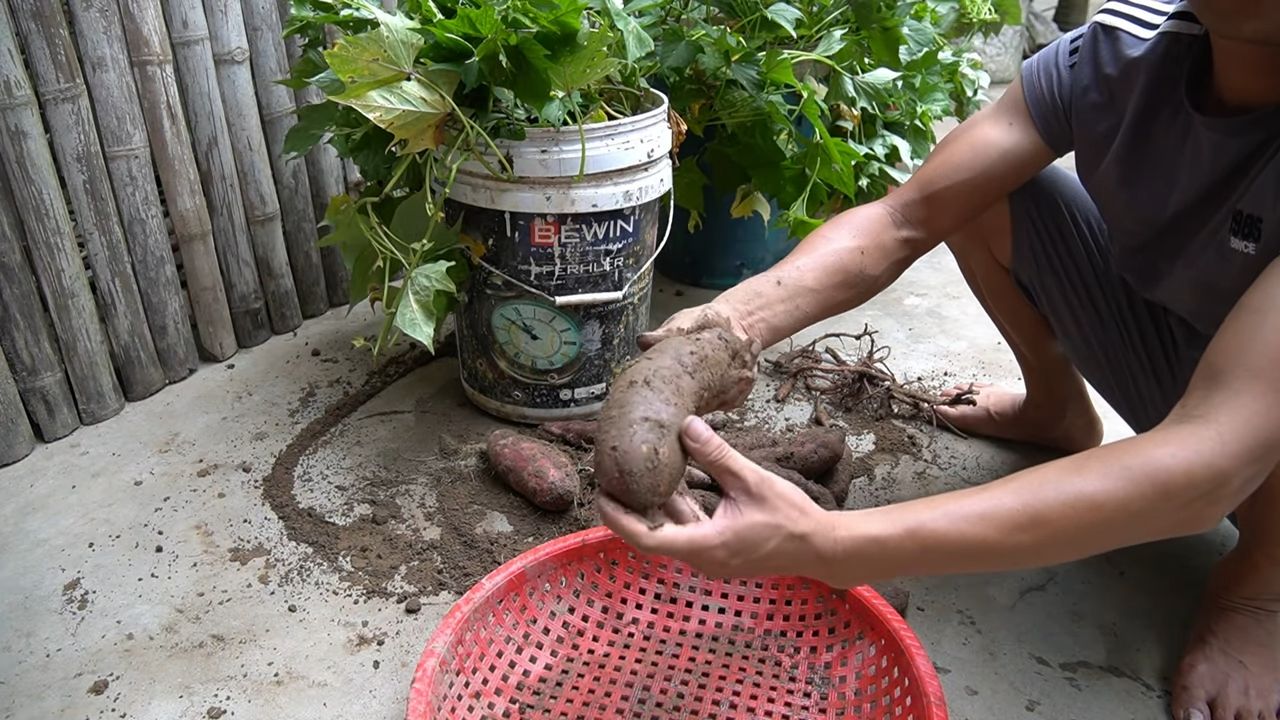
* Die Knollen sind groß genug: Grabe vorsichtig eine Knolle aus, um zu sehen, ob sie die gewünschte Größe hat.
* Vor dem ersten Frost: Ernte die Süßkartoffeln vor dem ersten Frost, da Frost die Knollen beschädigen kann.
Die Ernte: So geht’s richtig
1. Vorbereitung: Wähle einen trockenen Tag für die Ernte.
2. Ausgraben: Grabe vorsichtig um die Pflanze herum, um die Knollen freizulegen. Achte darauf, die Knollen nicht zu beschädigen.
3. Herausnehmen: Hebe die Knollen vorsichtig aus der Erde.
4. Reinigen: Entferne die Erde von den Knollen.
5. Trocknen: Lasse die Knollen einige Tage an einem warmen, trockenen Ort trocknen. Dadurch härtet die Schale aus und die Süßkartoffeln sind länger haltbar.
Die Lagerung: So bleiben deine Süßkartoffeln lange frisch
Nach dem Trocknen kannst du die Süßkartoffeln an einem kühlen, dunklen und trockenen Ort lagern. Ideal ist eine Temperatur zwischen 13 und 16 Grad Celsius. Unter diesen Bedingungen können sich Süßkartoffeln mehrere Monate halten. Vermeide es, die Süßkartoffeln im Kühlschrank zu lagern, da dies ihren Geschmack beeinträchtigen kann.
Häufige Fehler vermeiden: Tipps für eine erfolgreiche Ernte
* Zu kleine Töpfe: Süßkartoffeln brauchen Platz! Verwende ausreichend große Töpfe, damit die Knollen sich gut entwickeln können.
* Schlechte Blumenerde:
Conclusion
Growing sweet potatoes in containers is more than just a gardening experiment; it’s a gateway to fresh, flavorful harvests right at your doorstep, regardless of your space constraints. This DIY trick transforms the way you think about urban gardening, offering a rewarding experience that connects you to the food you eat. Imagine the satisfaction of harvesting your own vibrant, orange sweet potatoes, knowing exactly where they came from and how they were grown.
This method isn’t just about convenience; it’s about control. You have complete command over the soil quality, watering schedule, and sun exposure, allowing you to create the perfect environment for your sweet potatoes to thrive. Forget the limitations of traditional gardens and embrace the flexibility of container gardening.
But the benefits don’t stop there. Growing sweet potatoes in containers also offers a unique opportunity for experimentation. Try different varieties of sweet potatoes to discover your favorite flavor profiles. Beauregard, with its classic orange flesh, is a reliable choice, while the Japanese sweet potato offers a drier, nuttier taste. Explore the world of purple sweet potatoes for a visually stunning and antioxidant-rich addition to your meals.
Consider adding companion plants to your containers to enhance growth and deter pests. Marigolds can help repel nematodes, while basil can attract beneficial insects. These small additions can make a big difference in the health and productivity of your sweet potato plants.
And don’t be afraid to get creative with your container selection. While large plastic pots are a practical option, you can also use repurposed containers like old buckets, tubs, or even grow bags. Just ensure that your chosen container has adequate drainage to prevent waterlogging.
The key to success with this DIY trick lies in patience and observation. Sweet potatoes take time to mature, so don’t be discouraged if you don’t see results immediately. Regularly check the soil moisture, provide adequate sunlight, and fertilize as needed. With a little care and attention, you’ll be rewarded with a bountiful harvest of delicious, homegrown sweet potatoes.
We encourage you to embrace this simple yet effective method and experience the joy of growing your own food. Share your experiences, tips, and photos with us and the wider gardening community. Let’s inspire each other to create thriving container gardens filled with the goodness of homegrown sweet potatoes. This is more than just a recipe; it’s a journey of discovery, sustainability, and deliciousness. So, grab your containers, soil, and slips, and get ready to embark on your sweet potato growing adventure!
Frequently Asked Questions (FAQ)
What size container is best for growing sweet potatoes?
The ideal container size for growing sweet potatoes is at least 10 gallons, but larger is generally better. A 15-20 gallon container will provide ample space for the roots to develop and produce a good yield. The container should also be at least 12 inches deep to accommodate the growing sweet potatoes. Remember, sweet potatoes grow underground, so they need plenty of room to expand. If you’re using multiple containers, space them at least 2-3 feet apart to allow for adequate sunlight and air circulation.
How often should I water my container sweet potatoes?
Watering frequency depends on several factors, including the weather, the size of your container, and the type of soil you’re using. Generally, you should water your sweet potatoes when the top inch of soil feels dry to the touch. During hot, dry weather, you may need to water daily, while during cooler, wetter periods, you may only need to water every few days. Avoid overwatering, as this can lead to root rot. Ensure your container has adequate drainage to prevent water from pooling at the bottom. A good rule of thumb is to water deeply until you see water draining from the bottom of the container.
What type of soil is best for growing sweet potatoes in containers?
Sweet potatoes prefer well-draining, sandy loam soil that is rich in organic matter. A good potting mix specifically formulated for vegetables is a great option. You can also amend your own soil by mixing equal parts of garden soil, compost, and sand or perlite. This will provide the necessary nutrients and drainage for healthy sweet potato growth. Avoid using heavy clay soil, as it can become waterlogged and hinder root development. The ideal soil pH for sweet potatoes is between 5.5 and 6.5. You can test your soil pH using a home testing kit and adjust it accordingly with lime or sulfur.
How much sunlight do sweet potatoes need?
Sweet potatoes need at least 6-8 hours of direct sunlight per day to thrive. Choose a location for your containers that receives plenty of sunlight throughout the day. If you live in a particularly hot climate, you may need to provide some afternoon shade to prevent the plants from overheating. Insufficient sunlight can result in stunted growth and reduced yields. If you’re growing your sweet potatoes indoors, you’ll need to supplement with grow lights to provide adequate light.
When is the best time to harvest my container sweet potatoes?
Sweet potatoes are typically ready to harvest about 90-120 days after planting. The leaves will start to turn yellow and the vines will begin to die back, indicating that the sweet potatoes are mature. To harvest, gently tip the container over and carefully remove the sweet potatoes from the soil. Avoid damaging the skin, as this can shorten their storage life. Cure the sweet potatoes by placing them in a warm, humid location (80-85°F and 85-90% humidity) for 7-10 days. This will allow the skins to harden and the starches to convert to sugars, resulting in a sweeter flavor. After curing, store the sweet potatoes in a cool, dry place (55-60°F) for several months.
Can I grow sweet potatoes from store-bought sweet potatoes?
Yes, you can grow sweet potatoes from store-bought sweet potatoes, but it’s not always guaranteed to be successful. Choose organic sweet potatoes, as non-organic ones may have been treated with chemicals to prevent sprouting. To sprout the sweet potato, suspend it in a jar of water, with the bottom half submerged. Place the jar in a warm, sunny location and wait for sprouts to emerge. Once the sprouts are several inches long, carefully remove them from the sweet potato and plant them in your container. Keep in mind that store-bought sweet potatoes may not be the best variety for your climate or growing conditions.
What are common pests and diseases that affect sweet potatoes in containers?
Common pests that can affect sweet potatoes include aphids, spider mites, and sweet potato weevils. Aphids and spider mites can be controlled with insecticidal soap or neem oil. Sweet potato weevils are more difficult to control and may require the use of a systemic insecticide. Diseases that can affect sweet potatoes include fusarium wilt, black rot, and scurf. To prevent these diseases, use disease-free slips, practice crop rotation, and avoid overwatering. Ensure good air circulation around your plants to reduce humidity and prevent fungal diseases.
How do I fertilize my container sweet potatoes?
Sweet potatoes are heavy feeders and benefit from regular fertilization. Use a balanced fertilizer (e.g., 10-10-10) at planting time and then side-dress with a nitrogen-rich fertilizer (e.g., ammonium nitrate) every 4-6 weeks during the growing season. You can also use organic fertilizers such as compost tea or fish emulsion. Avoid over-fertilizing, as this can lead to excessive vine growth and reduced tuber production. Follow the instructions on the fertilizer label carefully.
Can I grow sweet potatoes in containers indoors?
Yes, you can grow sweet potatoes in containers indoors, but it requires providing the right conditions. You’ll need a large container, well-draining soil, and plenty of light. Place the container in a sunny window that receives at least 6-8 hours of direct sunlight per day. If you don’t have enough natural light, you’ll need to supplement with grow lights. Keep the soil consistently moist, but not waterlogged. Fertilize regularly with a balanced fertilizer. Be aware that indoor-grown sweet potatoes may not produce as large of a yield as those grown outdoors.
What are some good companion plants for sweet potatoes in containers?
Companion planting can help improve the growth and health of your sweet potatoes. Some good companion plants for sweet potatoes include:
* **Marigolds:** Repel nematodes and other soil pests.
* **Basil:** Attracts beneficial insects and repels some pests.
* **Beans:** Fix nitrogen in the soil, which benefits sweet potatoes.
* **Oregano:** Repels pests and attracts beneficial insects.
* **Thyme:** Repels cabbage moths and other pests.
Avoid planting sweet potatoes near fennel, as it can inhibit their growth.

Leave a Comment