
Water Spinach Bottle Growing: Unlock the secrets to fresh, homegrown greens right from your windowsill! Have you ever dreamed of harvesting your own vibrant, nutritious vegetables without a sprawling garden? Well, dream no more! This DIY guide unveils a simple, space-saving technique that will transform your empty plastic bottles into thriving water spinach havens.
Water spinach, also known as Ong Choy, boasts a rich history, deeply rooted in Asian cuisine. For centuries, it has been a staple in stir-fries, soups, and salads, prized for its delicate flavor and impressive nutritional value. Imagine bringing that same fresh, authentic taste to your own table, cultivated with your own hands!
In today’s fast-paced world, access to fresh, affordable produce can be a challenge. That’s where this water spinach bottle growing hack comes in. Whether you’re a seasoned gardener or a complete beginner, this method is incredibly easy to implement, requiring minimal space and resources. I’m excited to show you how to bypass the need for a large garden and still enjoy the satisfaction of growing your own food. Plus, it’s a fantastic way to recycle those plastic bottles and contribute to a more sustainable lifestyle. Let’s get started and turn those bottles into a mini water spinach farm!
Wasser-Spinat in Flaschen ziehen: Ein DIY-Leitfaden für den urbanen Gärtner
Hallo liebe Gartenfreunde! Habt ihr Lust, frischen, knackigen Wasser-Spinat direkt in eurer Wohnung zu ziehen? Das ist einfacher als ihr denkt und benötigt nicht viel Platz. Mit dieser DIY-Anleitung zeige ich euch, wie ihr aus einfachen Plastikflaschen kleine, aber feine Wasser-Spinat-Gärten zaubern könnt. Los geht’s!
Was ihr braucht:
* Plastikflaschen: Am besten eignen sich 1,5- oder 2-Liter-Flaschen. Achtet darauf, dass sie sauber sind.
* Wasser-Spinat-Samen: Diese bekommt ihr im Gartenfachhandel oder online.
* Kokosfaser oder Anzuchterde: Das ist euer Wachstumsmedium. Kokosfaser speichert gut Wasser und ist eine nachhaltige Alternative.
* Schere oder Messer: Zum Zuschneiden der Flaschen.
* Bohrmaschine oder Nagel: Für die Drainage-Löcher.
* Wasser: Klares Leitungswasser ist perfekt.
* Optional: Flüssigdünger: Für eine extra Portion Nährstoffe (aber nicht zwingend notwendig).
* Optional: Sprühflasche: Zum Befeuchten der Samen.
Die Vorbereitung der Flaschen
1. Reinigung: Zuerst müsst ihr die Plastikflaschen gründlich reinigen. Entfernt alle Etiketten und spült sie mit warmem Wasser und etwas Spülmittel aus. Achtet darauf, dass keine Spülmittelreste zurückbleiben.
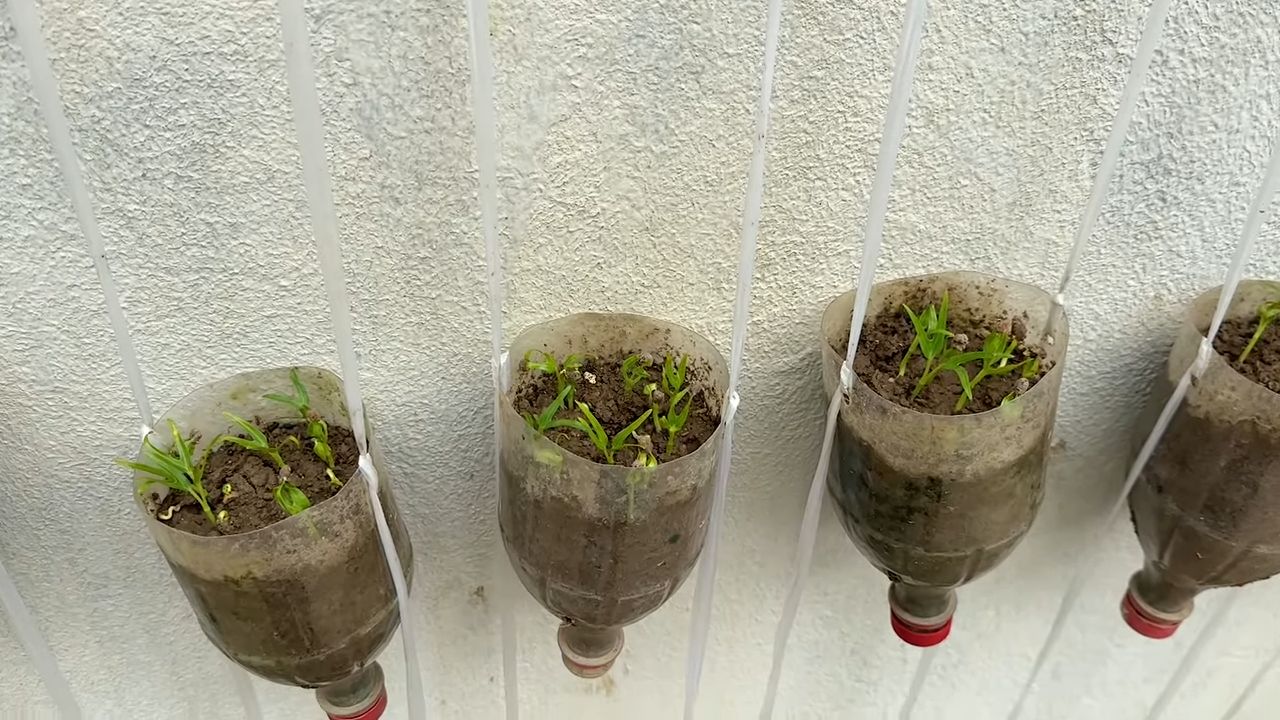
2. Zuschneiden: Jetzt kommt der spaßige Teil! Schneidet die Flaschen in der Mitte durch. Ihr könnt entweder beide Hälften verwenden oder nur die untere Hälfte. Wenn ihr beide Hälften nutzen wollt, dreht die obere Hälfte um und steckt sie in die untere Hälfte. Das dient als Bewässerungssystem.
3. Drainage-Löcher: Bohrt oder stecht mit einem Nagel ein paar kleine Löcher in den Boden der Flasche. Diese Löcher sind wichtig, damit überschüssiges Wasser ablaufen kann und die Wurzeln nicht faulen. Achtet darauf, dass die Löcher nicht zu groß sind, damit die Erde nicht herausfällt.
Die Aussaat des Wasser-Spinats
1. Vorbereitung des Wachstumsmediums: Befeuchtet die Kokosfaser oder Anzuchterde. Sie sollte feucht, aber nicht nass sein. Drückt überschüssiges Wasser aus.
2. Befüllen der Flaschen: Füllt die vorbereiteten Flaschen mit dem feuchten Wachstumsmedium. Lasst etwa 2-3 cm Platz bis zum Rand.
3. Aussaat der Samen: Verteilt die Wasser-Spinat-Samen gleichmäßig auf der Oberfläche der Erde. Drückt sie leicht an.
4. Bedecken der Samen: Bedeckt die Samen mit einer dünnen Schicht Erde (ca. 0,5 cm).
5. Bewässerung: Besprüht die Oberfläche mit einer Sprühflasche, um die Erde anzufeuchten. Achtet darauf, dass die Erde nicht weggespült wird.
Die Pflege des Wasser-Spinats
1. Standort: Stellt die bepflanzten Flaschen an einen hellen Ort, aber nicht in die pralle Sonne. Ein Fensterbrett ist ideal. Wasser-Spinat braucht viel Licht, um gut zu wachsen.
2. Bewässerung: Haltet die Erde feucht, aber nicht nass. Gießt regelmäßig, aber vermeidet Staunässe. Wenn ihr die obere Flaschenhälfte als Bewässerungssystem verwendet, füllt die untere Hälfte mit Wasser. Die Erde zieht sich dann das Wasser nach Bedarf hoch.
3. Belüftung: Sorgt für eine gute Belüftung. Öffnet regelmäßig das Fenster, um Schimmelbildung zu vermeiden.
4. Düngung (optional): Wenn ihr möchtet, könnt ihr den Wasser-Spinat alle zwei Wochen mit einem Flüssigdünger düngen. Achtet darauf, dass der Dünger für Blattgemüse geeignet ist.
5. Beobachtung: Beobachtet eure Pflanzen regelmäßig. Achtet auf Schädlinge oder Krankheiten. Wenn ihr etwas Ungewöhnliches bemerkt, handelt schnell.
Die Ernte des Wasser-Spinats
1. Erntezeitpunkt: Der Wasser-Spinat ist erntereif, wenn die Blätter etwa 15-20 cm lang sind. Das dauert in der Regel 4-6 Wochen.
2. Erntemethode: Schneidet die Blätter mit einer Schere ab. Lasst dabei die unteren Blätter stehen, damit die Pflanze weiterwachsen kann.
3. Häufigkeit der Ernte: Ihr könnt den Wasser-Spinat mehrmals ernten. Je öfter ihr erntet, desto mehr neue Blätter wachsen nach.
4. Verwendung: Der Wasser-Spinat kann roh in Salaten gegessen oder gekocht in Suppen, Pfannengerichten und Currys verwendet werden. Er ist reich an Vitaminen und Mineralstoffen und schmeckt einfach köstlich!
Zusätzliche Tipps und Tricks
* Verschiedene Sorten: Es gibt verschiedene Sorten von Wasser-Spinat. Probiert verschiedene Sorten aus, um euren Favoriten zu finden.
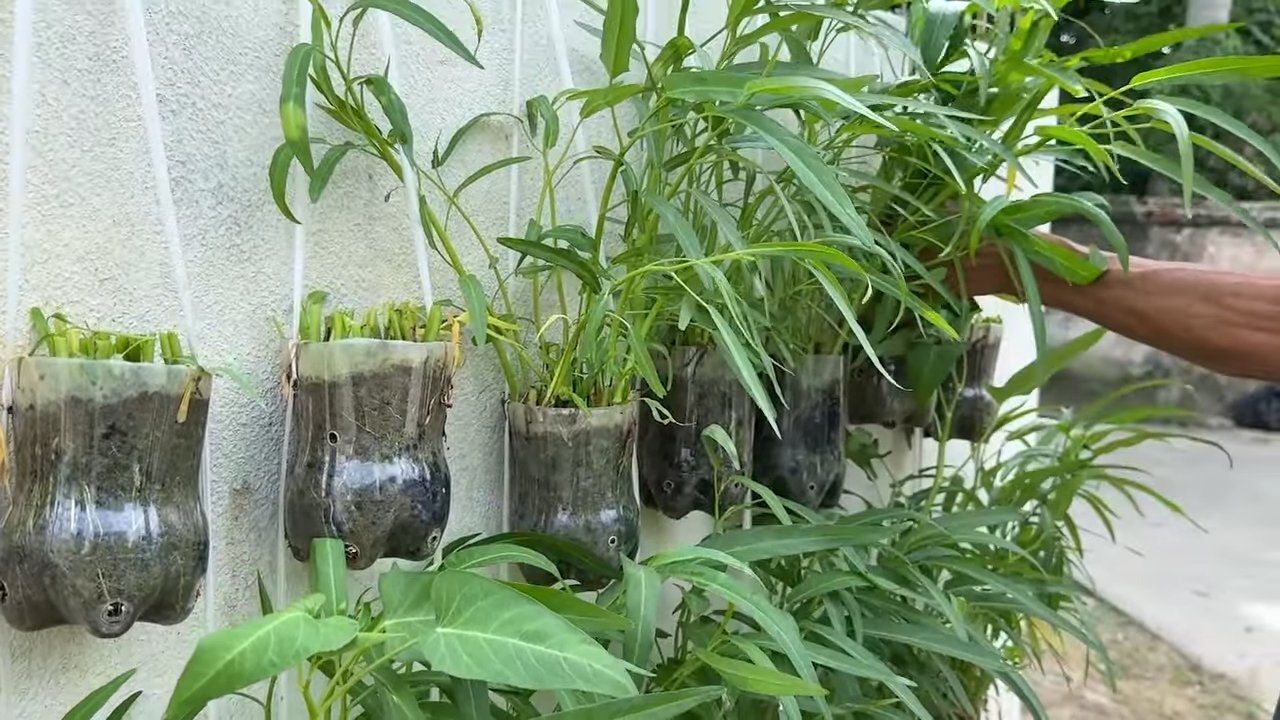
* Vertikale Gärten: Wenn ihr wenig Platz habt, könnt ihr die Flaschen auch an einer Wand befestigen und einen vertikalen Garten anlegen.
* Kombination mit anderen Pflanzen: Ihr könnt den Wasser-Spinat auch mit anderen Pflanzen kombinieren, die ähnliche Bedürfnisse haben.
* Schädlinge: Achtet auf Blattläuse und andere Schädlinge. Bei Befall könnt ihr die Pflanzen mit einer milden Seifenlösung besprühen.
* Überwinterung: Wasser-Spinat ist nicht winterhart. Ihr könnt ihn aber im Haus überwintern, wenn ihr ihn an einen hellen und warmen Ort stellt.
Häufige Probleme und Lösungen
* Gelbe Blätter: Gelbe Blätter können ein Zeichen für Nährstoffmangel sein. Düngt die Pflanzen mit einem Flüssigdünger.
* Schimmel: Schimmelbildung kann durch zu hohe Luftfeuchtigkeit entstehen. Sorgt für eine bessere Belüftung.
* Wurzelfäule: Wurzelfäule entsteht durch Staunässe. Achtet darauf, dass die Erde nicht zu nass ist und die Drainage funktioniert.
* Langsames Wachstum: Langsames Wachstum kann durch zu wenig Licht oder Nährstoffmangel verursacht werden. Stellt die Pflanzen an einen helleren Ort und düngt sie.
Warum Wasser-Spinat in Flaschen ziehen?
* Platzsparend: Ideal für kleine Wohnungen und Balkone.
* Nachhaltig: Wiederverwendung von Plastikflaschen.
* Frisch und gesund: Immer frischer Wasser-Spinat zur Hand.
* Einfach und kostengünstig: Benötigt wenig Material und Aufwand.
* Befriedigend: Es macht Spaß, seine eigenen Lebensmittel anzubauen.
Ich hoffe, diese Anleitung hilft euch dabei, euren eigenen kleinen Wasser-Spinat-Garten zu Hause zu starten. Viel Spaß beim Gärtnern! Und vergesst nicht, eure Erfolge mit mir zu teilen! Ich freue mich auf eure Bilder und Erfahrungen.
Conclusion
So, there you have it! Growing water spinach in a bottle isn’t just a quirky gardening experiment; it’s a genuinely rewarding and surprisingly efficient way to cultivate fresh, delicious greens right in your own home, regardless of space constraints. We’ve walked you through the simple steps, highlighting the ease and accessibility of this method. Forget complicated setups and expensive equipment. All you need is a plastic bottle, some water spinach seeds or cuttings, and a little bit of patience.
Why is this DIY trick a must-try? Because it democratizes gardening. It empowers anyone, even those living in apartments or with limited outdoor access, to enjoy the satisfaction of growing their own food. Imagine the pride of harvesting crisp, vibrant water spinach that you nurtured from a tiny seed or cutting. Think of the money you’ll save by reducing your reliance on store-bought vegetables. And consider the environmental benefits of reducing your carbon footprint by growing locally.
But the benefits extend beyond mere practicality. This method is incredibly engaging and educational, especially for children. It’s a fantastic way to teach them about plant life cycles, sustainability, and the importance of healthy eating. Watching the roots develop and the leaves unfurl is a captivating experience that fosters a deeper appreciation for nature.
Don’t be afraid to experiment! While we’ve outlined a basic method, there’s plenty of room for customization. Try using different types of bottles – larger bottles will allow for more extensive root systems and potentially larger harvests. You can also experiment with different growing mediums. While water is the primary medium, adding a small amount of nutrient solution can boost growth and yield. Consider using a diluted hydroponic fertilizer specifically formulated for leafy greens.
Another variation involves the lighting. While water spinach thrives in sunlight, you can supplement natural light with grow lights, especially during the winter months or in areas with limited sunlight. This will ensure consistent growth and prevent your plants from becoming leggy.
Furthermore, think about the placement of your bottle garden. While a sunny windowsill is ideal, you can also place it on a balcony, patio, or even indoors with adequate artificial lighting. Just be sure to protect it from extreme temperatures and strong winds.
We encourage you to embrace this simple yet effective technique and discover the joy of growing your own water spinach. It’s a fun, sustainable, and rewarding project that will bring fresh, delicious greens to your table.
Ready to get started? Don’t hesitate! Gather your materials, follow our instructions, and prepare to be amazed by the results. And most importantly, we want to hear about your experience! Share your photos, tips, and challenges in the comments section below. Let’s create a community of bottle garden enthusiasts and learn from each other. Your insights could inspire others to embark on their own water spinach growing journey. Let us know if this **water spinach bottle growing** method worked for you!
Frequently Asked Questions (FAQ)
What kind of water spinach is best for bottle growing?
While most varieties of water spinach will work, the ‘Chinese Water Spinach’ (Ipomoea aquatica) is generally recommended due to its vigorous growth and adaptability. Look for seeds or cuttings specifically labeled as ‘Chinese Water Spinach’ at your local garden center or online. These varieties tend to be more readily available and well-suited for container gardening. However, don’t be afraid to experiment with other varieties if you can find them. The key is to ensure that the variety you choose is suitable for your local climate and growing conditions.
How often should I change the water in the bottle?
Regular water changes are crucial for maintaining the health of your water spinach. We recommend changing the water every 2-3 days, or more frequently if you notice the water becoming cloudy or discolored. This helps to prevent the buildup of algae and harmful bacteria, which can inhibit growth and potentially harm your plants. When changing the water, be sure to use fresh, clean water that is free of chlorine and other chemicals. You can also add a small amount of diluted hydroponic fertilizer to the water to provide essential nutrients.
How much sunlight does water spinach need?
Water spinach thrives in full sunlight, requiring at least 6-8 hours of direct sunlight per day. If you’re growing your water spinach indoors, you may need to supplement natural light with grow lights. Position your bottle garden in a sunny windowsill or under grow lights to ensure that your plants receive adequate light. Insufficient sunlight can lead to leggy growth and reduced yields. If you notice your plants stretching towards the light, it’s a sign that they need more illumination.
Can I use tap water for growing water spinach in a bottle?
While tap water is generally safe to use, it’s best to let it sit for 24 hours before using it to allow the chlorine to dissipate. Chlorine can be harmful to plants, so it’s important to remove it before watering. Alternatively, you can use filtered water or rainwater. If you’re concerned about the quality of your tap water, consider investing in a water filter.
How do I harvest water spinach from a bottle garden?
Harvesting water spinach is easy! Simply cut the stems about 2-3 inches above the water level. This will encourage new growth and allow you to harvest multiple times. You can harvest the leaves and stems as needed, depending on your culinary preferences. Regular harvesting will also help to keep your plants compact and prevent them from becoming too leggy.
What if my water spinach starts to turn yellow?
Yellowing leaves can indicate a nutrient deficiency, overwatering, or underwatering. Check the water level and ensure that the roots are not sitting in stagnant water. If the water is cloudy or discolored, change it immediately. Consider adding a small amount of diluted hydroponic fertilizer to the water to provide essential nutrients. Also, make sure your plants are receiving enough sunlight. If the problem persists, you may need to adjust your watering schedule or nutrient solution.
Can I grow water spinach in a bottle during the winter?
Yes, you can grow water spinach in a bottle during the winter, but you may need to provide supplemental lighting and heating. Water spinach prefers warm temperatures, so it’s important to protect your plants from frost and cold drafts. You can use grow lights to provide adequate illumination and a heat mat to keep the water warm. Also, be sure to monitor the water level and change it regularly to prevent the buildup of algae and bacteria.
How long does it take for water spinach to grow in a bottle?
Water spinach is a fast-growing plant, and you can typically expect to harvest your first crop within 4-6 weeks of planting. The exact time will depend on the variety of water spinach, the growing conditions, and the amount of sunlight and nutrients available. With proper care and attention, you can enjoy a continuous harvest of fresh, delicious water spinach from your bottle garden.
Is water spinach bottle growing sustainable?
Absolutely! This method promotes sustainability by repurposing plastic bottles, reducing food miles, and minimizing the need for pesticides and herbicides. It’s a fantastic way to grow your own food in an environmentally friendly way. By growing your own water spinach, you’re reducing your reliance on commercially grown produce, which often involves long-distance transportation and the use of harmful chemicals.
What are some common problems with water spinach bottle growing and how to fix them?
Some common problems include algae growth, nutrient deficiencies, and pest infestations. To prevent algae growth, change the water regularly and avoid exposing the bottle to direct sunlight for extended periods. Nutrient deficiencies can be addressed by adding a diluted hydroponic fertilizer to the water. Pest infestations are rare, but if you notice any pests, you can try spraying your plants with a mild soap solution or neem oil. Regularly inspect your plants for any signs of problems and address them promptly to ensure healthy growth.

Leave a Comment